How to Setup dbt Staging Environment?
Summarize this article with:
✨ AI Generated Summary
dbt environments separate development, staging, and production workflows to protect production data and ensure reliable data transformations. The staging environment acts as a controlled testing ground mirroring production, enabling validation of data quality, business logic, and performance before deployment.
- Staging provides isolation, consistent data warehouse technology, and environment-level permissions for secure testing.
- Setup involves configuring profiles.yml for dbt Core or using dbt Cloud's UI for easier management.
- Combining dbt with modern ELT tools like Airbyte enhances data extraction and integration for robust pipelines.
The data build tool, or dbt, is an essential component of data-engineering workflows. With its robust capabilities, you can transform raw data into an analysis-ready format and extract actionable insights.
dbt lets you create separate environments—development, testing, and production—so work-in-progress never contaminates production data. A crucial intermediate step is the staging environment, where you validate development results before promoting them to production.
This article explains what a dbt staging environment is, why it matters, and how to configure it with both dbt Cloud and dbt Core.
What Are the Different Types of dbt Environments Available?

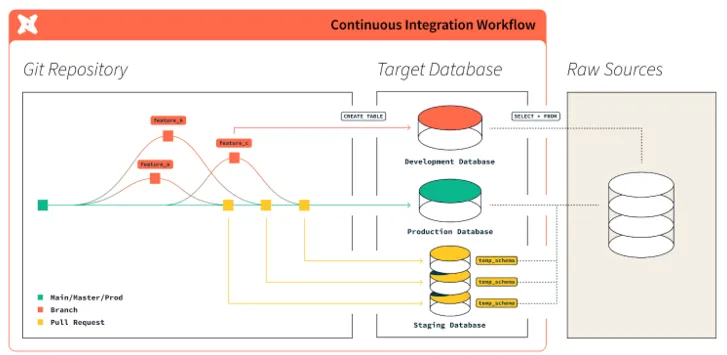
dbt environments help you segregate development, staging, and production work. End users interact only with production, preserving data integrity while engineers develop and test freely.
You define environments in the profiles.yml file located in your dbt directory. dbt reads this file at runtime and routes commands to the appropriate target.
Each environment serves a specific purpose in your data workflow. Development environments allow data engineers to experiment and build models without affecting other team members. Production environments contain the final, tested models that power business intelligence dashboards and analytics.
The staging environment acts as a crucial bridge between these two extremes. It provides a controlled testing ground where you can validate changes before they reach production systems.
What Exactly Is a dbt Staging Environment?

A staging environment sits between development and production. Like the other environments, it contains three dbt model layers that organize your data transformation logic.
The staging layer serves as the first transformation layer, focusing on cleaning and standardization. Models in this layer should be atomic, representing the smallest useful building blocks for your data warehouse.
The intermediate layer stacks logic to prepare data for downstream use. This layer handles complex business rules and calculations that build upon the clean foundation established in staging models.
The mart layer assembles modular pieces into business-ready entities. These final models power dashboards, reports, and analytics that business users depend on for decision-making.
Understanding the Staging Layer Architecture
The staging environment mirrors your production setup while maintaining complete isolation. This separation ensures that experimental changes never accidentally affect live business operations.
Your staging environment should use the same data warehouse technology as production. This consistency helps identify potential issues that might not appear in development but could cause problems in the production environment.
Data lineage remains intact across environments, allowing you to trace how changes in staging will propagate through downstream models. This visibility helps teams understand the full impact of proposed changes before deployment.
What Are the Key Benefits of Using a Staging Environment?
Testing and exploring changes in an isolated space protects production data from experimental modifications. You can validate model logic, test new data sources, and verify transformations without risking business-critical operations.
Advanced dbt features like deferral and cross-project references work seamlessly in staging environments. These capabilities let you reference production models while testing changes, reducing compute costs and improving development efficiency.
Environment-level permissions provide additional security by restricting access to production systems. Development teams can experiment freely in staging while maintaining strict controls over production deployments.
Quality Assurance and Validation Benefits
Staging environments enable comprehensive testing of data quality rules and business logic. You can run full test suites against realistic data volumes without impacting production performance.
Schema changes can be validated thoroughly before affecting downstream systems. This validation prevents breaking changes that could disrupt business intelligence dashboards or analytical workflows.
Performance testing becomes possible with production-like data volumes and query patterns. You can identify potential bottlenecks and optimize model performance before deployment.
How Do You Enhance Data Migration with Modern Integration Tools?
Before transforming data with dbt, you need to extract it reliably from source systems. Modern ELT platforms simplify this process by providing pre-built connectors and automated data pipeline management.

Airbyte provides a comprehensive solution for data extraction and loading that integrates seamlessly with dbt transformations. The platform offers over 600 pre-built connectors that handle the complexity of source system integration.
Key integration capabilities include AI-powered connector building that reads API documentation and automatically configures connection parameters. This automation reduces the manual effort required to establish new data sources.
Vector database destinations support modern AI and machine learning workflows through native integrations with Pinecone, Weaviate, Qdrant, and Milvus. These capabilities enable advanced analytics and AI-driven insights.
Airbyte facilitates data ingestion and preparation workflows essential for RAG systems, but chunking, embedding, and indexing operations must be implemented using external tools or user-defined configurations.
How to Setup dbt Staging Environment Configuration?
You can create a staging environment using either dbt Cloud's web interface or dbt Core's configuration files. While both enable staging environments, dbt Cloud provides additional features and a more integrated experience compared to dbt Core's manual setup.
The configuration process involves defining connection parameters, credentials, and environment-specific settings. These configurations ensure that your staging environment operates independently from development and production.
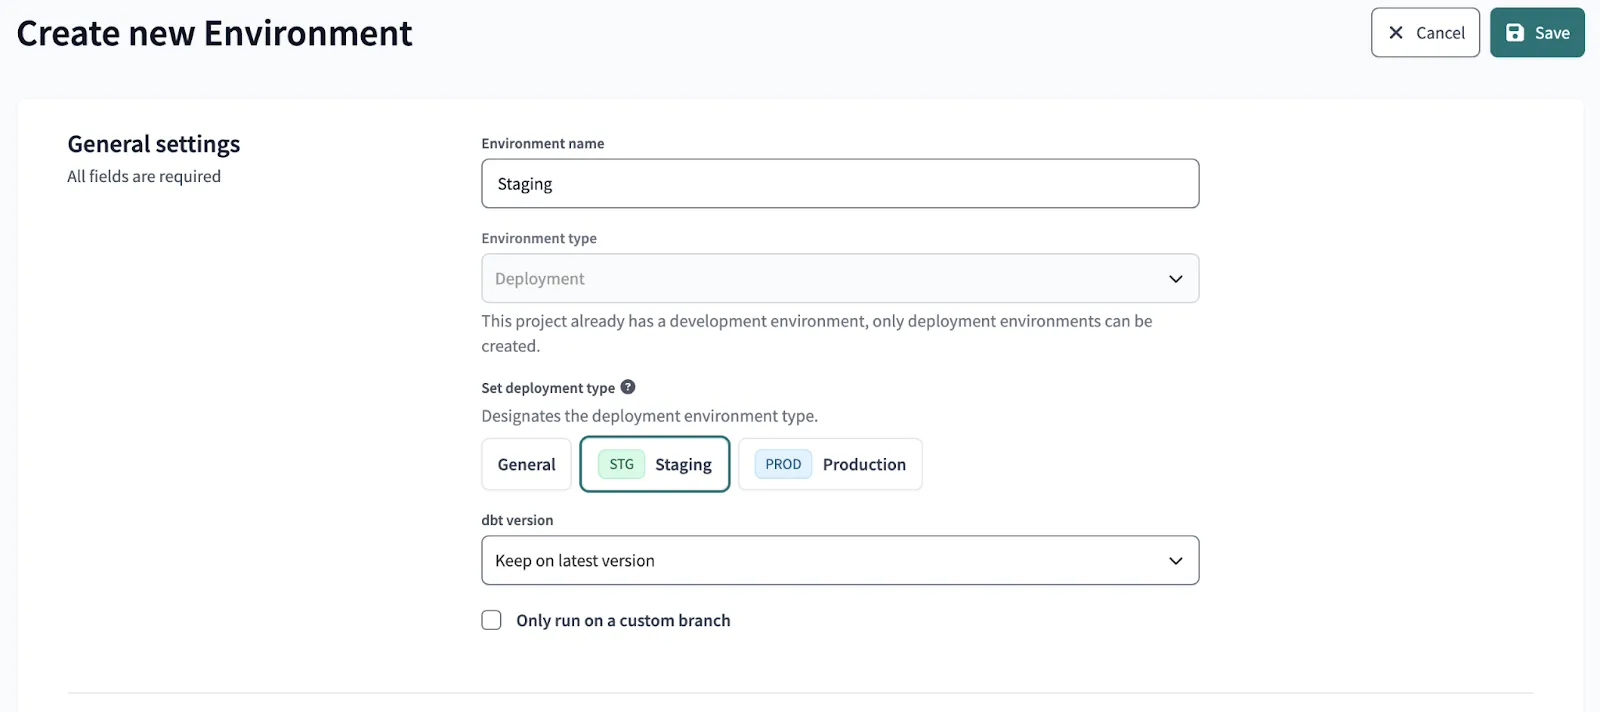
1. Creating a Staging Environment in dbt Cloud
Navigate to the dbt Cloud UI and access the Deploy section, then select Environment from the menu options.
Click the Create Environment button and choose Deployment as your environment type from the available options.
Select Staging as the specific deployment type to configure the appropriate environment settings automatically.
Choose your desired dbt version from the dropdown menu to ensure compatibility with your project requirements.
Save the initial configuration to create the basic environment structure before adding specific connection details.
Supply the required deployment credential fields including host, user, database, schema, and authentication parameters specific to your data warehouse.

2. Creating a Staging Environment in dbt Core
Add a staging configuration section to your profiles.yml file in your dbt directory. This file controls how dbt connects to your data warehouse across different environments.
Replace all bracketed placeholders with your actual database credentials and connection information. Ensure each environment uses appropriate permissions and access controls.
Execute commands against your staging environment using the target flag:
Environment-Specific Configuration Best Practices
Use environment variables to manage sensitive credentials like passwords and API keys. This approach prevents accidentally committing secrets to version control systems.
Configure separate schemas or databases for each environment to ensure complete data isolation. This separation prevents cross-contamination between development, staging, and production data.
Implement consistent naming conventions across environments to maintain clarity and prevent configuration errors. Clear naming helps team members understand which environment they're working with at any given time.
Conclusion
A dedicated dbt staging environment provides essential validation capabilities that protect production systems while enabling thorough testing of data transformations. Whether you choose dbt Cloud's user-friendly interface or dbt Core's flexible configuration approach, the setup process is straightforward and delivers significant reliability improvements. This intermediate environment bridges the gap between experimental development work and business-critical production deployments. For organizations building comprehensive ELT pipelines, combining dbt's transformation capabilities with modern data integration platforms creates a robust foundation for data-driven decision making.
Frequently Asked Questions
What is the difference between staging and development environments in dbt?
Development environments are personal workspaces where individual data engineers build and test models in isolation. Staging environments serve as shared validation spaces that mirror production configurations, allowing teams to test changes collaboratively before deployment. While development focuses on individual experimentation, staging emphasizes team collaboration and production readiness testing.
How often should I deploy changes from staging to production?
Deployment frequency depends on your organization's change management processes and business requirements. Many teams deploy weekly or bi-weekly after thorough testing in staging, while others use continuous deployment practices for smaller, well-tested changes. The key is maintaining consistent testing standards regardless of deployment frequency to ensure production stability.
Can I use different data warehouse technologies between staging and production?
Technically possible, but using different data warehouses for staging and production is risky. Performance differences and SQL dialect variations may not appear until production. Keeping technologies consistent ensures testing accurately reflects real-world behavior.
What testing should I perform in the staging environment?
Comprehensive testing should include data quality validation, business logic verification, performance testing with production-like data volumes, and end-to-end pipeline testing. Run your complete dbt test suite, validate schema changes, and verify that downstream applications can consume the transformed data successfully.
How do I handle sensitive data in staging environments?
Implement data masking or synthetic data generation techniques to protect sensitive information while maintaining realistic testing conditions. Use separate access controls and encryption for staging environments, and consider using subsets of production data rather than full datasets when possible to reduce exposure risk.

.webp)
