12 Asana Automation Workflows to Automate Processes
Summarize this article with:


Managing projects and workflows can be a significant burden for many organizations, especially as teams become more distributed and projects grow in complexity. To overcome this challenge, a growing number of companies have turned to project management tools to streamline their operations.
According to a survey, over 77% of high-performing projects utilize project management software to streamline communication and improve overall project efficiency. Asana is one such platform that has become a popular choice for teams seeking to enhance their productivity and collaboration.
What is Asana Workflow Automation?
Asana workflow automation allows you to create efficient, hassle-free workflows so your team can spend minimal time coordinating and more time on mission-critical work. With Asana's Workflow Builder, you can easily connect teams, organize work, and streamline projects in a single place.
In Asana, you can use rules to automate common steps in your workflows. Each rule consists of two components: a trigger and an action. A trigger is an event that initiates the rule, while an action is what happens when the trigger is activated.
For example, if you want to notify your team about overdue tasks automatically, you can set up a rule where the trigger is a task becoming overdue. When this condition is met, an action is automatically executed, such as adding a comment to the task saying, "This task is overdue. Please prioritize and update the status." It helps ensure tasks are handled promptly without requiring manual updates.
12 Asana Automation Workflow Examples
Let’s explore some of the Asana workflow automation examples in detail:
1. Task Assignment
Assigning tasks to team members is an important aspect of project management. Here is a step-by-step process of doing it in Asana.
Step 1: Log into Asana
Log in to your Asana account and navigate to the project where you want to create a new task.
Step 2: Create a New Task
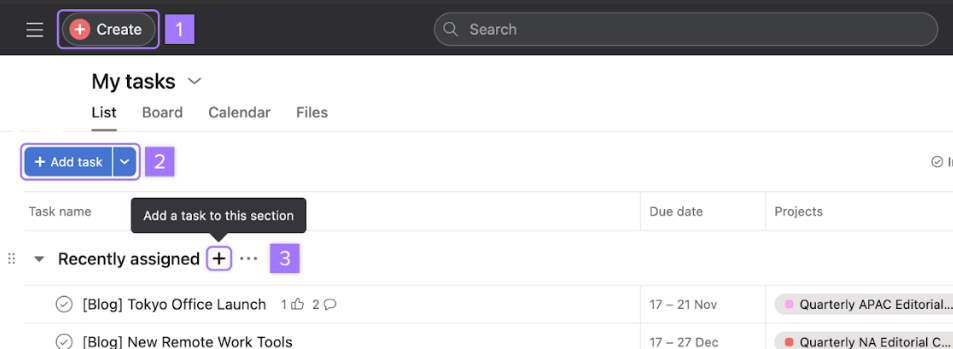
You can create a task in three different ways:
- Use the +Create orange button in the top bar.
- Select My tasks in the left sidebar and click +Add Task.
- Click on the + button next to the Recently assigned section.
Step 3: Specify the Task Details
Fill in the task details such as task name, description, due date, attachments, and any other relevant information in the task window that appears.

Step 4: Assign the Task
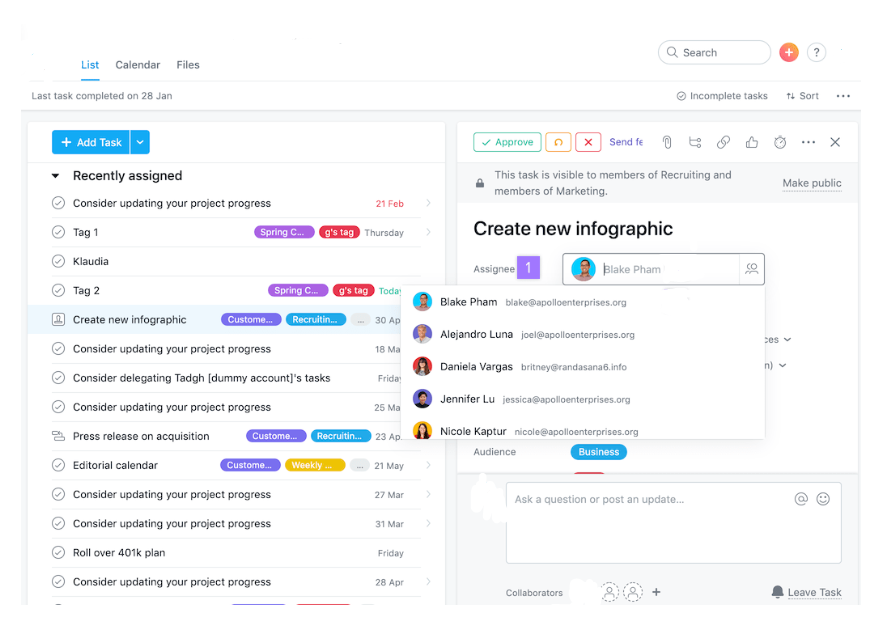
- Click on the Assignee field located at the top of the task.
- Type the name or email address of the person you want to assign the task to and select the relevant assignee from the dropdown list.
- To ensure effective communication and collaboration, click the + button next to Collaborators to add multiple individuals who need to be informed or contribute to the task.
- Once you've added all the assignees and collaborators, click on the Create Task button to finalize the task assignment.
2. Due Date Management
Effective management of task schedules is crucial to ensure the success of projects and promote team collaboration. Let's explore how to set due dates seamlessly into your Asana workflows.
Step 1: Selecting a Task
- Open Asana and choose the project where you want to manage your tasks.
- Then, click on the specific task for which you need to set or manage due dates. This will open the task details panel on the right side of the screen.

Step 2: Adding a Due Date
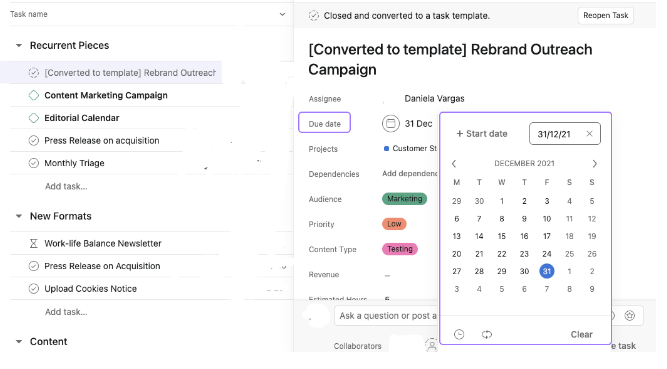
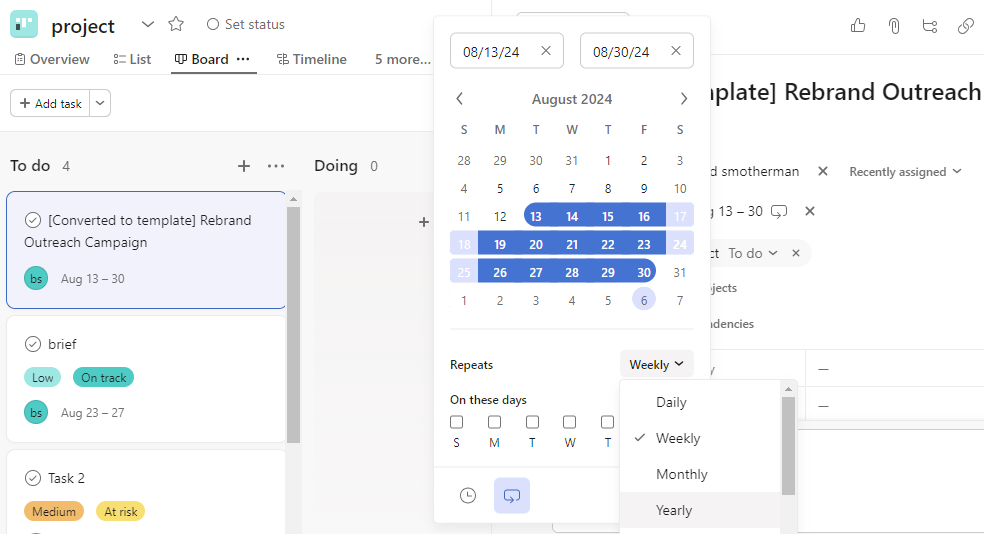
- In the task details pane, find the Due date field.
- Click on the calendar icon to open the date picker.
- Choose the due date on the calendar and add a specific time, if needed, by clicking the clock.
Step 3: Adding a Start Date
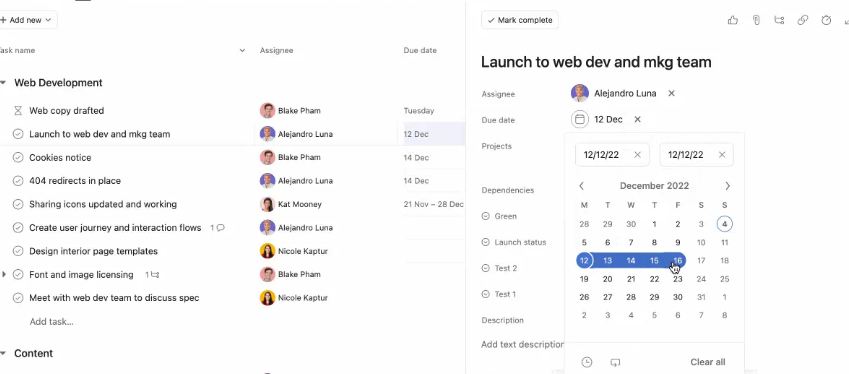
- To establish a timeline for your task, click the Start date option on the calendar to set a start date along with a due date. This way, you can effectively manage and track the status of your task from start to finish.
Step 4: Recurring Due Dates
- For tasks that need to be repeated or have recurring due dates, click on the Set to repeat option.
- Choose the frequency of recurrence (e.g., daily, weekly, monthly), or customize the recurrence pattern if necessary.
3. New Project Creation
Here are the steps to create a new project in Asana:
Step 1: Initiate Project Creation
- Click on the +Create button in the top left corner of the Asana interface.
- From the dropdown menu that appears, select Project.

Step 2: Choosing Project Options
- Now, a new screen will appear with various options for project templates.
- You can choose the one that fits your project needs, such as Blank Project, Recommended Templates, or Importing Spreadsheet.
- If you select Blank Project, you can start from scratch.

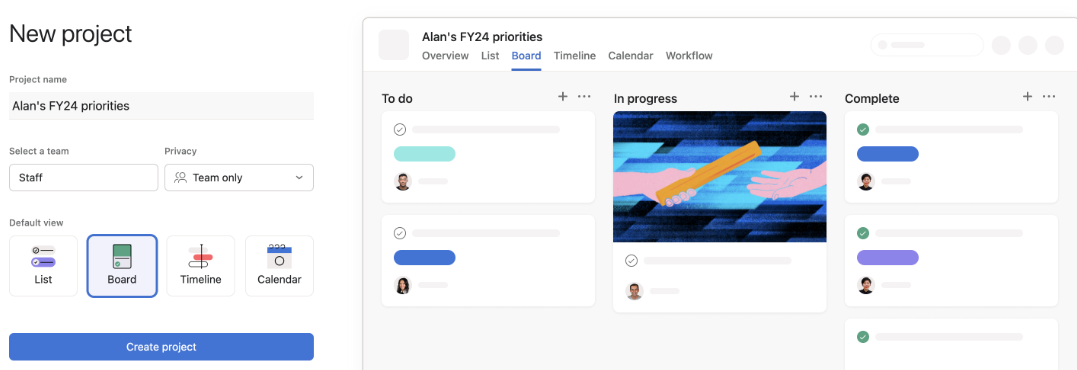
Step 3: Set Up Your New Project
- On the project details screen, enter the project name.
- Choose a team you wish to include in the project.
- Adjust privacy settings.
- Choose the preferred layout for your project: List, Board, Timeline, or Calendar.
- After filling in all necessary details, click the Create Project button.
4. Approval Processes
Approval processes are critical to effective project management and task execution in project management software. They help ensure that work is reviewed and validated before proceeding, reducing the risk of errors. Here are the essential steps to establish approval processes:
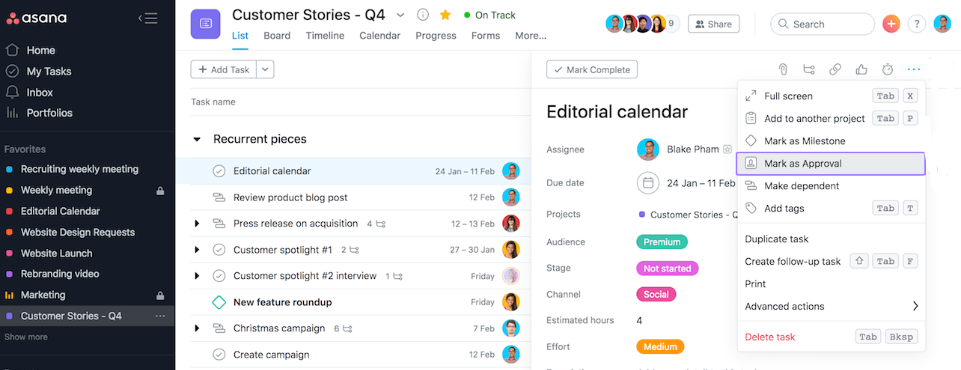
Step 1: Create an Approval Task
- Open Asana and choose the project for which you want to set up the approval process.
- Create a new task or select an existing task that requires approval.
- Click on the three-dot icon in the task pane.
- Select Mark as Approval from the dropdown menu.
Step 2: Assign the Task to an Approver
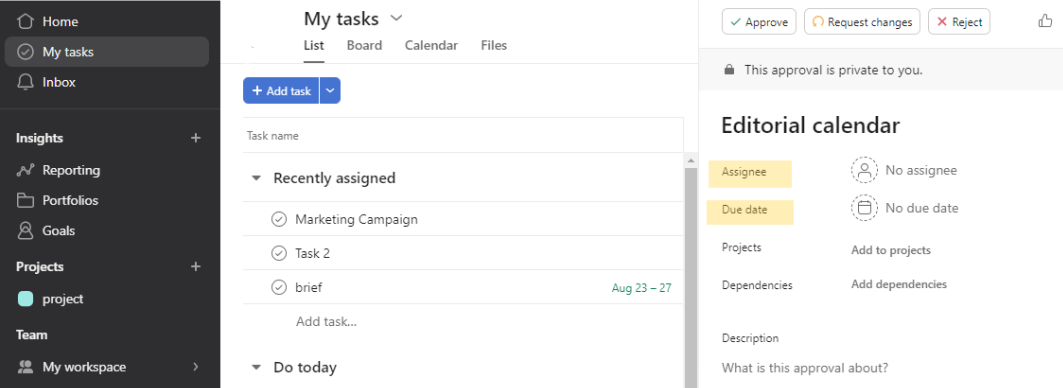
- Assign the task to the person responsible for approval. You can do this in the task details pane by selecting the Assignee.
- Set a Due date for when the approval needs to be completed to keep the process on track.
- Provide clear instructions in the task's description field. You can also attach relevant files or documents that the approver may need to review.
Step 3: Completing the Approval Task
To update the reviewed task, the approver can click on the square icon in the task list view and select the appropriate option.
- Approved: The task meets all requirements.
- Changes Requested: The task needs modifications before approval.
- Rejected: The task does not meet the necessary criteria.

5. Email Integration
With Gmail and Outlook integrations, you can utilize Asana directly in your inbox, enhancing workflow efficiency. Here are the steps to integrate Asana with Gmail.
Step 1: Install the Asana for Gmail Add-On
- First, log in to your Gmail account. Then, click the +Get add-ons button on the right-hand side.
- Now, type in Asana in the search bar, select the required add-on, and install it.

Step 2: Log into Asana from Gmail
- Open any email and look for the Asana logo in the side panel. Click on it, authorize access, and sign in using your Asana account credentials.

Step 3: Create and Manage Tasks
- Select an email that you want to convert into a task.
- Click on the Asana icon and select Create Task.

- Fill in the task details, including the task name, assignee, due date, and description, and click on Create task.
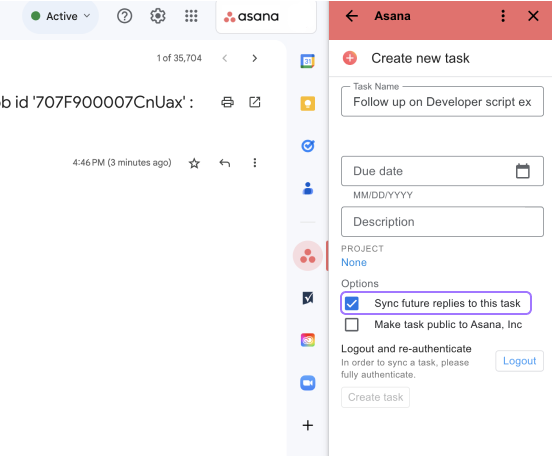
- You can also search for existing tasks, comment on them, or mark them as complete directly from Gmail.
6. Resource Allocation
Resource allocation allows you to effectively manage your team’s workload and helps you achieve your project goals on time. Here’s a step-by-step process for resource allocation in Asana:
Step 1. Create a Capacity Plan
- Capacity plans let you optimize resourcing decisions by visualizing project staffing over long periods of time.
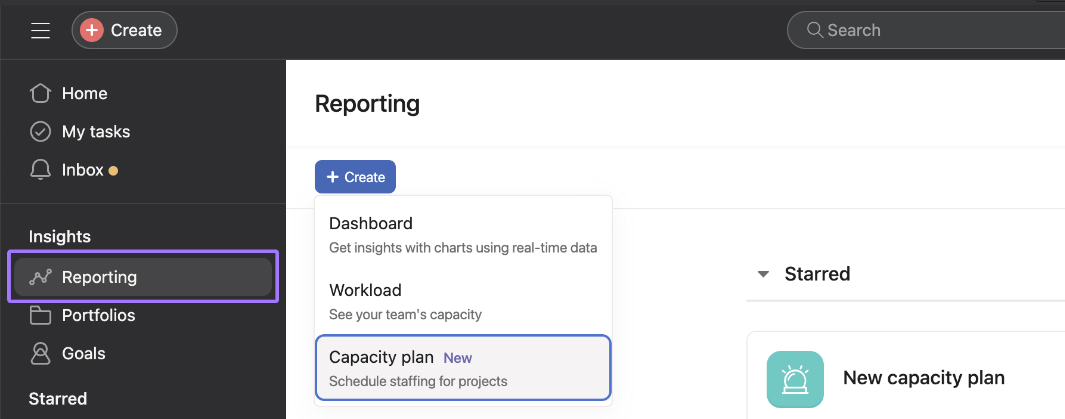
- To set up a capacity plan, go to Reporting in the Insights section on the left sidebar. Then, click the + Create button and choose Capacity Plan.
Step 2: Allocate Resources
- When you create a capacity plan, you’ll see two tabs: Projects and People.
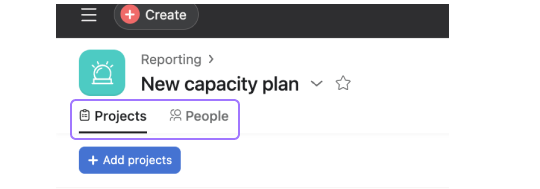
- Click the +Add projects button to start adding projects or portfolios. If you add a portfolio, all the projects within that portfolio will be included in the capacity plan.

- Next, add your team by clicking the + Add people button and selecting the teammates who you would like to staff on projects.
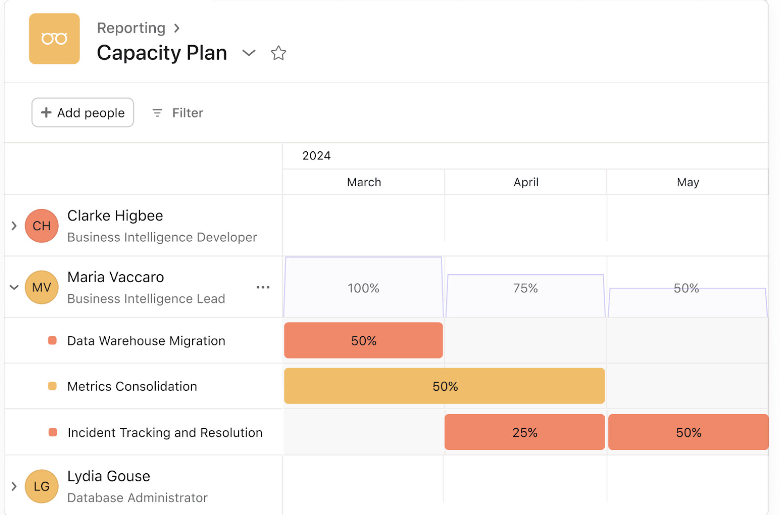
- Once you’ve added your team, it’s time to allocate resources. You can assign your team members to different projects by clicking on their profile picture in the capacity plan and selecting + Add project to allocate them.

Step 3: Capacity Management
- When planning a project, determine how you want to measure capacity. You can choose between Percent allocation, Estimated hours, or Project count.

- Percent Allocation: Measures the percentage of a team member's total available time allocated to specific tasks or projects, helping to manage workload balance.
- Estimated Hours: Refers to the projected number of hours required to complete a particular task or project, allowing for more precise scheduling and workload planning.
- Project Count: Shows the total number of projects a person is working on during the chosen time.
7. Goal Setting
Asana's Goals feature allows you to set clear company objectives and connect them directly to ongoing work, such as projects and tasks. Here's how you can set up goals:
Step 1: Creating a Goal
- To create a goal, navigate to Insights on your sidebar and select the Goals tab.
- When setting your goals, you’ll have the option to establish both company goals and team goals.
- If you're looking to prioritize Company Goals, simply navigate to the Company Goals tab and click on + Add goal.

- Enter the goal’s name, choose a goal owner, select a time period, and set the goal’s privacy.
- When setting a new goal, you have the option to update it using either an automatic or manual method. With the automatic method, you can use sub-goals, projects, and tasks as sources of progress.

Step 2: Updating Goal Status
Here are the steps to update a goal status:
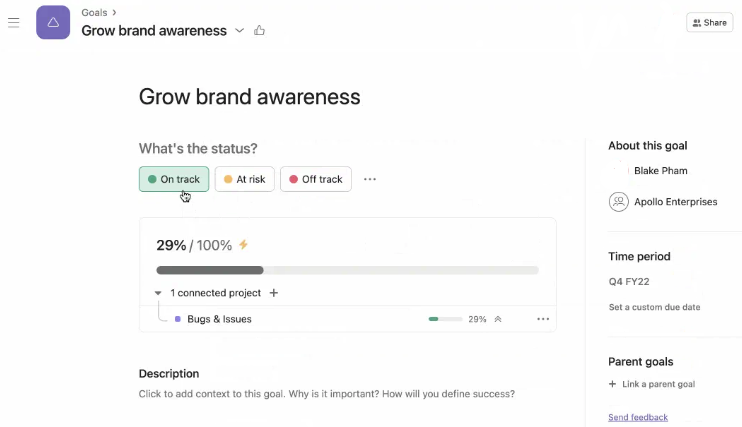
- Select the goal you need to update.
- Based on the progress made, you can choose one of three statuses: On track, At risk, and Off track.
- Give a name for your status update and add information about the progress made towards the goals.
- You can also set an update status reminder to weekly, biweekly, monthly, or quarterly.
- Select Post to send the update.
Step 3: Reporting on Goals
- Creating a dashboard will help you track the progress of your goals across your organization.
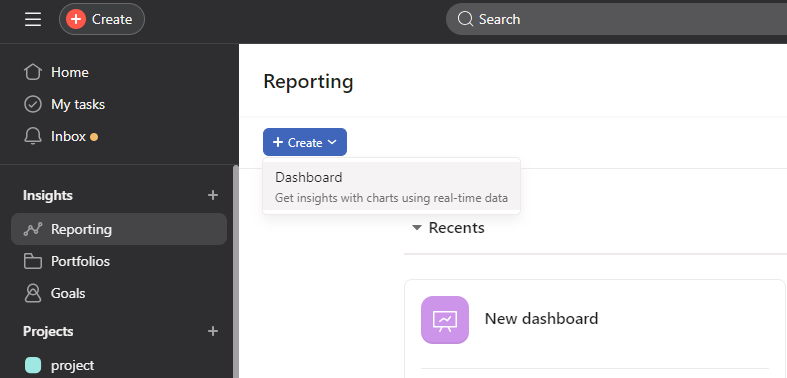
- To create a goal dashboard, navigate to the sidebar and click Reporting. From here, click + Create and select Dashboard.
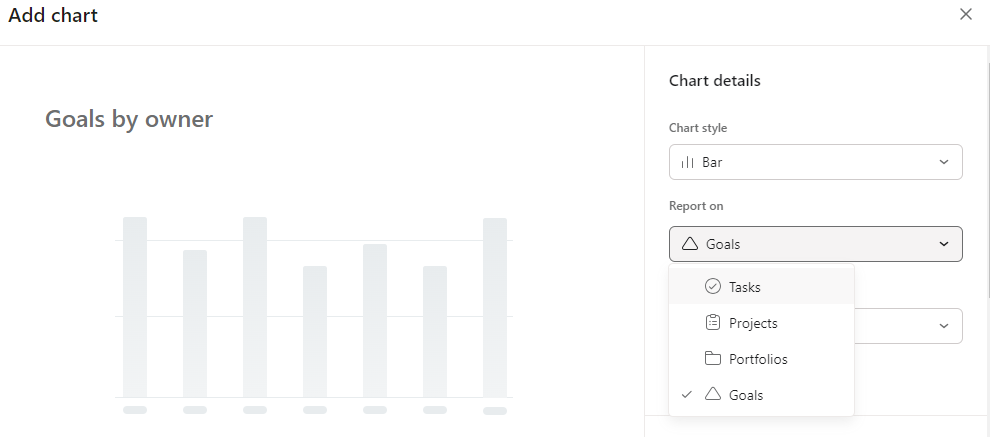
- You can use pre-built charts or create a custom one and select Goals from the Report on drop-down.
8. Portfolio Management
Portfolios offer a holistic view of all your important projects in one place. With portfolio management, you can organize your crucial projects and track their progress in real-time. Here are the steps to effectively manage your portfolios:
Step 1: Create a Portfolio
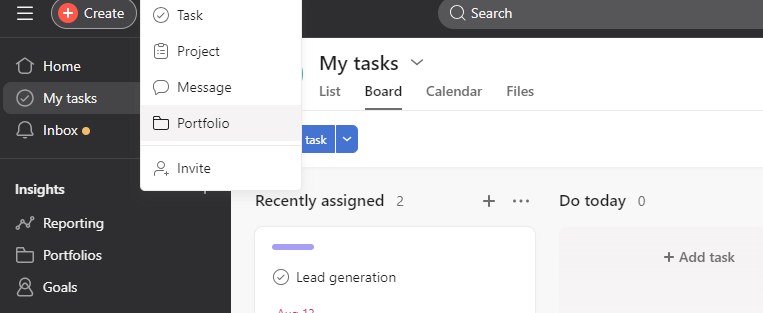
- To create a portfolio, click the + Create button in the top bar, select Portfolio, and name it appropriately.
Step 2: Add Projects to the Portfolio
You can add projects within your portfolio in the following ways:
- Click Add work to search for an existing project.
- Create a new project by clicking the drop-down arrow next to + Add work and selecting Create new project.

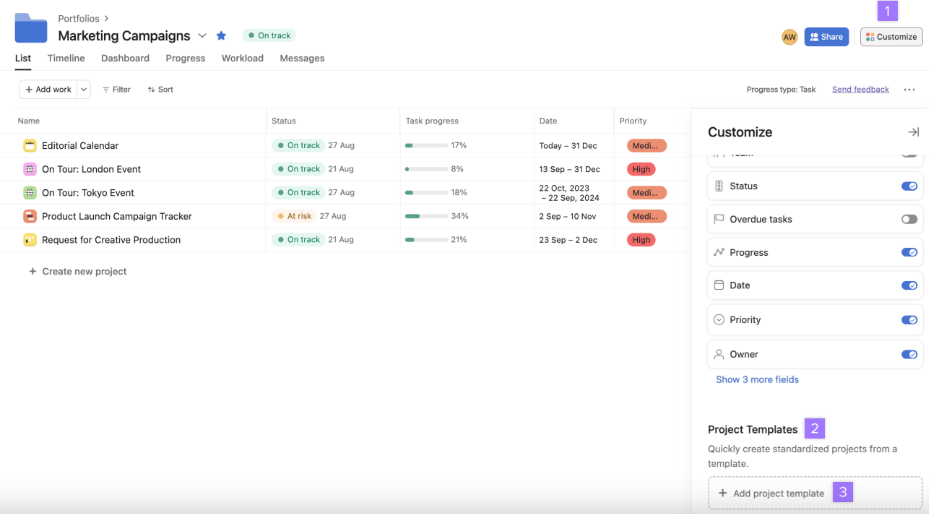
Step 3: Add Project Templates to Portfolios
- Click on Customize.
- Scroll down to Project Templates.
- Click on + Add project template.
- Choose a template and click the + Add to portfolio button.
9. Project Customization
Custom fields in Asana help you to add additional information to tasks in your projects. You can set up fields for stages, priority, cost, or any other relevant details that are important for your workflows.
Step 1: Adding a Custom Field to Your Project
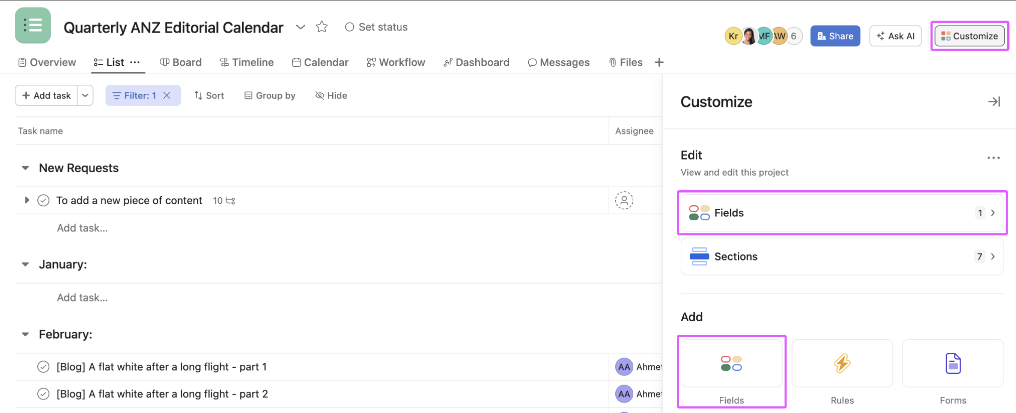
There are two ways to add a custom field to your project.
- The first is to click the + button beside the row of fields in the list view.

- Otherwise, click the Customize button at the top right and choose Fields, either under the Edit options or the Add options.
Step 2: Creating a Global Custom Field
- To set up a global custom field, add a field to your project as shown above.
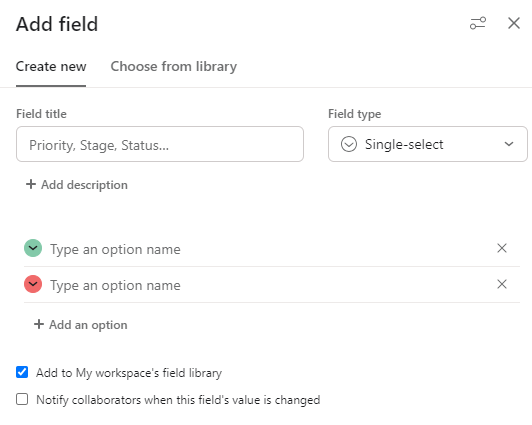
- In the Add field tab, you can input a field title, choose the field type, and provide a description.
- Then, incorporate the field into your organization's field library to ensure its reusability across the entire organization. This makes the field a global custom field.
Step 3: Leverage Asana AI-Recommended Fields
Asana AI will suggest some fields depending on the context of your project and tasks. Follow the below steps to add them to your project:
- Click Customize.
- Select Fields under the Edit option.
- Click the + Add button and choose Recommend fields.

10. Project Milestones
Milestones mark significant progress points along a project timeline. You can create a milestone or convert existing tasks into milestones.
Step 1: Create a New Milestone
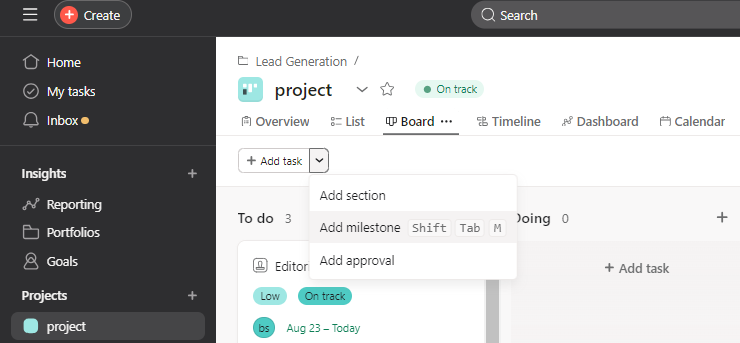
- Go to Projects.
- Click on the dropdown arrow next to + Add Task.
- Select Add Milestone.
Step 2: Convert an Existing Task to a Milestone
- Locate the task you want to convert to a milestone in your project.
- Click on the task to open the task details.
- Click on the three-dot menu in the top right corner of the task details.
- Select Mark as from the dropdown menu and then click on Milestone.

Step 3: Identify Milestones in Your Project
- In your project view, milestones will be displayed with a diamond icon next to them, making them easily identifiable.
- You can also filter your project view to only show milestones by clicking the filter icon and selecting Milestones from the list.

11. Asana Chrome Extension
Here are the steps to install and use the Asana Chrome extension:
Step 1: Installation
- Search Asana in the Chrome Web Store.
- Click Add to Chrome to install the integration.

- Accept requested permissions.
- Upon installation, click the Asana icon at the top right to open the extension. This will prompt you to log in.
- After logging in with your Gmail credentials, you can create, edit, and search for tasks.
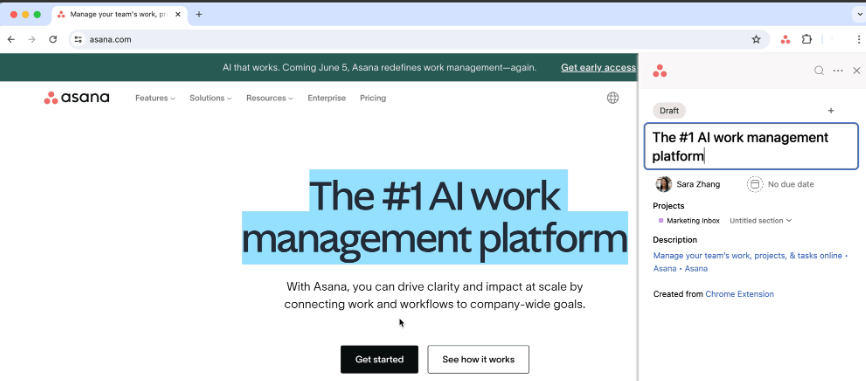
Step 2: Create Tasks from any Web page
- Click on the Asana icon to open the Chrome extension.
- Then, highlight the text you want to turn into a task.
- Right-click to open the drop-down menu and select Create task.
- When creating a task, you can add details such as assignee, due date, project, and task collaborators.
12. Cross-Functional Collaboration
Cross-functional teams have the flexibility to establish their projects and processes according to their preferences. However, they can still depend on a single task that is shared across multiple projects as the source of truth. Here's how you can achieve this:
Step 1: Create Your Tasks
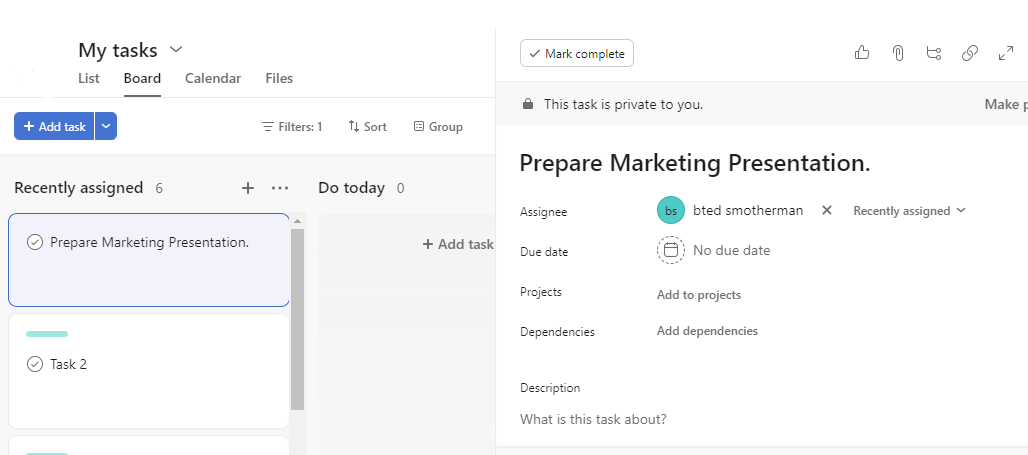
Start by creating the task you want to multi-home. For example, let’s say you have a task titled Prepare Marketing Presentation.
Step 2: Multi-Home the Task
To add the same task to different projects, you can use one of the following methods:
- Under the Projects field, click Add to projects. If this doesn't appear, use the shortcut Tab+P to open the typeahead.
- Search for the project name you wish to multi-home the task into or paste the URL if necessary.

- Once multi-homed, any updates made to the task will automatically be reflected in all associated projects, keeping consistent and up-to-date information.
Benefits of Asana Automation Workflows
Here are some of the benefits of Asana workflow automation:
Faster Project Initiation & Completion
Asana's workflow automation features enable you to streamline project kickoff and completion. By defining custom rules and leveraging pre-designed templates, you can quickly set up processes that guide projects from start to finish. Additionally, automated reminders, approvals, and progress tracking can ensure the timely completion of project milestones, accelerating the overall timeline.
Increased Productivity
With Asana's automation, you can enhance your productivity by eliminating repetitive tasks that consume valuable time. By automating routine actions such as task assignments, status updates, and notifications, you can focus on strategic activities that require critical thinking. This shift allows you to utilize your time more effectively, resulting in increased productivity and better-quality work.
Standardized Processes
Automation in Asana helps you establish standardized processes across your team. By creating custom rules and templates, you ensure that everyone follows the same procedures for similar tasks. This consistency reduces the probability of errors and miscommunication, as everyone knows exactly the steps to follow.
Optimized Task Distribution
Asana's automation features enable you to optimize task distribution within your team. You can set rules that automatically assign tasks based on team members' workloads, expertise, or availability. This means that tasks are allocated more efficiently, ensuring that no one is overwhelmed. By balancing the workload, you can enhance productivity, as everyone can contribute effectively without feeling overburdened.
Lower Administrative Overhead
Automating your workflows in Asana reduces the amount of manual and administrative work required to manage projects and tasks. With automated status updates, deadline tracking, and other routine processes, you can spend less time on coordination and more time on value-adding activities. This lowers the overall administrative overhead associated with project management, allowing your organization to operate more efficiently.
Streamline Your Asana Workflows with Airbyte
Asana is a powerful platform for managing projects and promoting team collaboration. However, to fully leverage its capabilities, it's often necessary to integrate the data within Asana with other applications or consolidate it into a centralized database. This integration is essential for performing advanced analysis, reporting, and business intelligence, enabling you to gain deeper insights into project progress and optimize workflows.
Data integration tools like Airbyte can make this process a lot easier. With Airbyte, you can effortlessly manage and pull together your Asana data into different destinations, like databases, data warehouses, or data lakes.
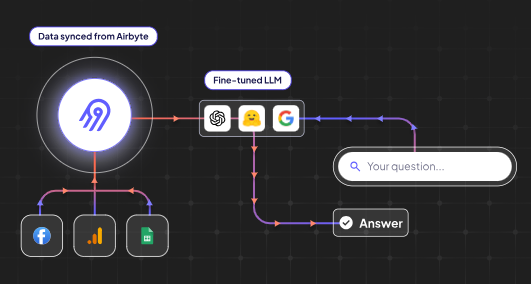
The Asana source connector in Airbyte supports multiple streams, including Projects, Attachments, Portfolios, Custom fields, Tags, Workspaces, Users, Teams, and Tasks. Therefore, you can seamlessly gather all crucial data into a unified platform to gain a holistic view of project management throughout the organization.
Here are some of the key features of Airbyte:
Custom Connectors: Airbyte offers a vast library of over 350+ pre-built connectors that enable you to seamlessly integrate various data sources, ensuring efficient and secure data transfer. Furthermore, if you don't find the desired connector, Airbyte offers you greater flexibility through its Connector Development Kit (CDK). With the CDK, you can quickly build custom connectors in less than 30 minutes.
Vector Database Integration: It supports various vector database destinations, including Pinecone, Milvus, and Weaviate. You can store and query project-related documents, files, or other unstructured data in a highly efficient manner.
Change Data Capture: Airbyte's CDC capabilities allow you to capture and replicate data changes, ensuring that your data is always up-to-date across various systems. For example, with CDC, you can easily track changes in tasks or project statuses and automatically reflect these updates in your destination system.
Building Conversational Interfaces: It facilitates integration with popular large language model (LLM) frameworks like LangChain. This enables you to create powerful conversational interfaces that streamline project management workflows. LLMs can quickly process queries and provide relevant answers by retrieving data from various sources synced through Airbyte.
Data Orchestration: Airbyte allows you to orchestrate your data pipelines using various tools, such as Airflow, Dagster, Prefect, and Kestra. This integration helps you manage complex workflows and streamline data processes effectively.
Data Security: Security is crucial when handling sensitive project data. Airbyte addresses this by adhering to industry standards like GDPR and HIPAA. It provides strong security measures, including encryption and role-based access controls, to keep your data safe throughout the integration process.
Conclusion
Asana workflow automation significantly enhances productivity by streamlining repetitive tasks, reducing manual effort, and ensuring consistency across projects. Therefore, you can focus more on strategic initiatives rather than mundane activities, improving operational efficiency.
This article provided important insights on Asana workflows along with illustrative examples to set them up and manage easily. By utilizing Asana, you can create a more adaptable and agile work environment, leading to better project outcomes and increased team satisfaction.
FAQs
Can you make workflows in Asana?
Yes, you can create workflows in Asana for almost any part of your work that involves a series of repeatable steps. By establishing predefined processes and rules, you can automate task management and updates as they move through different stages, enhancing team efficiency.
How much does Asana automation cost?
The cost of Asana's automation varies depending on the pricing plan you choose. The Starter plan costs $10.99, and the Advanced plan costs $24.99 per user per month on an annual basis. For the Enterprise plan, which offers unlimited project management options, you can contact the sales team for detailed pricing information.
Who can use Asana automation?
Asana automation can be used by businesses of all sizes, from small startups to large enterprises. Its user-friendly interface makes it accessible for individuals from diverse backgrounds and serves as a valuable tool for project managers to streamline workflows and enhance productivity.
What should you do next?
Hope you enjoyed the reading. Here are the 3 ways we can help you in your data journey:


