SQL Database Migration: Steps for a Smooth Transition
Summarize this article with:
✨ AI Generated Summary
Organizations face challenges in modernizing SQL databases due to downtime, data integrity, and compliance issues. Effective migration requires:
- Advanced strategies addressing data sovereignty, security, and performance in cloud environments.
- Automated tools like Airbyte offering 600+ connectors, AI-assisted custom connector development, and real-time Change Data Capture for seamless, secure migrations.
- Manual methods provide control but are less scalable, more time-consuming, and costly compared to automated solutions.
- Security measures including encryption, access control, audit trails, and compliance validation are critical throughout migration.
Organizations worldwide face mounting pressure to modernize their database infrastructure while maintaining operational continuity and regulatory compliance. Recent industry analysis reveals that traditional SQL migration approaches often result in extended downtime, data integrity issues, and substantial cost overruns that can derail digital transformation initiatives. Modern enterprises require sophisticated migration strategies that address not only technical data movement but also emerging challenges around data sovereignty, security governance, and performance optimization in cloud-native environments.
This comprehensive guide explores proven methodologies for SQL migration, from automated solutions using Airbyte's extensive connector ecosystem to manual approaches that provide granular control over data movement processes.
What Are SQL Data Migrations and Why Do They Matter?
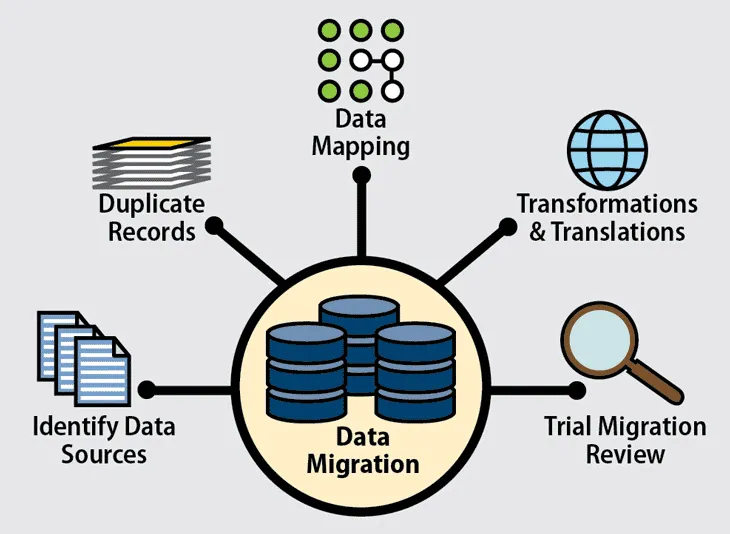
SQL data migration represents the systematic process of transferring data between SQL databases to improve accessibility, enhance performance, and support enterprise data analytics initiatives. An SQL database functions as a relational data-storage system that enables you to store, query, and analyze data using Structured Query Language, providing essential commands for retrieving, querying, and transferring information between different database systems. Prominent examples of SQL databases include MySQL, Microsoft SQL Server, PostgreSQL, and Oracle Database, each offering unique capabilities and optimization features for specific use cases.
Modern SQL migration has evolved far beyond simple data copying to encompass comprehensive transformation processes that address schema differences, data type conversions, and performance optimization requirements. Organizations typically pursue SQL migration to achieve several strategic objectives: consolidating disparate data sources into unified platforms, migrating from legacy on-premises systems to cloud-native architectures, optimizing costs by moving to more efficient database platforms, and implementing disaster recovery or backup strategies that ensure business continuity.
The complexity of contemporary SQL migration reflects the sophisticated requirements of modern enterprise environments, where data must maintain integrity while transitioning between systems with different architectural patterns, security models, and performance characteristics. Successful migrations require careful planning that addresses not only technical compatibility but also regulatory compliance, data governance, and operational continuity throughout the transition process.
Database migration projects have become increasingly critical as organizations recognize that legacy systems often constrain business agility and create unsustainable operational costs. The migration process typically involves extracting data from source systems, transforming it to meet target system requirements, and loading it into destination databases while maintaining referential integrity and business logic consistency. This ETL approach ensures that migrated data supports existing business processes while enabling new capabilities that justify the migration investment.
How Do You Ensure Security and Compliance During SQL Migration?
Security and compliance considerations have become paramount in SQL migration projects as organizations must navigate increasingly complex regulatory frameworks while protecting sensitive data throughout the transition process. Modern migration security requires comprehensive frameworks that address data encryption, access controls, audit trails, and compliance validation across multiple regulatory standards including GDPR, HIPAA, SOC 2, and industry-specific requirements.
Data Encryption and Key Management
Advanced encryption standards now mandate protection of data both in transit and at rest throughout the migration lifecycle. Sophisticated key management systems help maintain cryptographic control within appropriate jurisdictional boundaries. Modern migration tools implement end-to-end encryption using protocols such as TLS 1.3 and AES-256, while customer-managed encryption keys provide organizations with complete control over cryptographic operations even when leveraging cloud-based migration services.
Data Sovereignty and Residency
Data sovereignty and residency requirements have introduced new complexities that organizations must address during migration planning and execution. These requirements extend beyond simple data storage location to encompass jurisdictional control over data processing activities, requiring migration strategies that consider legal frameworks, regulatory compliance, and geopolitical factors. Organizations operating across multiple regions must implement classification and governance frameworks that ensure compliance with diverse regulatory requirements simultaneously.
Access Control and Identity Management
Access control and identity management frameworks have evolved to provide granular control over migration processes while maintaining operational flexibility. Multi-factor authentication, role-based access controls, and the principle of least privilege ensure that only authorized personnel can access sensitive data during migration. Advanced identity systems integrate with existing enterprise directories while providing temporary elevation capabilities migration teams may require, without compromising long-term security posture.
Audit Trails and Monitoring
Comprehensive audit trail capabilities have become essential for demonstrating compliance and supporting forensic analysis when issues arise. Modern audit systems document every migration activity, including data access, transformation operations, and system modifications, while providing real-time monitoring that can detect and respond to security incidents immediately. These audit capabilities must integrate with security information and event management (SIEM) systems to provide unified visibility across migration and production environments.
Validation, Testing, and Data Masking
Validation and testing frameworks now incorporate security testing as a fundamental component rather than an afterthought. Automated security scanning identifies potential vulnerabilities before they can impact production systems. Data masking and anonymization protect sensitive information during testing phases while maintaining data utility for validation purposes. Organizations must balance strong security measures with operational efficiency, ensuring that protective capabilities enhance rather than slow down migration success.
Your Step-by-Step Guide on SQL Database Migrations with Airbyte
Database migration involves extracting data from a source data system and loading it to a destination database. Considering the compatibility of the target system, you might need to perform certain transformations. Several database-migration tools are available that facilitate the automation of the SQL migration process. One prominent solution is Airbyte, an effective data-movement platform that offers a vast library of 600+ pre-built connectors to help you perform SQL data migration with ease.
Here, we will migrate data from Microsoft SQL Server (MSSQL) to PostgreSQL. The steps are as follows:
Step 1: Set up MSSQL as a Source
1. Log in to your Airbyte Cloud account. On the dashboard, click Sources from the left navigation pane.
2. Enter MSSQL in the search box and click on the MSSQL Server connector.

3. On the Create a Source page, enter the mandatory fields Host, Port, Database, Username, and Password.
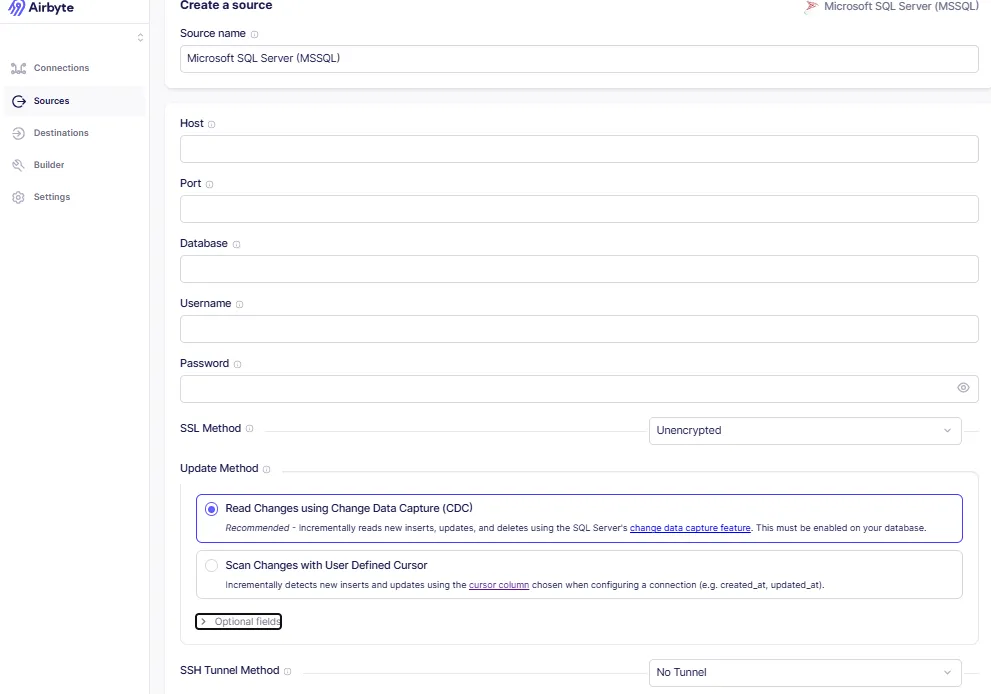
4. Configure SSL Method (Unencrypted, Encrypted–trust, or Encrypted–verify) and choose an Update Method (CDC or Standard Replication).
5. Optionally, specify Schemas and JDBC URL Params, then click Set up Source.
Step 2: Set up Postgres as a Destination
1. Click Destinations from the left navigation pane. Enter Postgres in the search box.

2. On Create a Destination, enter Destination Name, Host, Port, DB Name, Default Schema, and Username.

3. Select an SSL Mode or SSH Tunnel method, then click Set up Destination.
Step 3: Create a Connection
1. From Connections in the left navigation, choose MSSQL as the source and Postgres as the destination.
2. Select a sync mode (Incremental Append or Full Refresh), toggle the streams you want to replicate, and click Next.
3. On Configure Connection, fill in Connection Name, Schedule Type, Replication Frequency, and Destination Namespace.
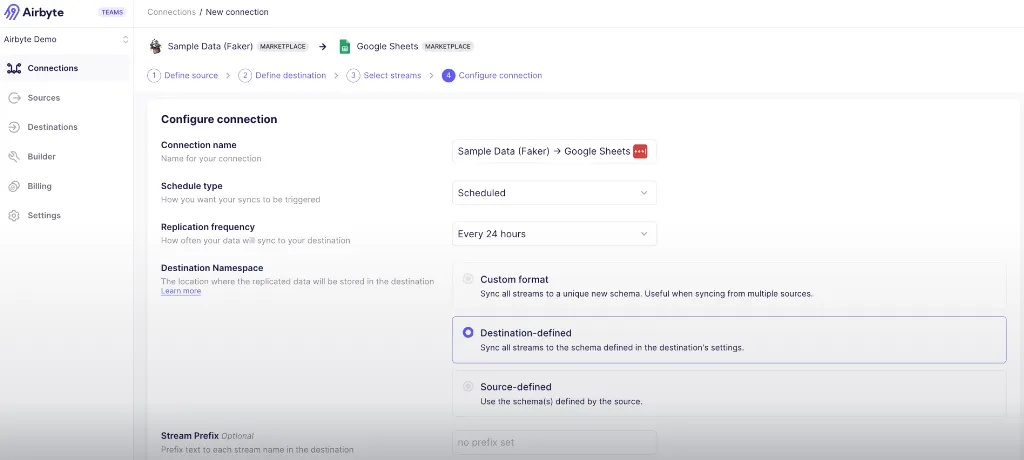
4. Click Finish & Sync, then monitor the Connection Overview page (Status, Timeline, Schema tabs).
5. After the first sync completes, verify the data in Postgres.
This three-step approach completes the data migration from MSSQL Server to Postgres using Airbyte. You can then integrate Airbyte with dbt to perform transformations, or use PyAirbyte for Python-based workflows that enable advanced analytics and machine learning applications on your migrated data.## How Can You Perform SQL Database Migration Manually?
In the manual method, you extract data from MSSQL Server, store it in a local CSV file, and import it into Postgres using SSMS and pgAdmin. This approach provides granular control over the migration process while requiring more technical expertise and hands-on management throughout the data transfer process.
Load SQL Server Data from the CSV File to Postgres
Using pgAdmin:
1. Log in or sign up for pgAdmin. Create a table via Tables › Create › Table.

2. On the Create Table page, enter a Name and Schema, then click Save.

3. Right-click the table and choose Import/Export.
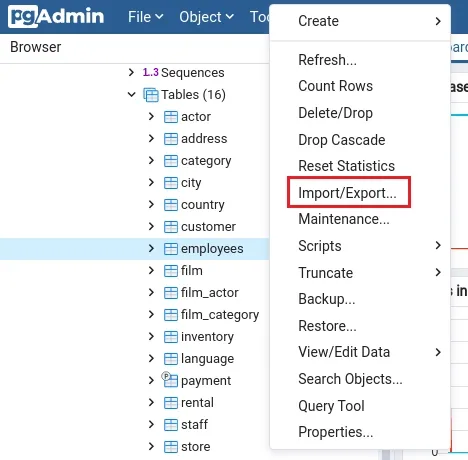
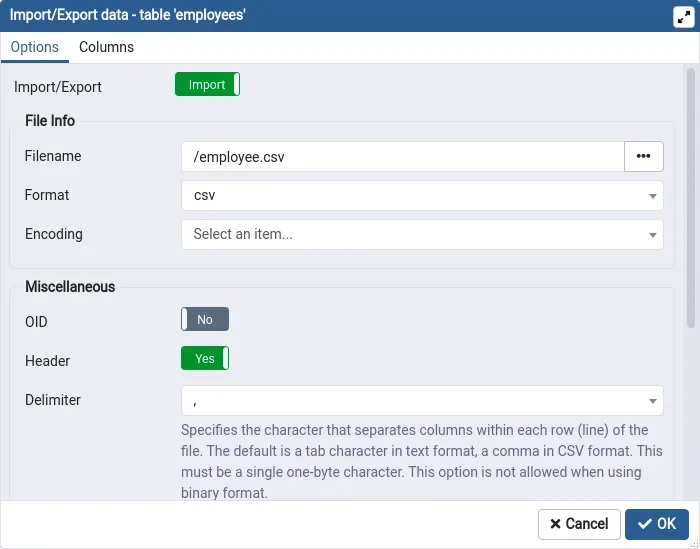
4. In Import/Export Data, specify the CSV Filename, set Format to CSV, and click OK.
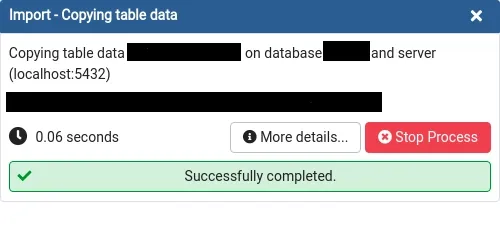
5. A popup confirms successful import.
Limitations of the Manual Approach
Manual SQL migration approaches, while providing granular control over data transfer processes, present significant challenges that can impact project success and organizational efficiency. Limited scalability represents the most significant constraint, as managing large datasets or frequent migrations manually becomes increasingly difficult and resource-intensive as data volumes grow. Organizations dealing with terabytes of data or complex multi-table relationships often find manual approaches impractical for enterprise-scale requirements.
Time-consuming processes characterize manual migrations, with numerous intermediate steps that slow down operations and extend project timelines significantly. Each phase of the manual process requires human intervention, from data extraction and transformation to validation and loading, creating bottlenecks that can delay critical business initiatives. The complexity of tools like pgAdmin and ODBC drivers creates steep learning curves that require specialized expertise, limiting the number of team members who can effectively execute migration projects.
Difficulty tracking changes and maintaining audit trails presents additional challenges in manual approaches, making it harder to troubleshoot issues or implement rollback procedures when problems arise. Higher costs result from increased error rates, rework requirements, and extended resource allocation that manual processes often demand, ultimately consuming more budget than automated alternatives while delivering slower results.
Why Should You Choose Airbyte for SQL Database Migration?

Airbyte represents a transformative approach to SQL migration that addresses the fundamental challenges organizations face when moving data between database systems. The platform's comprehensive connector ecosystem, featuring over 600 pre-built integrations, eliminates the development overhead traditionally required for database migration projects while providing the flexibility to create custom connectors when specialized requirements arise.
- Flexibility to Develop Custom Connectors enables organizations to address unique integration requirements through multiple development approaches including the visual Connector Builder, Low-Code CDK, Python CDK, and Java CDK. This multi-tiered approach ensures that teams can select the appropriate development method based on their technical expertise and specific integration complexity, from no-code solutions for standard protocols to full SDK implementations for sophisticated custom requirements.
- AI-enabled Connector Builder accelerates custom connector development through intelligent assistance that pre-fills configuration fields and suggests optimal settings based on API documentation and common integration patterns. This AI-powered approach reduces the time and expertise required for custom connector creation while ensuring adherence to best practices and compatibility standards that maintain long-term reliability and performance.
- Change Data Capture (CDC) capabilities provide real-time data synchronization that enables zero-downtime migration strategies and ongoing data integration scenarios. CDC implementation captures incremental changes from source databases and replicates them to target systems with minimal latency, supporting business continuity requirements while enabling gradual migration approaches that reduce risk and operational disruption.
- Schema Change Management automation refreshes database schemas per connection to maintain synchronization as source systems evolve, eliminating the manual overhead traditionally required to keep migration processes current with database modifications. This capability ensures that ongoing data integration remains reliable even as business requirements drive structural changes to source and target systems.
- Streamlined GenAI Workflows enable organizations to load semi-structured data directly into vector databases such as Pinecone and Milvus, supporting advanced AI and machine learning initiatives that leverage large language models and semantic search capabilities. This functionality positions SQL migration as an enabler of AI-driven analytics rather than simply a data movement exercise.
- Enterprise-Grade Security and Governance capabilities ensure that SQL migration projects maintain compliance with regulatory requirements while protecting sensitive data throughout the transfer process. Comprehensive encryption, access controls, and audit trail functionality provide the security framework that enterprise environments require without compromising migration performance or operational flexibility.
- Open-Source Foundation with Enterprise Extensions provides organizations with the flexibility to leverage community-driven innovation while accessing commercial support and advanced features when business requirements demand enterprise-grade capabilities. This hybrid approach eliminates vendor lock-in risks while ensuring access to professional support and advanced functionality as organizational needs evolve.
Conclusion
Emerging trends in SQL migration technology, including AI-powered automation, cloud-native architectures, and advanced security frameworks, demonstrate the rapid evolution of capabilities that enable faster, more reliable, and more secure database transitions. While manual methods provide granular control, they cannot match the efficiency, reliability, and scalability of modern automated solutions like Airbyte. The platform's extensive connector ecosystem, AI-enhanced capabilities, and enterprise-grade security features position it as a comprehensive solution for organizations seeking to modernize their data infrastructure without compromising operational excellence.
Frequently Asked Questions
1. What is the difference between homogeneous and heterogeneous SQL migration?
Homogeneous migration moves data between identical database engines, ensuring easier schema compatibility. Heterogeneous migration transfers data across different platforms, requiring schema conversion, data type mapping, and complex transformations to handle engine-specific differences.
2. How long does a typical SQL migration project take?
SQL migration duration depends on data size and complexity - small databases may take days, while enterprise-scale projects can span months. Automated tools accelerate timelines, whereas manual or phased migrations extend duration but reduce operational risk.
3. What are the most important factors to consider when selecting a SQL migration tool?
Key factors include source–target compatibility, data volume and complexity, downtime tolerance, transformation and mapping flexibility, security/compliance, monitoring and validation, scalability, deployment options, total cost of ownership, and vendor support and roadmap.
4. How can you ensure data security during SQL migration?
Ensure data security through end-to-end encryption, strict access controls, and detailed audit logging. Use data masking during testing, validate compliance with regulations, and secure network configurations. Apply defense-in-depth strategies across all migration stages to minimize risk.
5. What validation approaches should be implemented during SQL migration?
SQL migration validation should include pre-migration profiling, real-time transfer monitoring, post-migration data reconciliation, business logic checks, performance testing, and user acceptance testing, using automated tools where possible to ensure accuracy, completeness, and operational integrity.

.webp)
