3 Steps to Orchestrate dbt Core Jobs Effectively
Summarize this article with:
✨ AI Generated Summary
The article explains how to automate and orchestrate dbt Core jobs for efficient data transformation using Airbyte and Airflow. Key points include:
- dbt Core enables modular, incremental SQL-based data transformations within data warehouses.
- Airbyte automates data extraction and replication from sources like Shopify to warehouses such as Snowflake.
- Airflow orchestrates and schedules dbt Core jobs, ensuring reliable, scalable, and automated data workflows.
- Best practices include using version control, virtual environments, environment variables, monitoring, and documentation for smooth orchestration.
With the increase in data sources, such as IoT devices, marketing applications, and ERP solutions, the modern data stack is essential for managing and transforming the large scales of data being generated. However, this raw data is not as effective in producing insights as it can be with some modification. For this reason, most professionals prefer to transform the data to make it compatible with analysis techniques.
Tools like the data build tool (dbt) core can help you enhance productivity by providing free-to-use data transformation capabilities. Automating the dbt project enables you to reduce manual efforts by performing scheduled tasks.
This article will guide you through the steps to orchestrate dbt core jobs with the help of Airbyte and Airflow.
Understanding dbt Core
dbt Core is an open-source library that plays a pivotal role in analytics engineering, enabling data teams to build interdependent SQL models for in-warehouse data transformation. It leverages the ephemeral compute power of data warehouses, making it a cornerstone of modern data transformation processes. dbt Core is designed to work seamlessly with SQL, allowing teams to create modular, reusable SQL components with built-in dependency management. This modularity ensures that complex transformations can be broken down into manageable parts, enhancing efficiency and maintainability.
One of the standout features of dbt Core is its support for incremental builds, which significantly optimizes performance by only processing new or changed data. Additionally, dbt Core integrates smoothly with orchestration tools like Airflow, enabling automated, reliable, and scalable data workflows. By using dbt Core, data teams can ensure that their data transformations are robust, efficient, and aligned with the needs of their organization.
What Is dbt?

dbt is one of the most popular data transformation tools that enables you to modify raw data to make it analysis-ready. It allows you to centralize your business logic by enabling transformations based on specific rules your organization sets. For example, features that are not necessary for business insights can be eliminated to enhance focus on key metrics. Its modular nature, dbt lets you break down complex tasks into smaller manageable chunks.
There are two different versions that dbt offers:
- dbt cloud: This is a browser-based platform that provides an interface to centralize data model development and enables you to schedule, test, modify, and document the dbt projects.
- dbt core: This is an open-source version that enables you to build and execute your dbt projects through a command-line interface. dbt core projects can be seamlessly integrated into broader data workflows, making automating and deploying tasks easier.
What is a dbt Core Job?
A dbt Core job is a scheduled or triggered process that runs your dbt models to transform data in your data warehouse. Think of it as an automated assistant that ensures your data pipelines run smoothly and consistently. When you set up a dbt Core job, you’re essentially telling your system to ingest data from raw tables, apply the transformations defined in your dbt models, and update your analytics-ready tables. These jobs can be configured to run on a regular schedule (like daily or hourly), or in response to specific events (like when new data arrives). They help data teams maintain reliable, up-to-date information without manual intervention, making it easier for everyone in your organization to access trustworthy data for making decisions.
The Need for Orchestration in Data Pipelines
Orchestration is critical in managing data pipelines, especially as data processes become increasingly complex. It ensures that data transformations occur in the correct sequence, preventing costly errors and ensuring data integrity. By managing dependencies between different data processes, orchestration provides a clear and structured workflow, making troubleshooting issues and optimizing performance easier.
As data volumes grow, orchestration becomes essential for scaling operations. It provides visibility into the entire data pipeline, allowing data engineers to monitor and log job runs, identify bottlenecks, and make necessary adjustments. This visibility is crucial for maintaining a consistent data flow, which modern organizations rely on for timely and accurate decision-making.
Moreover, orchestration frees data engineers from manual intervention, allowing them to focus on higher-value tasks such as optimizing data models and developing new analytics capabilities. By automating routine processes, orchestration enhances productivity and ensures data pipelines run smoothly and efficiently.
Why do Data Engineers Need to Orchestrate them?
Data Engineers need to orchestrate dbt Core jobs to ensure reliable, timely data transformations that power business intelligence. By scheduling and monitoring these jobs, engineers create a dependable rhythm for data processing—transforming raw data into trusted insights exactly when the business needs them.
Orchestration creates structured workflows, ensuring transformations happen in the correct sequence and preventing costly errors. When engineers properly orchestrate dbt Core jobs, they gain visibility into the entire data pipeline, making it easier to troubleshoot issues, optimize performance, and scale operations as data volumes grow.
Perhaps most importantly, well-orchestrated jobs free data engineers from manual intervention, allowing them to focus on higher-value work while maintaining the consistent data flow that modern organizations depend on for decision-making.
Choose an Orchestration Tool for dbt Core Jobs
Selecting the right orchestration tool for dbt Core jobs is crucial for ensuring scalability, reliability, and ease of use. Airflow is popular among data engineers due to its robust feature set and user-friendly interface. It supports a wide range of data sources and provides comprehensive scheduling, monitoring, and alerting tools.
Airflow’s scalability allows it to handle large volumes of data and complex workflows, making it suitable for organizations of all sizes. Its reliability ensures that data pipelines run consistently and accurately, reducing the risk of errors and downtime. Additionally, Airflow’s extensive community of users and developers means it is well-maintained and continuously improved, providing a reliable and up-to-date solution for orchestrating dbt Core jobs.
When choosing an orchestration tool, consider its ability to integrate with your existing data sources, scalability to handle growing data volumes, and ease of use for your team. Airflow’s combination of these features makes it an excellent choice for orchestrating dbt Core jobs, ensuring that your data workflows are efficient, reliable, and scalable.
How to Orchestrate dbt Core Jobs Using Airbyte and Airflow
Orchestrating dbt core jobs enables you to automate SQL script execution on your data that is available in a remote location. With this feature, you can reduce manual intervention while performing your daily data analytics tasks.
Using these tools, you can address client-specific needs and ensure that your data workflows are tailored to meet your clients' unique challenges.
Step 1: Extracting Data Using Airbyte
The first step of orchestrating the dbt core jobs is ensuring the data is available in the correct platform where you can perform the transformations. In some organizations, developers prefer to build custom connectors to migrate data from various tools into a data warehouse. However, this method has some limitations in terms of flexibility and infrastructure management.
To overcome this challenge, you can use SaaS-based tools like Airbyte to automate data replication tasks for your organization. Airbyte is a no-code data integration tool that allows you to connect various data sources to a destination of your preference. Over 550+ pre-built connectors enable you to automate data movement between numerous tools. Airbyte’s extensive capabilities allow you to form strong partnerships with your clients by efficiently addressing their data integration challenges.
If the connectors you seek are unavailable, you can use Airbyte’s Connector Builder or Connector Development Kit (CDK) to build custom connectors within minutes. The Connector Builder provides an AI-assist feature that reads through your connector’s API documentation and automatically fills out most necessary fields. These capabilities allow you to develop connectors without getting into the underlying technical complexities.
Let’s look at an example of data movement from Shopify to Snowflake, which you can use to orchestrate the dbt core jobs. The following steps will highlight how to move data from your Shopify store into a data warehouse like Snowflake and automate dbt jobs.
Configure Shopify as a Source
- Log in to your Airbyte account. After submitting your login credentials, you will be redirected to the Airbyte dashboard.
- Click on the Sources tab from the left panel.
- Enter Shopify in the Search Airbyte Connectors… box on the Set up a new source page.

- Select the available Shopify connector.

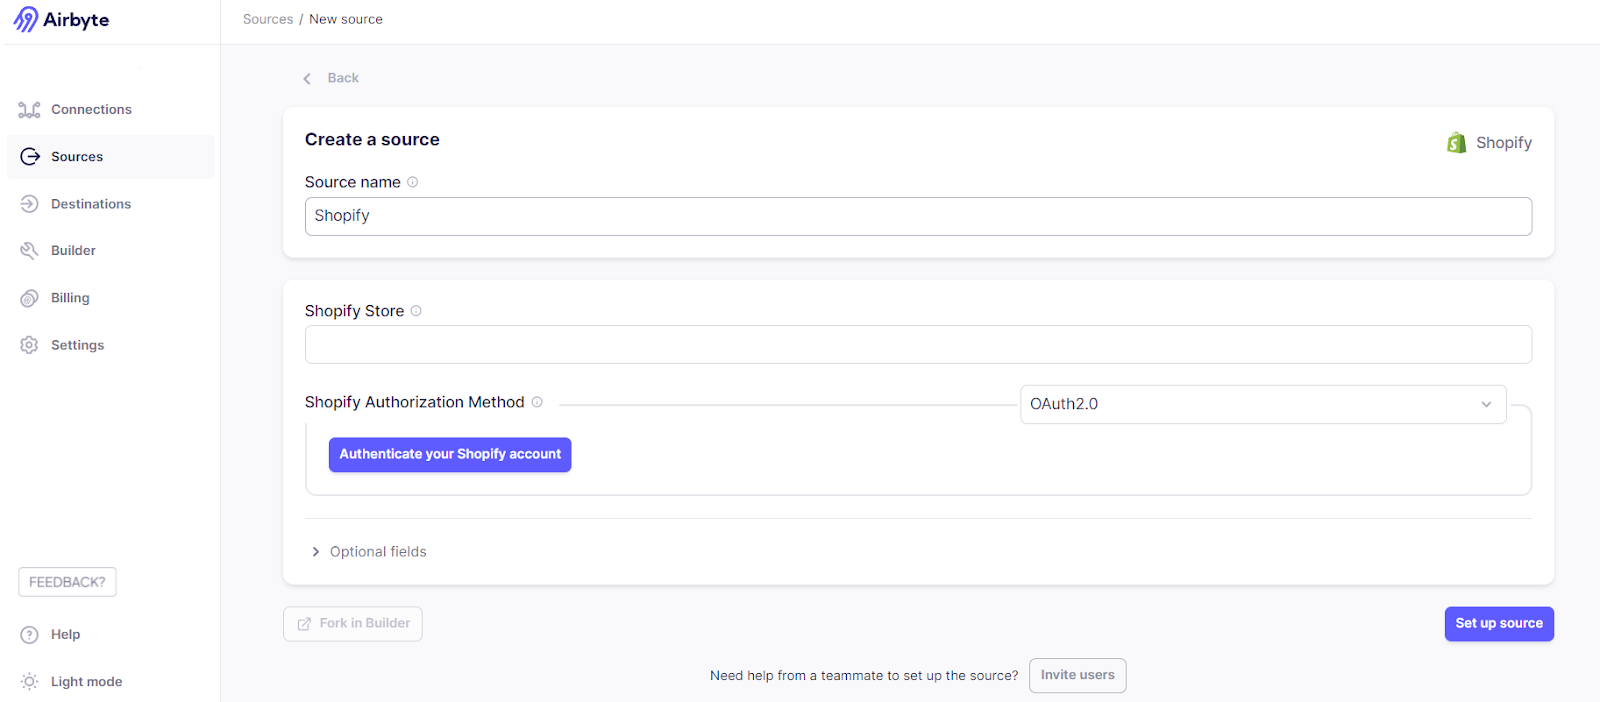
- On that page, enter the name of your Shopify store and authenticate your Shopify account using OAuth2.0 or API password.
- Click on the Destinations tab on the left panel.

- Select the available Snowflake connector option.

- Authenticate your Snowflake account using Key Pair Authentication or Username and Password.
- Click Set up destination to configure it as a destination for your data pipeline.
- Click on the Connections tab on the left panel of the Airbyte dashboard and select + New Connection.
- Select Shopify and Snowflake from the source and destination dropdown list.

- Specify the frequency of the data syncs according to your requirements. With Airbyte, you can choose manual or automatic scheduling for your data refreshes.
- You can select the specific data objects you want to replicate from Shopify to Snowflake.
- Choose the sync mode for your stream between full refreshes or incremental syncs.
- Click on Test Connection to ensure the setup works as expected.
- Finally, if the test passes successfully, click Set Up Connection to initiate the data movement.
By integrating platforms this way, you can ensure proper data synchronization between the source and the destination. Airbyte offers change data capture (CDC) functionality, enabling you to automatically identify and replicate source data changes in the destination system. This feature lets you perform dbt transformations on your organization's latest/updated data.
Step 2: Configure and Execute a dbt Project
This step involves setting up the dbt environment, organizing it, compiling, and executing the dbt project. Let’s explore each section in depth.
Basic Configuration
In the first step, you must create and activate a virtual environment for your project. Execute the code in the command prompt:
- Configure the dbt core in your local environment.
Setting up the dbt core in your local environment requires strong technical skills to ensure proper configuration and execution.
python -m pip install dbt-core- After setting up the dbt core, you can create a dbt orchestration project to perform transformation tasks on the Snowflake dataset. To do so, you will first need to create a new GitHub repository for version control. You can choose a name and whether you want to keep the repo public or private.
To create a project, use the dbt init command with the project name. You can use the cd and the pwd commands to navigate to your project folder. Using a code editor like VSCode to work with these files is often considered a good practice. A code editor provides an extensive marketplace with version control tools like Git, enabling you to manage your project effectively. Navigate to your dbt project folder; the content of this folder must include a ‘.yml’ and a ‘.sql’ files when executing the init method.
Organize, Compile, and Execute the Project
- Organizing the project folders is a best practice to help you identify and resolve issues while orchestrating dbt core jobs.
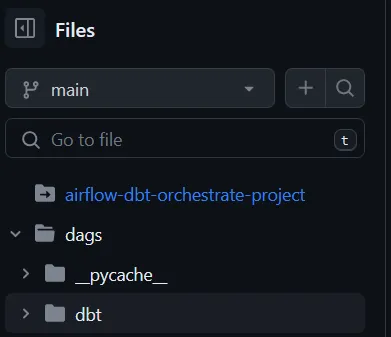
To organize your project on GitHub, you can keep all your dbt projects under the dags directory. For example, you can move the dbt folder under the repository—’airflow-dbt-orchestrate-project’ in the image you created in the previous step.

After organizing the files, you can configure a connection between the project and the Snowflake dataset to run dbt jobs on the replicated data. To achieve this, you must create a file 'profiles.yml' in your '.dbt' folder. Enter the following code in the profiles.yml file by replacing all the values with your credentials:
By performing this step, you can see the updates in your GitHub folder.

- Now, you can navigate to your project folder and perform transformation operations by executing SQL commands in a ‘.sql’ file. These commands will be compiled once you run the dbt compile command.
- After successfully executing the SQL commands, you can see their status on the terminal. If the last line displays “Done,” the results should appear in the compiled directory. The actual Snowflake table will appear on your screen. This way, you can ensure effective communication between dbt and the database.
- Perform the dbt run command. The dbt core engine relies on the SQL available in the compiled folder. With the help of the INSERT INTO command, you can replicate the transformed data from a temp table into your preferred location in Snowflake.
Step 3: Use Airflow to Orchestrate dbt Core Job
The second step demonstrates how to create a dbt core job and work with your Snowflake data. Although you can run the transformations by executing the job, you'll need to schedule dbt Core pipelines to automate the process fully. You can utilize Airflow—a scheduling and monitoring tool—to orchestrate dbt core jobs. It offers BashOperator, a beneficial component for automating the dbt processes.
The BashOperator is a task manager that allows you to run Bash commands within your directed acyclic graphs (DAGs). Using the BashOperator, you can execute tasks without installing Bash—a scripting language—on your local machine.
The DAGs represent all the operations you want to perform on your data according to a schedule. You can create custom DAGs according to your specific requirements by specifying the schedules, descriptions, and arguments. Read Airflow’s official documentation to know how to create a DAG.
Airflow scans through the acyclic graphs to form data workflows. When working with Airflow, you will have three tasks: dummy start, dbt module, and dummy end task.

- You must provide the project directory, the location of the profiles.yml file, and the model name you wish to execute. For example,
- Once your SQL models are tested, you might notice a reduction in the number of steps to schedule tasks. In this process, dbt passes all its logs to Airflow UI, reducing manual efforts while transforming the data.
- Finally, you can review the changes by performing a simple query on your target Snowflake data table. This will ensure that all the steps are performed correctly.
Best Practices for Orchestration
To ensure the successful orchestration of dbt Core jobs, follow these best practices:
- Use Version Control: Implement version control systems like Git to manage changes to your dbt project and Airflow workflows. This ensures you can track modifications, collaborate effectively, and revert to previous versions if needed.
- Define Environment Variables: Use environment variables to manage dependencies and configurations across different environments. This practice helps maintain consistency and simplifies the deployment process.
- Use a Virtual Environment: Create a virtual environment to isolate dependencies and ensure consistent execution of dbt jobs. This prevents conflicts between different projects and maintains a clean development environment.
- Organize Your Project Folder: Keep your project folder well-organized to ensure easy access to dbt models, tests, and transformations. A structured folder hierarchy enhances productivity and simplifies troubleshooting.
- Use dbt Commands: Leverage dbt commands to execute dbt jobs and manage workflows. Commands like dbt run, dbt test, and dbt compile are essential for orchestrating and maintaining your data transformations.
- Monitor and Log: Implement monitoring and logging to gain visibility into dbt job runs. This practice helps identify issues, track performance, and ensure your data pipeline operates smoothly.
- Optimize Performance: Optimize performance using incremental builds and caching. These techniques reduce processing time and resource consumption, ensuring efficient data transformations.
- Document Workflows: Maintain comprehensive documentation of your workflows to ensure stakeholders understand the data pipeline. Clear documentation facilitates onboarding, collaboration, and troubleshooting.
Adhering to these best practices can ensure the successful orchestration of dbt Core jobs and maintain a reliable and efficient data pipeline that supports your organization’s data-driven decision-making.
Key Takeaways
Understanding the key concepts of dbt core jobs and how to orchestrate them provides you with the necessary information for effective dbt Core automation.
Although manual techniques exist to transform data, integrating data integration tools like Airbyte with dbt core and Airflow enables you to save time.
Using these tools, you can orchestrate almost all your data transformation requirements, allowing you to extract impactful insights from your data. Ready to simplify your data stack and unlock faster insights? Try Airbyte today and start building smarter, more scalable data workflows.

