Learn how to use Airbyte’s Python CDK to write a source connector that extracts data from the Webflow API.
Published on Jun 28, 2022
Summarize this article with:

Airbyte has hundreds of source connectors available, which makes it easy to get data into any of Airbyte's supported destinations. However, there is a long tail of sources that may not yet be written, which is where Airbyte shines!
Because of the open source nature of Airbyte, it is relatively easy to create your own data connector. For example, Python CDK Speedrun: Creating a Source shows how you can easily build a connector to retrieve data about Pokemons. The Pokemon example is a great introduction to building a simple source connector, but it is missing some real-world requirements such as authentication, pagination, dynamic stream generation, dynamic schema generation, connectivity checking, and parsing of responses – and it does not demonstrate how to import your connector into the Airbyte UI. In this article I will discuss these areas in detail.
As an example of how to create a custom Airbyte source connector, I discuss the Webflow source connector implementation that I developed with the Python Connector Development Kit (CDK). Webflow is the CMS system that is used at Airbyte for hosting our website and blog articles, and at Airbyte we use this connector to drive Webflow data into BigQuery to enhance our analytics capabilities.
ℹ️ If your goal is to just get data out of Webflow then you can easily make use the Webflow source connector without understanding the implementation details that are described in this article. However, if your goal is to learn about the Webflow API and/or how to build your own custom source connector, then continue reading!
In order to guide you through the steps for building a new Webflow source connector, this article is broken into three main sections:
If you are able to understand the topics that are presented in this article, you should be well on your way to building your own Python HTTP API Source connector!
The steps and topics discussed in this article were valid as of June 2022, but due to the fast-changing nature of Airbyte, this article may go out of date at some point in the future. Below is a list of versions used in this article.
When creating an Airbyte source connector, one of the most critical things to understand is the API that your code will interact with. No matter what API you are connecting to, manually interacting with the API before you start to write code will ensure that you understand how to work with the API, that your authentication credentials are correct, and that the API is functioning as expected.
In this section I show you how to interact with the Webflow API by using cURL for sending HTTP requests, and by using jq for parsing json responses. In order to interact with the Webflow API, you will need to know your site id and API token as instructed in the Webflow source connector documentation.
ℹ️ If you do not have a Webflow site and would like to try out the Webflow API and/or to test out the Webflow source connector, then you can create your own site for free at Webflow.com by clicking on the Get started – it's free button.
You will use the Webflow API to gather the following information:
Webflow uses the concept of collections to group together different types of records, where the records within a given collection share a common schema. For example, in Airbyte’s Webflow site, there are collections such as Blog Posts, Blog Authors, etc. Collection names are not pre-defined by Webflow, the number of collections is not known in advance, and the schema for each collection may be different from one another.
To get a list of the available collections, execute Webflow’s list collections API as follows:
curl --request GET \\
--url https://api.webflow.com/sites//collections \\
-H "Authorization: Bearer " \\
-H "accept-version: 1.0.0" | jq
Which will respond with a list of collections, similar to the following:
[
  {
    "_id": "<_id of the Blog Posts collection>",
    "lastUpdated": "2022-06-01T15:04:32.944Z",
    "createdOn": "2021-03-31T17:36:31.772Z",
    "name": "Blog Posts",
    "slug": "blog",
    "singularName": "Blog Post"
  },
 etc …
]
In order to execute an API call to extract the contents of a collection, you will need the _id of the collection from the above response.
Once you know the _id of the collection that you want to extract data from, you can access Webflow’s get collection items API, to extract the collection contents as follows:
curl https://api.webflow.com/collections//items \
-H "Authorization: Bearer " \
-H "accept-version: 1.0.0" | jq
If you have requested items from your Blogs Posts collection, then the response from the above request may be quite long. Below is a heavily abbreviated representation of the response:
{
  "items": [
    {
      "post-body": "",
      "name": "",
      "slug": "",
      "updated-on": "2022-02-28T17:00:51.510Z",
      etc…
    },
    ... more items ...
  ],
  "count": 82,
  "limit": 100,
  "offset": 0,
  "total": 82
}
Because there may be many fields in each Webflow collection, and because the type of each field is not known in advance, the Webflow connector must extract the schema for each collection.
To get the schema for each collection, access Webflow’s get collection API as follows:
curl https://api.webflow.com/collections/ \
-H "Authorization: Bearer " \
-H "accept-version: 1.0.0" | jq
For example, if you used the collection id of the Blogs Posts collection in the above request, then the response may be quite lengthy. Below is a heavily abbreviated version of the Blog Posts response:
{
  "_id": "",
  "lastUpdated": "2022-06-01T15:04:32.944Z",
  "createdOn": "2021-03-31T17:36:31.772Z",
  "name": "Blog Posts",
  "slug": "blog",
  "singularName": "Blog Post",
  "fields": [
    {
      "name": "SEO Title Tag",
      "slug": "seo-title-tag",
      "type": "PlainText",
      "required": false,
      "editable": true,
      "helpText": "",
      "id": "",
      "validations": {
        "singleLine": true
      }
    },
    ... many more fields ...
}
Each of the fields has a type defined, but the types returned by Webflow (such as PlainText above) do not have a one-to-one correspondence to the types expected by Airbyte. The conversion of these types to Airbyte types is handled in the Webflow source connector by the CollectionSchema class discussed in the next section.
Download our free guide and discover the best approach for your needs, whether it's building your ELT solution in-house or opting for Airbyte Open Source or Airbyte Cloud.

Before building a new custom source connector from scratch, it is illustrative to discuss an already-existing real-world source connector implementation. Therefore, in this section I discuss the design and implementation details of the Webflow source connector. For now I will focus on the logic and design of the Webflow connector, and later in this article I will discuss the mechanics of building a new Webflow connector from scratch.
ℹ️ While the descriptions given in this article should give you a good general understanding of the various classes and methods that are defined in the Webflow source connector, in each class description I also provide a URL where the source code can be viewed, which you may wish to consult in order to help improve your comprehension.
An Airbyte stream defines the logic and the schema for reading data from a given source. For example, if you are pulling data from a database, then you would likely implement a unique Airbyte stream for each database table that you wish to pull data from. Or if you are accessing an API-based system, then you could implement a unique stream for each different API endpoint that you are pulling data from.
ℹ️ One of the interesting implementation details of this Webflow source connector is that it figures out what Webflow collections are available and what their schema is, and dynamically creates a unique stream for each one.
Below is a list of the classes that are defined in the Webflow source connector, along with a high-level description of what they are used for.
These classes are explained in detail in the following subsections.
In order to connect to various Webflow APIs, the Webflow source connector creates several streams (a new stream for each unique API endpoint), each of which inherits from the WebflowStream class (in source.py), which itself inherits from the HttpStream class and the Stream class (defined in http.py) as demonstrated in the class diagram below.

The Stream and HttpStream classes provided by the Airbyte CDK define much of the logic for building HTTP requests and for parsing the HTTP responses. On the other hand, the WebflowStream class doesn’t add much functionality aside from the following:
The CollectionsList class (in source.py), connects to the previously discussed list collections API.
This returns a list of the available Webflow collections, including the name of each collection and its associated _id. A collection id is required as part of the URL for most of the other Webflow API calls, which are discussed in subsequent sections.
As demonstrated in the class diagram below, CollectionsList inherits from WebflowStream.
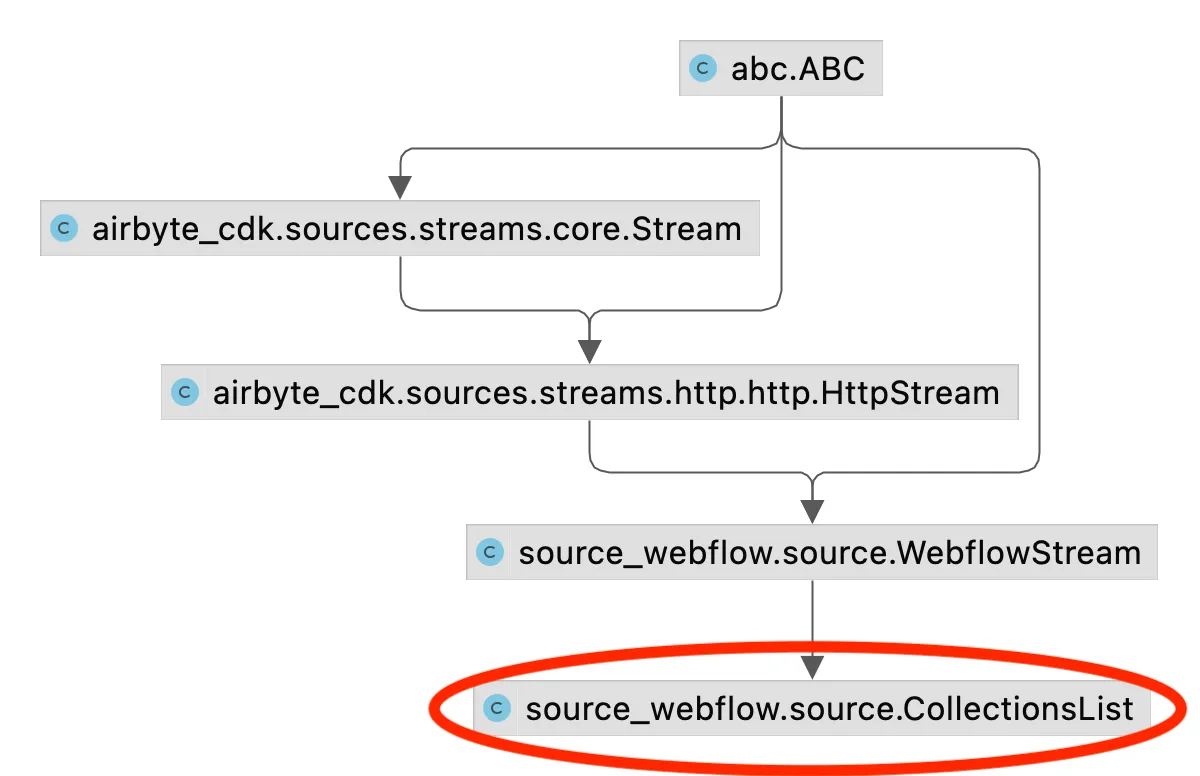
There are two important methods worth discussing in the CollectionsList class implementation:
The CollectionContents class (in source.py), connects to the previously discussed get collection items API.
This extracts items (for example, individual Blog Posts) from within each Webflow collection. This class is instantiated multiple times to create a new stream for each Webflow collection by looping over the list of collections returned by a CollectionsList stream (discussed above).
As demonstrated in the class diagram below, CollectionContents inherits from WebflowStream.
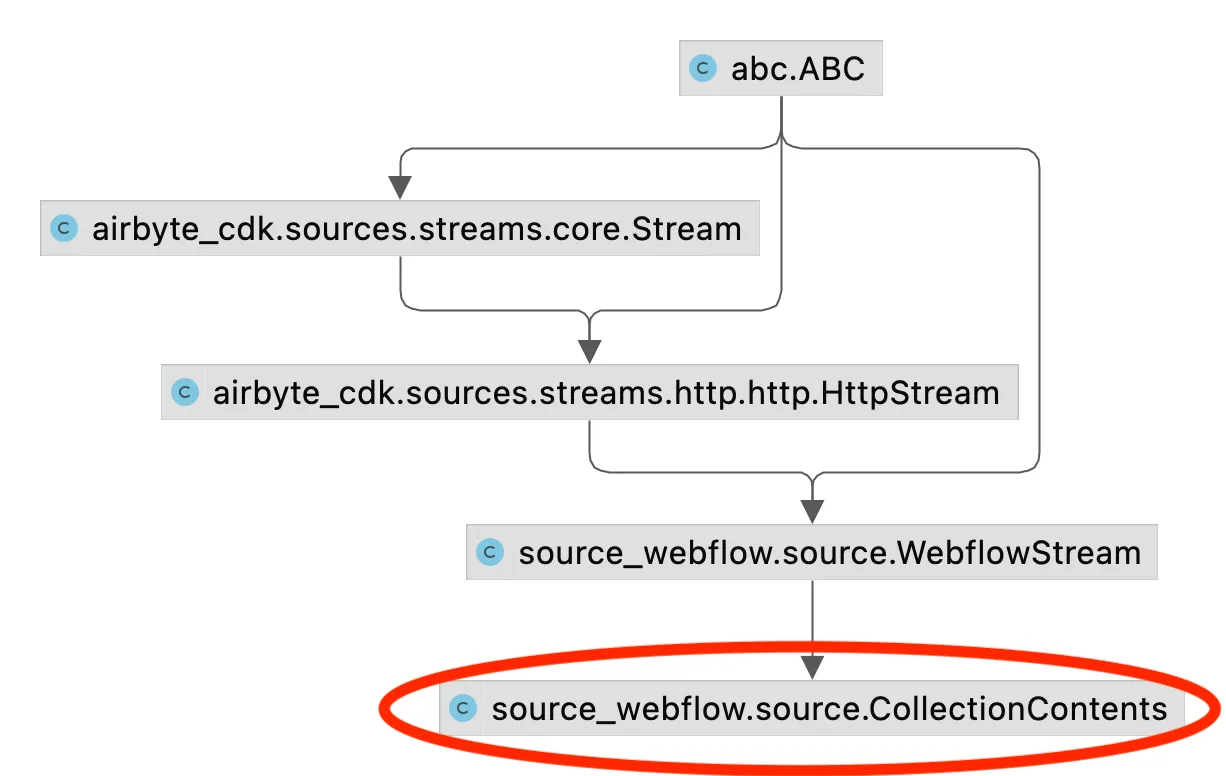
There are several methods worth highlighting in the CollectionContents class implementation.
The CollectionSchema class (in source.py) is responsible for retrieving the Airbyte schema for each Webflow collection, by connecting to the previously discussed get collection API.
This class inherits from WebflowStream as demonstrated in the class diagram below.
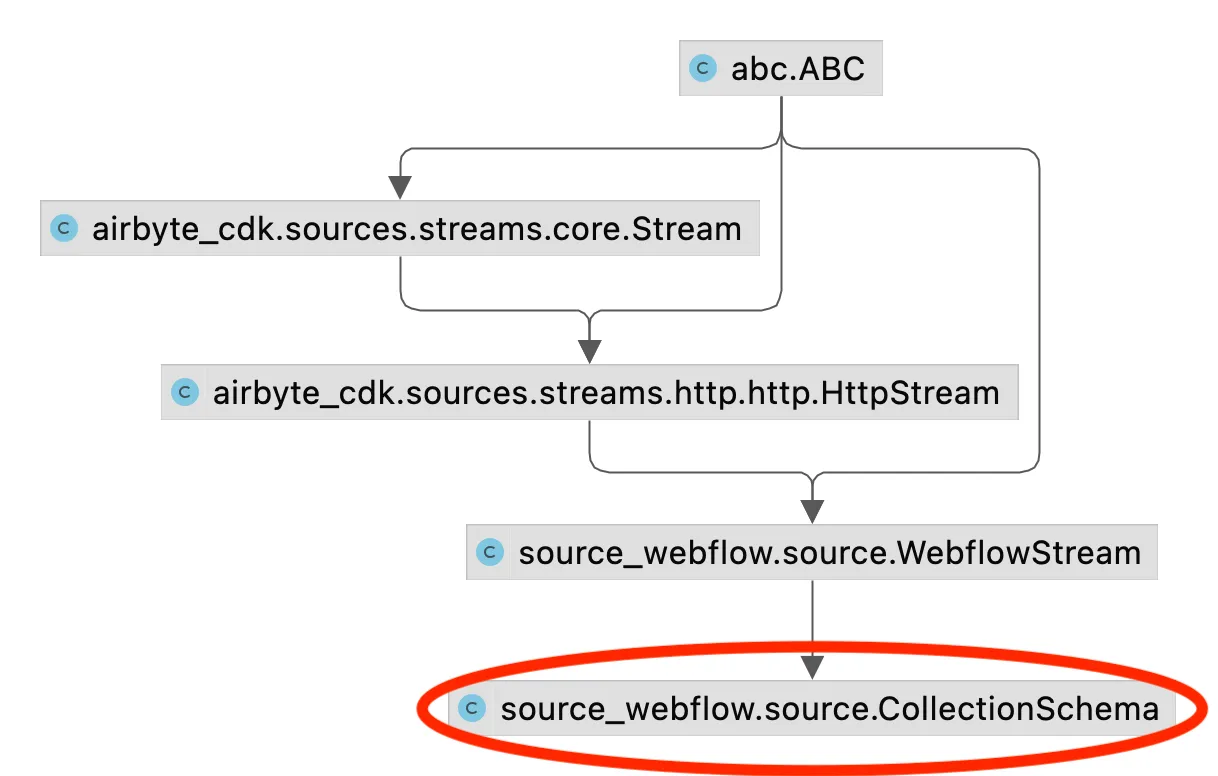
There are a few methods defined in this class which are worth discussing
As mentioned in the API Versions section of Webflow developer documentation, Webflow requires that a field called accept-version is included in the authentication header as follows:
"accept-version: 1.0.0"
As can be seen in auth.py, in order to include the accept-version field in the HTTP request header, the Webflow source connector defines a new class called WebflowTokenAuthenticator, which inherits from the TokenAuthenticator class (defined in token.py). This WebflowTokenAuthenticator class uses a mixin called WebflowAuthMixin to override the default get_auth_header method so that accept-version will be included in the header. The class diagram looks as follows:

The WebflowTokenAuthenticator class is instantiated as an object called auth as follows:
auth = WebflowTokenAuthenticator(token=api_key, accept_version=accept_version)
The auth object created by this call is passed to each stream, and ensures that accept-version will be included in each API request.
The Webflow source connector defines a class called SourceWebflow (defined in source.py) that defines the check_connection method for validating connectivity to Webflow, and that defines a streams method which instantiates and returns streams objects that will be made available in the Airbyte UI and to the end user.
SourceWebflow inherits from the AbstractSource class (defined in abstract_source.py), as shown in the following class diagram.
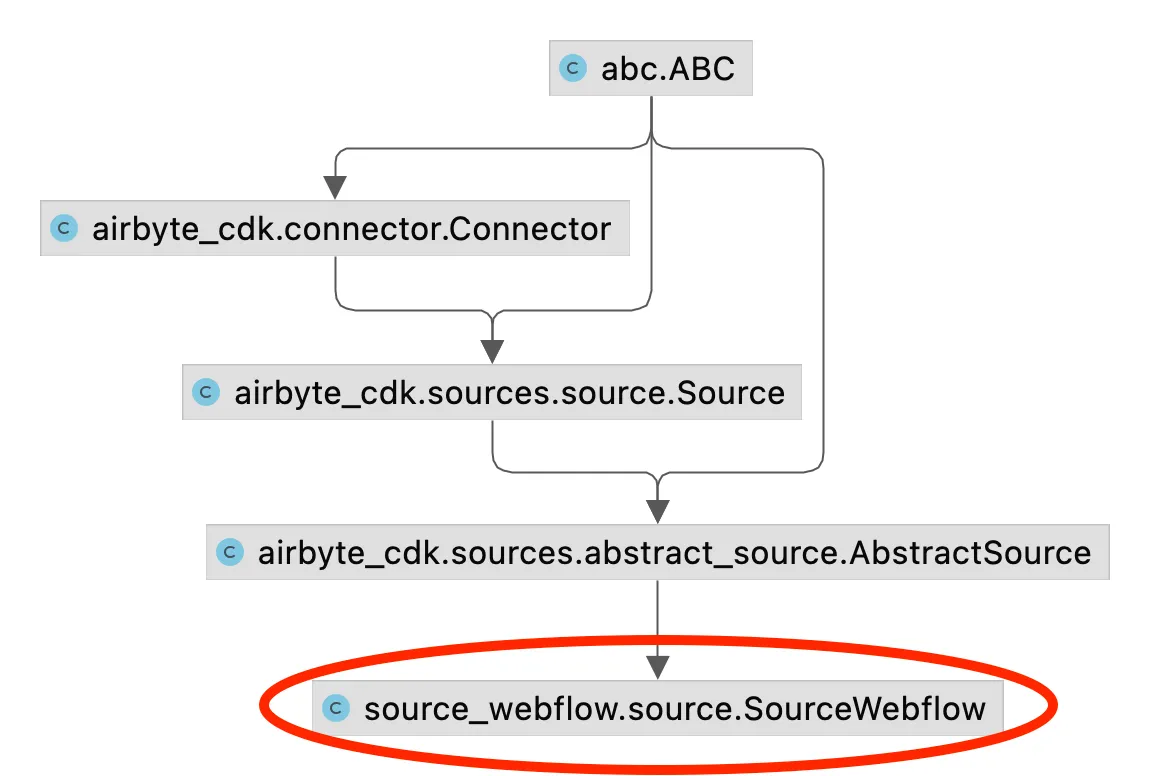
Interesting methods in this class are the following.
You should now have a better idea of how the existing Webflow source connector works, and will now create your own “new” Webflow connector.
Before starting to work on your connector, be sure that your development environment is configured correctly as follows:
The Webflow source connector is available on Airbyte’s github. In this article I will show you how to build a “new” Webflow connector, but for expediency and demonstration purposes, you will copy/paste code from the existing Webflow source connector implementation into your new connector.
ℹ️ The instructions in this section follow along the instructions given in contributing to Airbyte.
If you are developing a connector that you plan on contributing back to the community, then the first step is to check if there is an existing GitHub issue for the proposed connector. If there is no existing GitHub issue, then create a new issue so that other contributors can see what you are working on, and assign the issue to yourself. For example, this GitHub issue was created during the development of this Webflow source connector.
Next, create a fork of Airbyte’s repository. Go to https://github.com/airbytehq/airbyte, and select the fork button as demonstrated in the image below.

This should present you with an option similar to what is shown below, and you can enter in the repository name you will use for the fork of Airbyte’s code. I named my fork airbyte-webflow-source as demonstrated below.
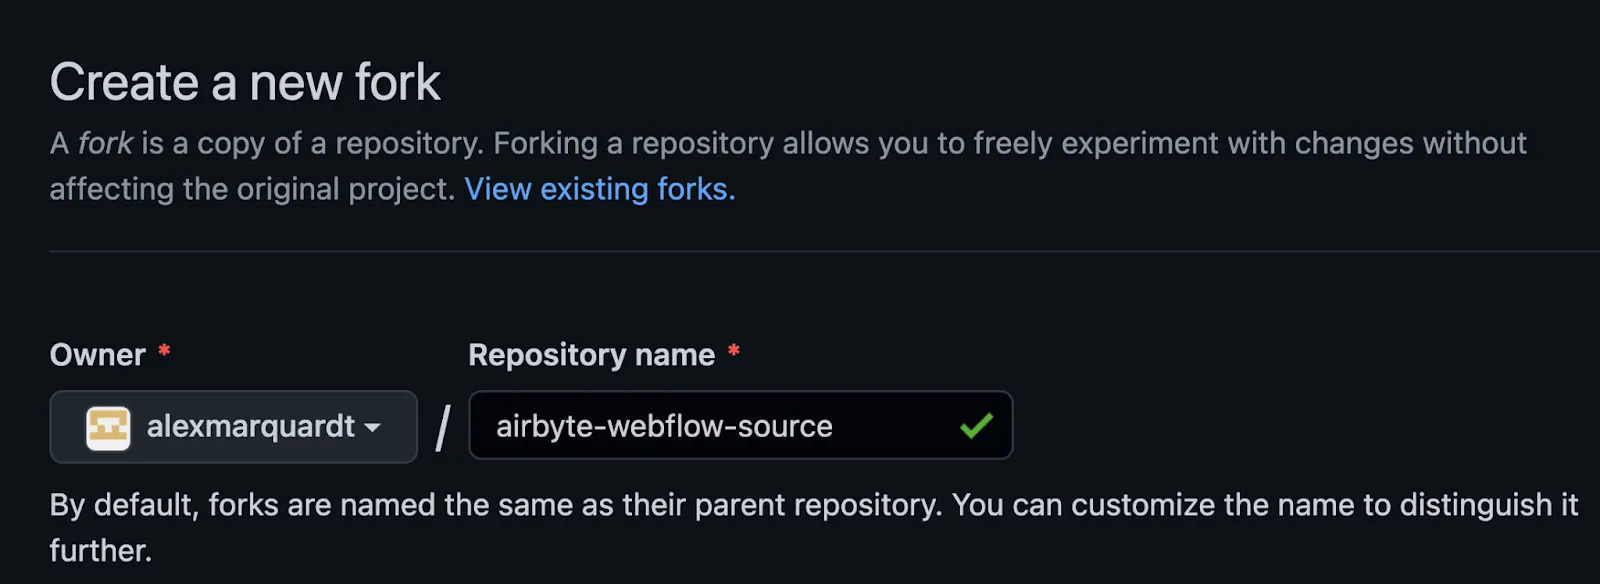
You can then get a copy of the HTTPs path to the forked repository from GitHub as demonstrated below.
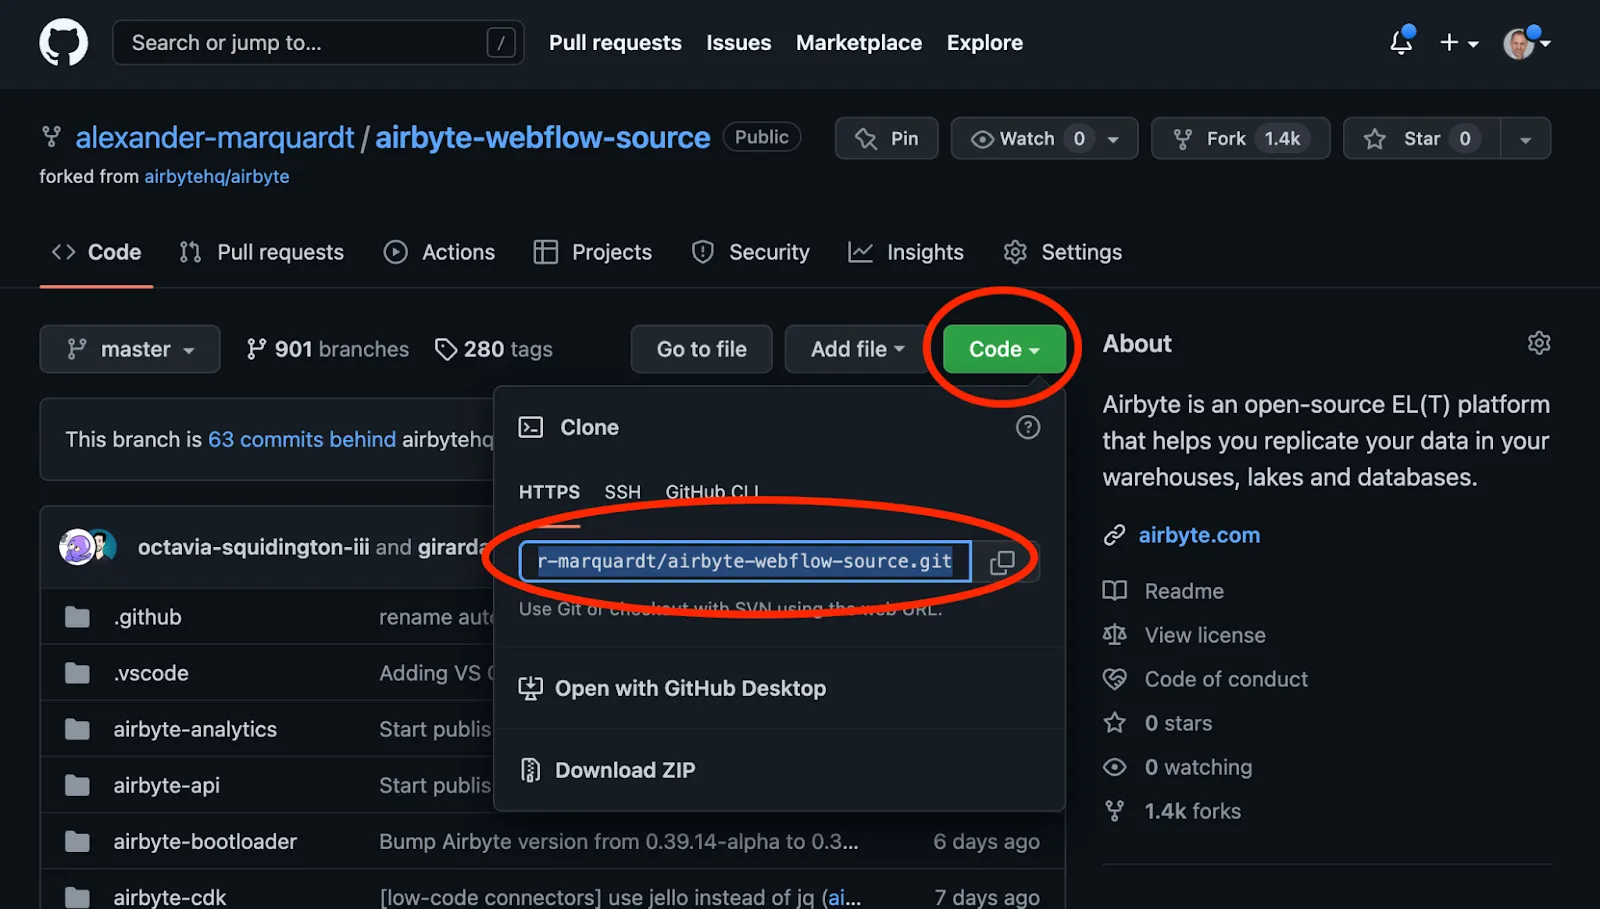
Using the path extracted above, you will then clone the fork to your local host for development. In my case the command I execute to create the clone is as follows:
git clone https://github.com/alexander-marquardt/airbyte-webflow-source.git
Next, create a branch in your local environment as follows:
git checkout -b webflow-dev-branch
In this section, I will guide you through the steps given in Python CDK: Creating a HTTP API Source. The goal of this section is to cover the process for building a custom connector, without re-hashing the specific implementation details of the Webflow source connector. To expedite the creation of a new connector, in the steps given below you will copy/paste code from the Webflow implementation available on GitHub into your new connector.
ℹ️ See the Airbyte protocol to get an idea of the terminology and the interfaces that must be implemented – specifically spec, check, discover, and read. Note that while the specification is Docker-based, almost all development is done directly in Python, and Docker is not needed until the code is ready for final testing.
In order to create a new source connector, run the generator script as instructed in Step 1: Creating the Source as follows:
cd airbyte-integrations/connector-templates/generator
./generate.sh
This command gives an option to select the kind of connector that you are interested in developing. Use the down arrow to select Python HTTP API Source option as shown below:

During the creation of the Webflow connector I entered “webflow” as the name for the Webflow source connector as shown below, but you will choose a different name such as “blog-webflow” in order to avoid a naming conflict with the existing webflow connector.

If you used the name “blog-webflow”, the generator will create a directory such as:
/airbyte-integrations/connectors/source-blog-webflow
The above directory is where you will do most of your development. For the remainder of this document I will refer to this directory as the Webflow source connector directory. This directory is the location where you will execute the spec, check, discover, and read tests that are defined in the Airbyte protocol.
ℹ️ Notice that there is a README.md file in the newly created directory. This contains useful pointers on building and testing your connector.
Next, you will execute Step 2: Install Dependencies from the folder that was created in the previous step.
Create a Python virtual environment as shown below.
python -m venv .venv # Create a virtual environment in the .venv directory
source .venv/bin/activate # enable the venv
Install additional requirements as follows:
pip install -r requirements.txt
In this section you will implement the spec interface that is defined in the Airbyte protocol. The instructions below are based on Step 3: Define Inputs.
Within the newly created Webflow source connector directory (source-blog-webflow), the generator script will have created a subdirectory called source_blog_webflow. This contains a file called spec.yaml, in which you define the parameters that will be required from the user for connecting to the webflow API.
There are two input parameters: site_id, and api_key – you can obtain the values corresponding to your Webflow CMS as described in the Webflow source documentation.
The spec.yaml for the Webflow source connector looks as follows:
documentationUrl: https://docsurl.com/TBD
connectionSpecification:
  $schema: http://json-schema.org/draft-07/schema#
  title: Webflow Spec
  type: object
  required:
    - api_key
    - site_id
  additionalProperties: false
  properties:
    site_id:
      title: Site id
      type: string
      description: "The id of the Webflow site you are requesting data from. See https://developers.webflow.com/#sites"
      example: "a relatively long hex sequence"
      order: 0
    api_key:
      title: API token
      type: string
      description: "The API token for authenticating to Webflow. See https://university.webflow.com/lesson/intro-to-the-webflow-api"
      example: "a very long hex sequence"
      order: 1
      airbyte_secret: true
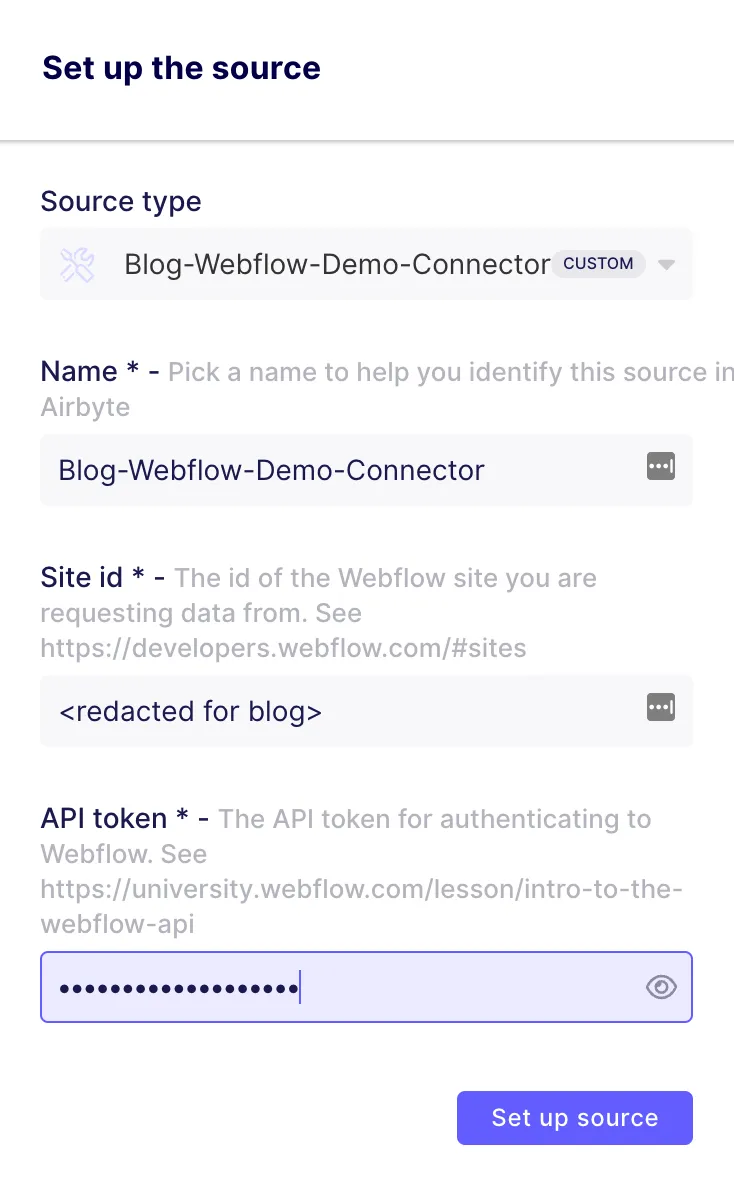
ℹ️ The above spec.yaml will eventually be used to populate the Airbyte UI with a Site ID input and an API token input as shown in the image below. This will be covered in more detail later in this article.
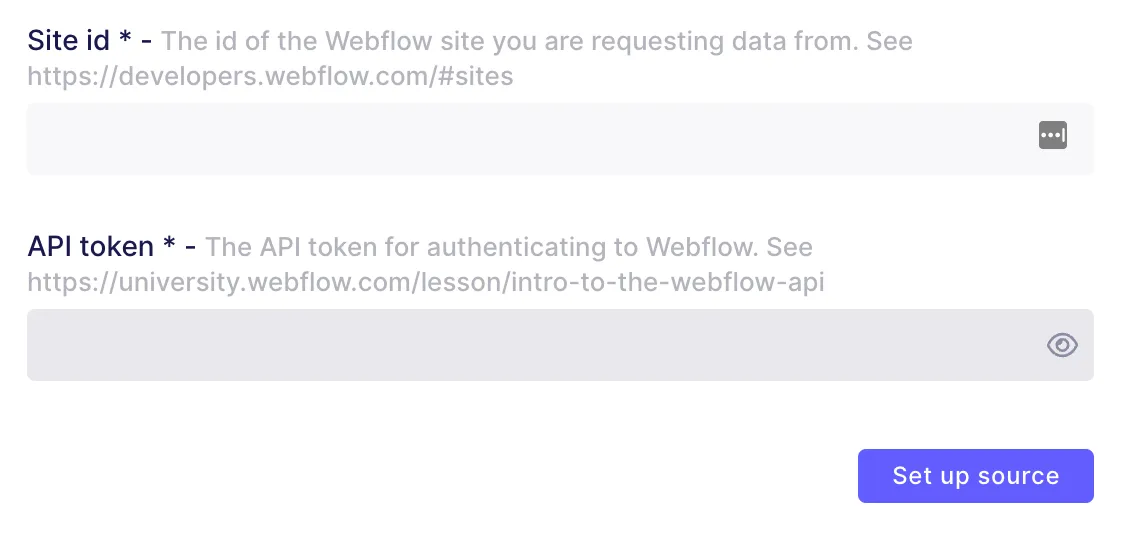
After completing the spec.yaml file, you can execute the following command to ensure that the specification can be read correctly.
python main.py spec
The above command should respond with a json representation of the specification that you provided above, such as:
{"type": "SPEC", "spec": {"documentationUrl": "https://docsurl.com/TBD", "connectionSpecification": {"$schema": "http://json-schema.org/draft-07/schema#", "title": "Webflow Spec", "type": "object", "required": ["api_key", "site_id"], "additionalProperties": false, "properties": {"site_id": {"title": "Site id", "type": "string", "description": "The id of the Webflow site you are requesting data from. See https://developers.webflow.com/#sites", "example": "", "order": 0}, "api_key": {"title": "API token", "type": "string", "description": "The API token for authenticating to Webflow. See https://university.webflow.com/lesson/intro-to-the-webflow-api", "example": "", "order": 1, "airbyte_secret": true}}}}}
In this section you will invoke the check interface that is defined in the Airbyte protocol. The instructions below are based on Step 4: Connection Checking.
If you look in the source_blog_webflow subdirectory, you will see that the generate.sh script has created a file called source.py which includes a class called SourceBlogWebflow with a skeleton check_connection method already defined. The check_connection method will be used to validate that Airbyte can connect to the Webflow API.
In order to validate connectivity to the API, the check functionality must be supplied with input values for the fields specified in spec.yaml – because you are still running Airbyte without the full UI functionality, the input parameters will be passed in via a configuration file for now. In the Webflow source connector directory, the secrets/config.json file will look as follows:
{
 "site_id": "",
 "api_key": ""
}
You can get your site_id and api_key as instructed in the Webflow source documentation. Next, verify that the configuration conforms to your spec.yaml by executing the following command from the Webflow source connector directory:
python main.py check --config secrets/config.json
Which should respond with the following:
{"type": "LOG", "log": {"level": "INFO", "message": "Check succeeded"}}
{"type": "CONNECTION_STATUS", "connectionStatus": {"status": "SUCCEEDED"}}
If you look at the default implementation of the check_connection method in your local copy of source.py, you will see that it returns True, None regardless of the status of the connection – in other words, the connection to Webflow hasn’t actually been verified yet.
The source connector must receive a valid response from Webflow in order to validate (aka “check”) connectivity. In order to execute a real API call, you can copy the existing auth.py, source.py, and webflow_to_airbyte_mapping.py files into your local source_blog_webflow sub-directory.
ℹ️ Because implementation details of the Webflow source connector were discussed earlier in this article, I do not discuss them again in this section.
After copying the files, be aware that the original connector has some classes in source.py that will need to be re-named to match the connector name that was entered when you executed the generator script. For example, assuming you called your connector blog-webflow then:
Next, re-run the check as before to confirm that the connector can connect to your Webflow site:
python main.py check --config secrets/config.json
If all goes well, you will see a successful response such as the following:
{"type": "LOG", "log": {"level": "INFO", "message": "Check succeeded"}}
{"type": "CONNECTION_STATUS", "connectionStatus": {"status": "SUCCEEDED"}}
In this step you will validate the discover interface that is defined in the Airbyte protocol. The instructions below are based on Step 5: Declare the Schema.
ℹ️ As discussed earlier, the schema for the Webflow streams are automatically created by the connector, and therefore you do not need to manually define any schemas.
Execute the discover command as follows to see what the generated schemas look like:
python main.py discover --config secrets/config.json
The response will include the schema for each Webflow collection. When I run this command the response is hundreds of lines long. Your output should be similar to the (heavily redacted) output shown below:
{"type": "CATALOG", "catalog": {"streams": [{"name": "Data Champions", "json_schema": {"$schema": "http://json-schema.org/draft-07/schema#", "additionalProperties": true, "type": "object", "properties": {"seo-title-tag": {"type": ["null", "string"]} ... ... "supported_sync_modes": ["full_refresh"]}]}}
You are now ready to read data from the get collection items API. In this section you will validate the read interface defined in the Airbyte protocol. The instructions below are based on the instructions in Step 6: Read Data.
Create a new folder called sample_files and add a configured_catalog.json file to this folder to specify which collections you are interested in pulling from Webflow. Because I know that there is a collection called Blog Authors in Airbyte’s Webflow site, I specify the configured_catalog.json as follows:
{
 "streams": [
   {
     "stream": {
       "name": "Blog Authors",
       "json_schema": {
       }
     },
     "sync_mode": "full_refresh",
     "destination_sync_mode": "overwrite"
   }
 ]
}
This configured_catalog.json can be used to read the Blog Authors collection by executing the following command:
python main.py read --config secrets/config.json --catalog sample_files/configured_catalog.json
Which should respond with several json records corresponding to the contents of the Blog Authors collection, similar to the following:
{"type": "RECORD", "record": {"stream": "Blog Authors", "data": {"email": "email1@airbyte.io", …  }}}
{"type": "RECORD", "record": {"stream": "Blog Authors", "data": {"email": "email2>@airbyte.io", …  }}}
… etc…
{"type": "LOG", "log": {"level": "INFO", "message": "Read 19 records from Blog Authors stream"}}
{"type": "LOG", "log": {"level": "INFO", "message": "Finished syncing Blog Authors"}}
{"type": "LOG", "log": {"level": "INFO", "message": "SourceWebflow runtimes:
Syncing stream Blog Authors 0:00:01.592318"}}
{"type": "LOG", "log": {"level": "INFO", "message": "Finished syncing SourceWebflow"}}
Up until now, you have been running the Webflow source connector as a Python application, and to some degree you have been simulating how the connector will function inside Airbyte. However, Airbyte is a docker-based specification, and to really make use of your connector code, you need to build a docker container as specified in Step 7: Use the Connector in Airbyte.
Ensure that you have installed Docker and have the docker daemon running. Then within the Webflow source connector directory (source-blog-webflow) you will build a new docker container as follows:
docker build . -t airbyte/source-blog-webflow:dev
Execute the following command to verify that the new image has been created:
docker images
Which should respond with something similar to the following:

You can test the container that you just created is working as expected by executing the following commands:
docker run --rm airbyte/source-blog-webflow:dev spec

docker run --rm -v $(pwd)/secrets:/secrets airbyte/source-blog-webflow:dev check --config /secrets/config.json

docker run --rm -v $(pwd)/secrets:/secrets airbyte/source-blog-webflow:dev discover --config /secrets/config.json

docker run --rm -v $(pwd)/secrets:/secrets -v $(pwd)/sample_files:/sample_files airbyte/source-blog-webflow:dev read --config /secrets/config.json --catalog /sample_files/configured_catalog.json
You are now ready to “write” unit tests to test the connector. The generator script will have created a unit_tests directory in your Webflow source connector directory. Copy the contents of test_source.py and test_streams.py from GitHub into your local unit_tests directory, and ensure that the copied tests refer to the correct class names corresponding to the name that you gave in the generator script. For example, if you entered the name blog-webflow when you executed the generator script, then:
Be sure to remove the file test_incremental_streams.py from the unit_tests folder, as this connector does not implement any incremental functionality. Also, be sure to install the test dependencies into your virtual environment by executing:
pip install '.[tests]'
ℹ️ if you are using zsh/OSX, .[tests] must be wrapped in single quotes as shown above. If using a different shell, the single quotes are not required – most Airbyte documentation shows the above command without the single quotes.
Then execute the unit tests
python -m pytest -s unit_tests
Which should respond with
Results (0.19s):
      12 passed
There are several other tests that will need to be written before submitting your connector. You should follow the additional instructions for testing connectors.
If you have not previously done so, you can start Airbyte by switching to the root Airbyte directory (in my case /Users/arm/Documents/airbyte-webflow-source/) and then run the following:
docker compose up
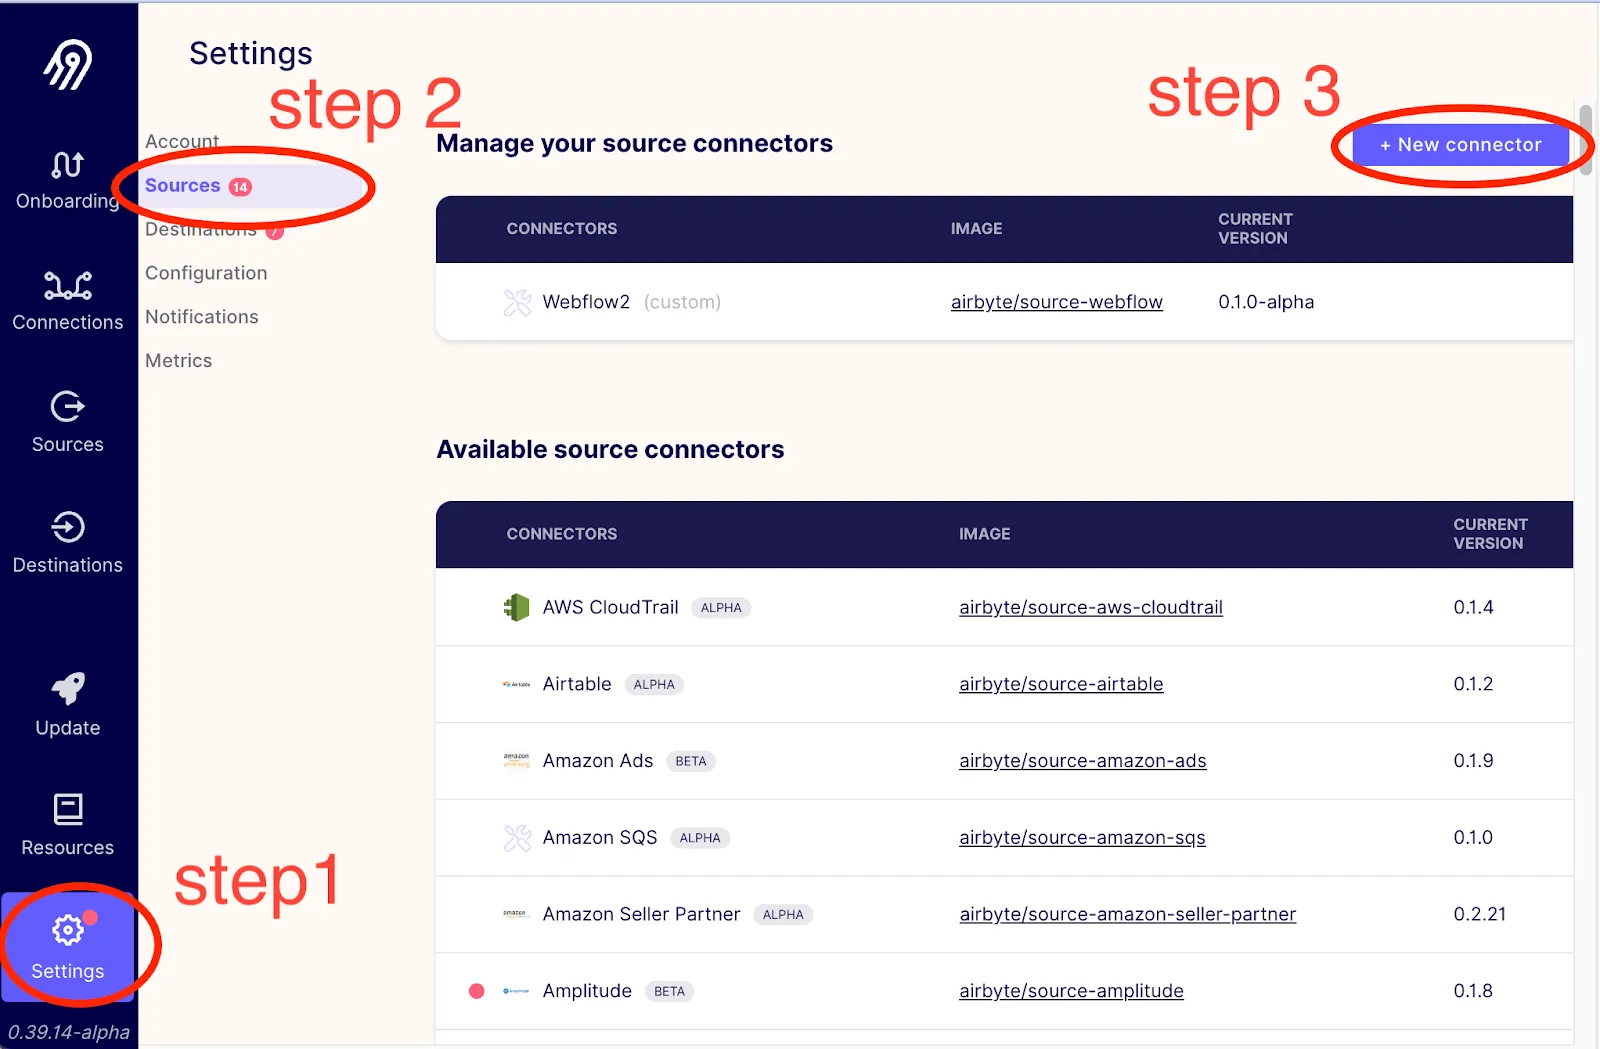
After a few minutes, you will be able to connect to http://localhost:8000 in your browser, and should be able to import the new connector into your locally running Airbyte. Go to Settings → Sources → + New connector as shown below.
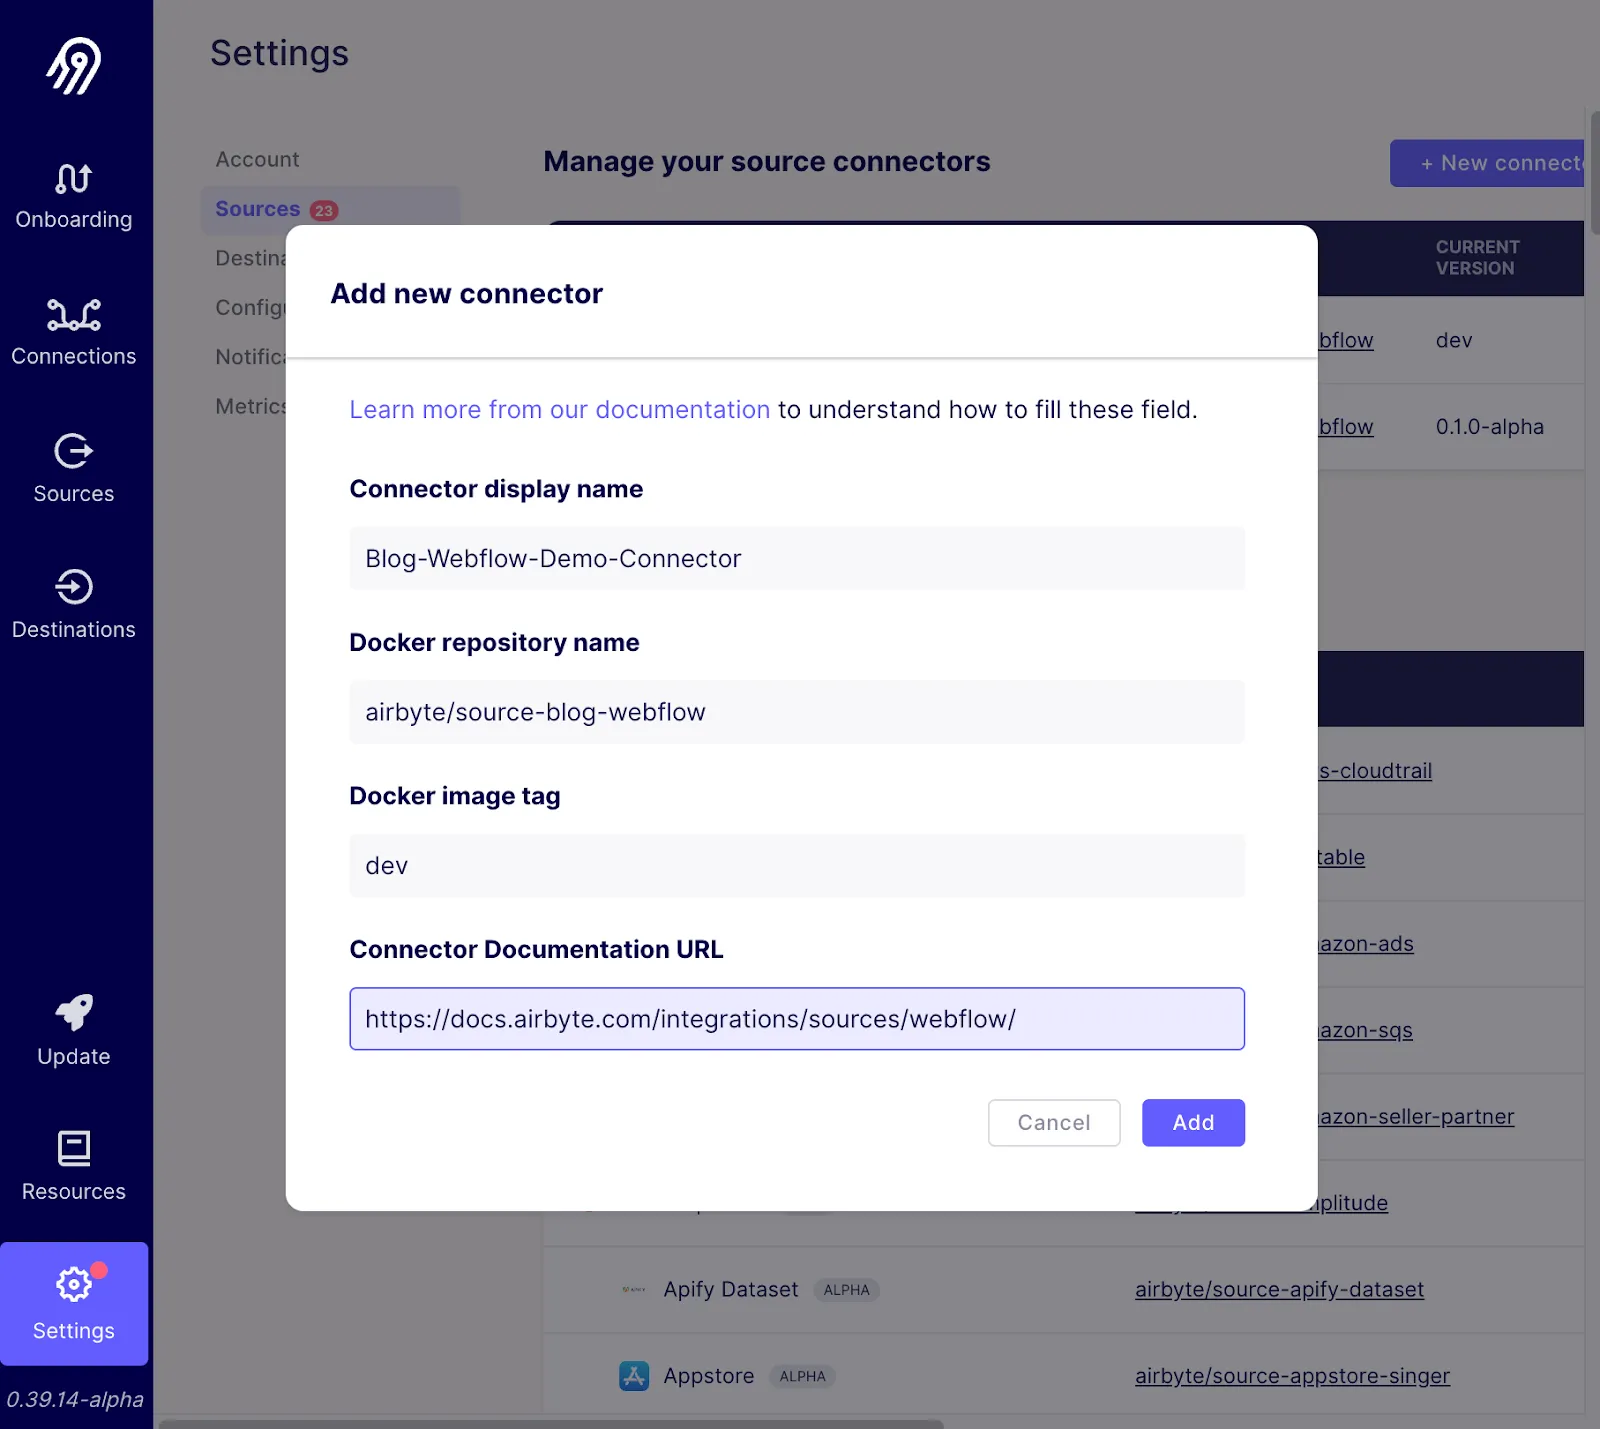
From here you should be able to enter in the information about the docker container that you created as shown in the pop-up below, and by then pressing the Add button.
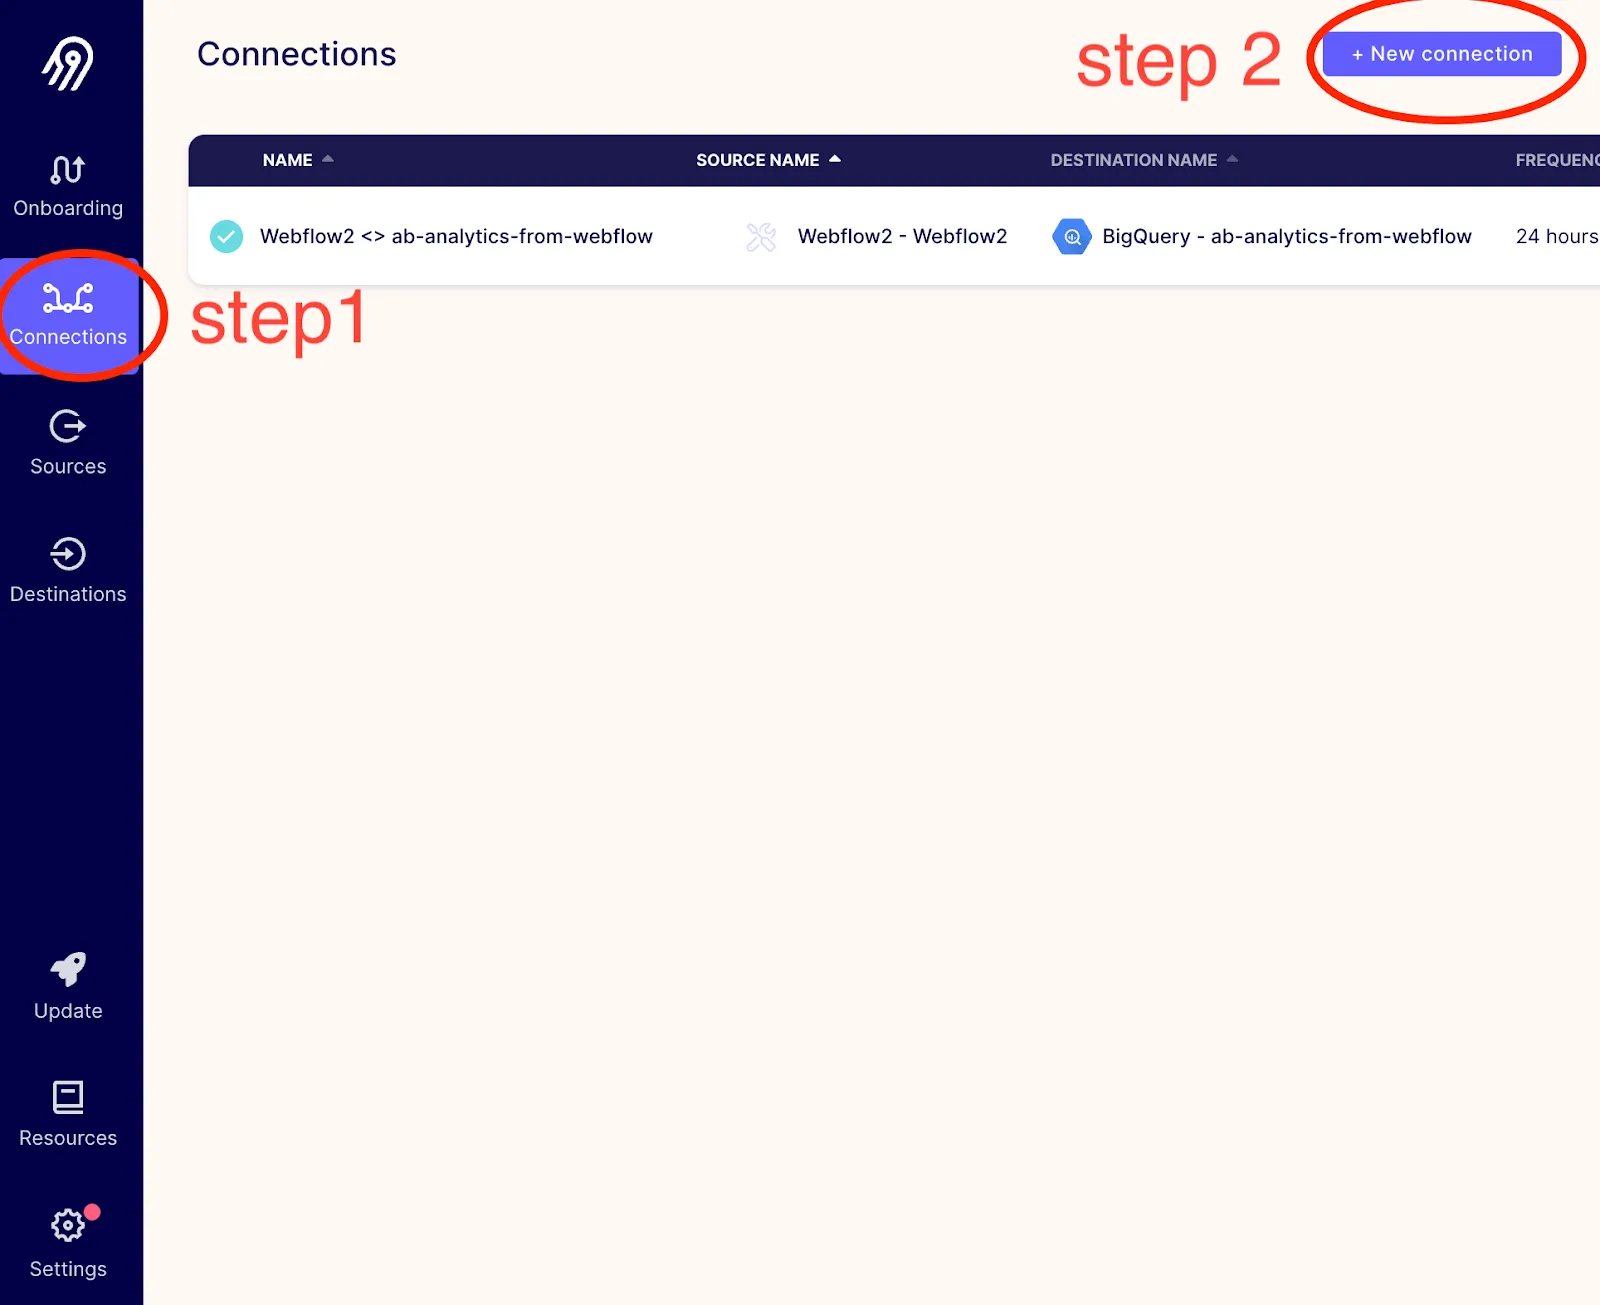
You should now be able to create a new connection (source connector + destination connector) that uses your Webflow source connector, by clicking in the UI as demonstrated below:
Select the Webflow connector that you created as follows.

And from there you will be requested to enter in the Site id and API token as follows:
Once the source has been created you will be asked to select a destination. You may wish to export Webflow data to a local CSV file, backup Webflow data into S3, or extract Webflow data to send into BigQuery, etc. – the list of supported destinations is long and growing.
Below I show how to replicate Webflow collections to a local json file.
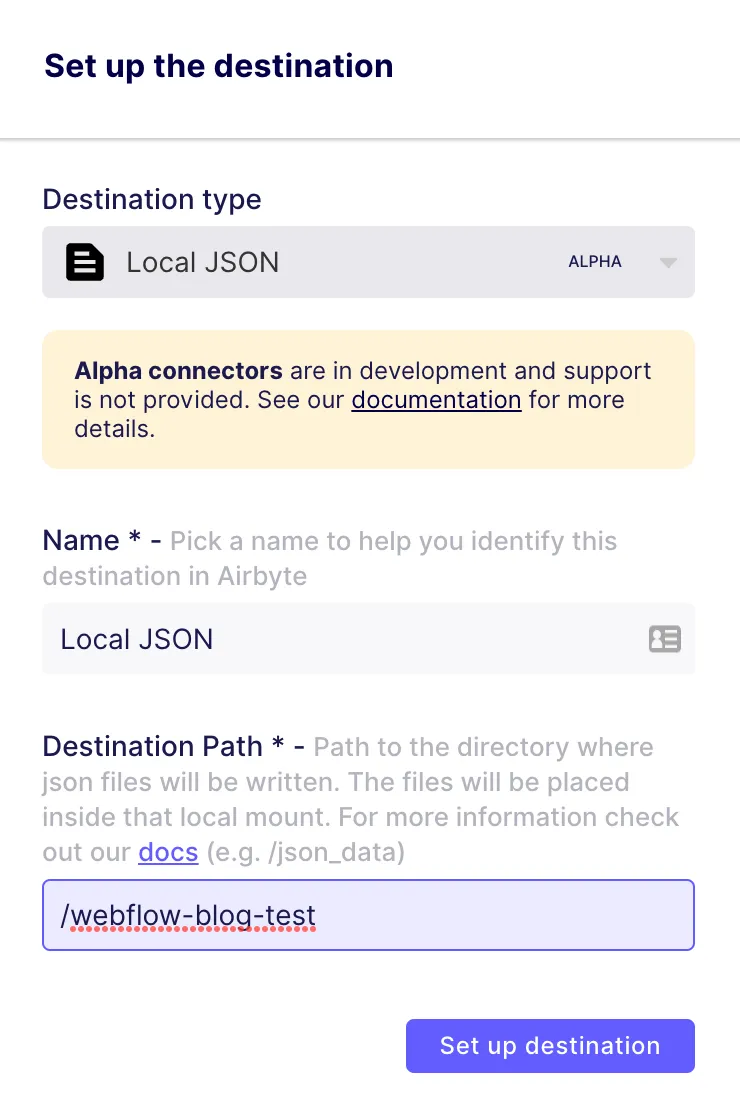
This tells Airbyte to output json data to /tmp/airbyte_local/webflow-blog-test. You will then be presented with a screen that allows you to configure the connection parameters as follows:
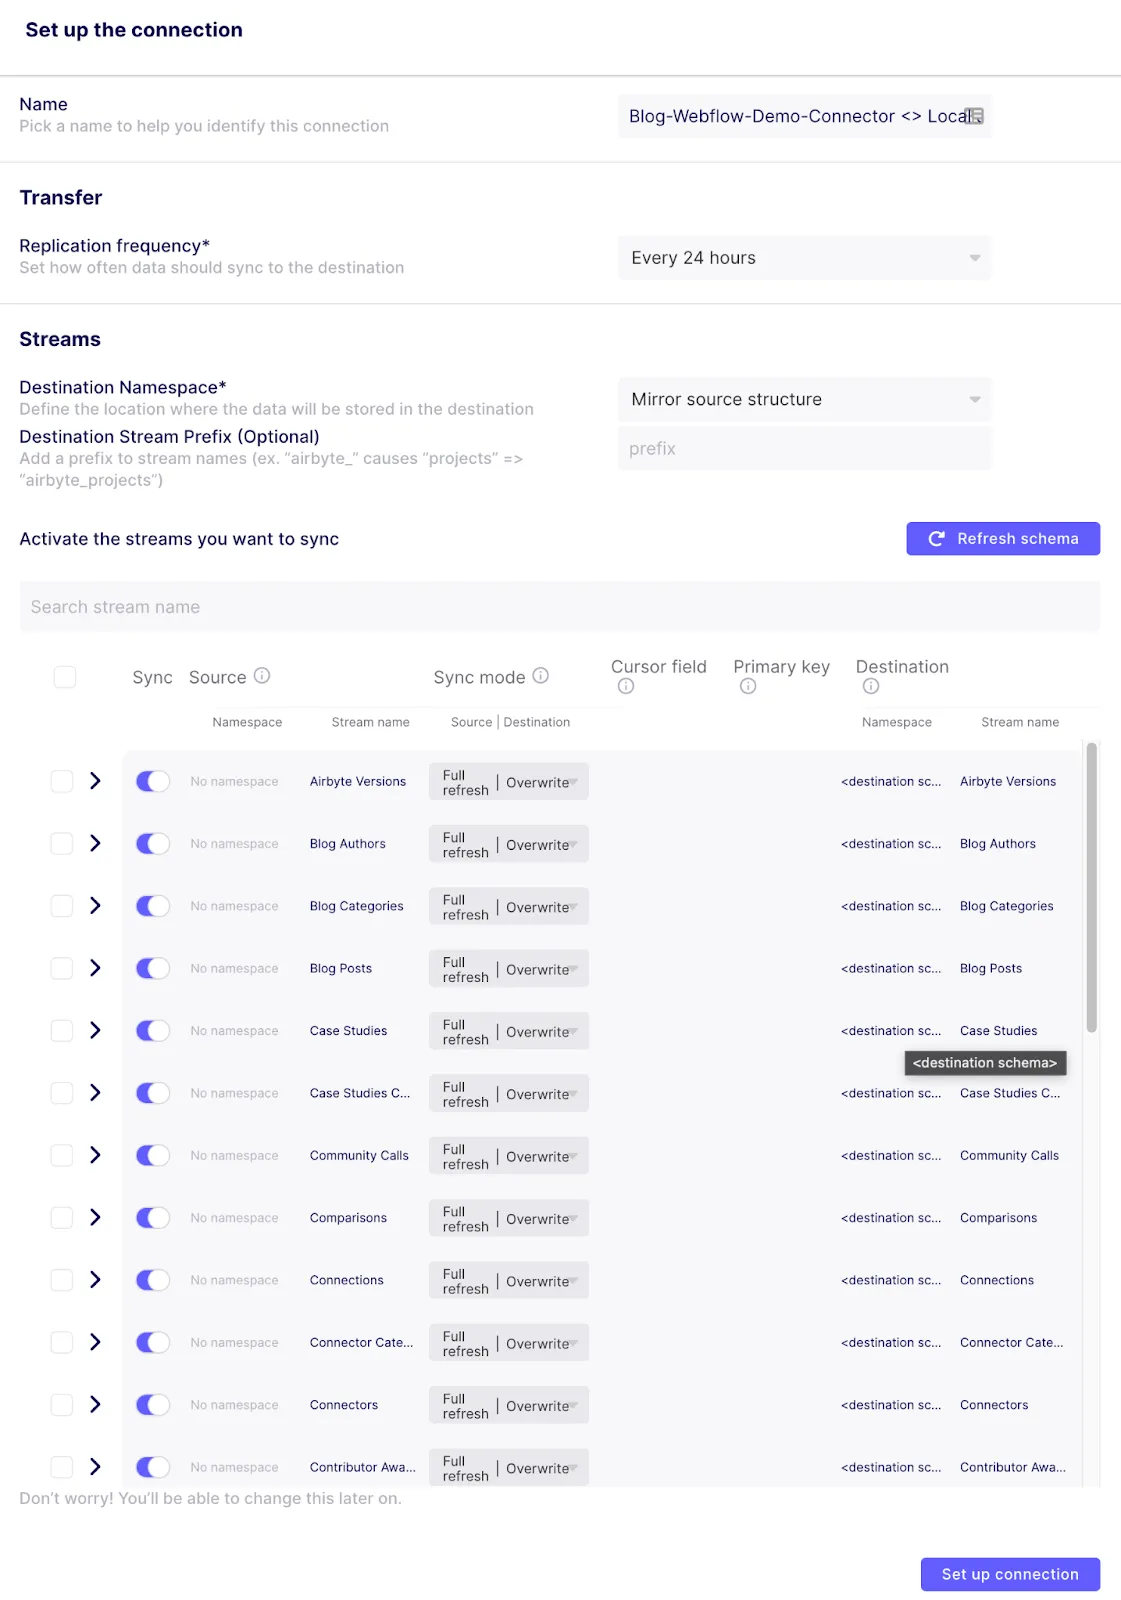
Notice that there are many stream names available, all of which were dynamically generated based on the collections that are available in Webflow. Using the switch on the left side allows you to specify which of these streams you are interested in replicating to your output. For this demonstration, you may leave all settings with their default value, and then click on the Set up connection button in the bottom right corner.
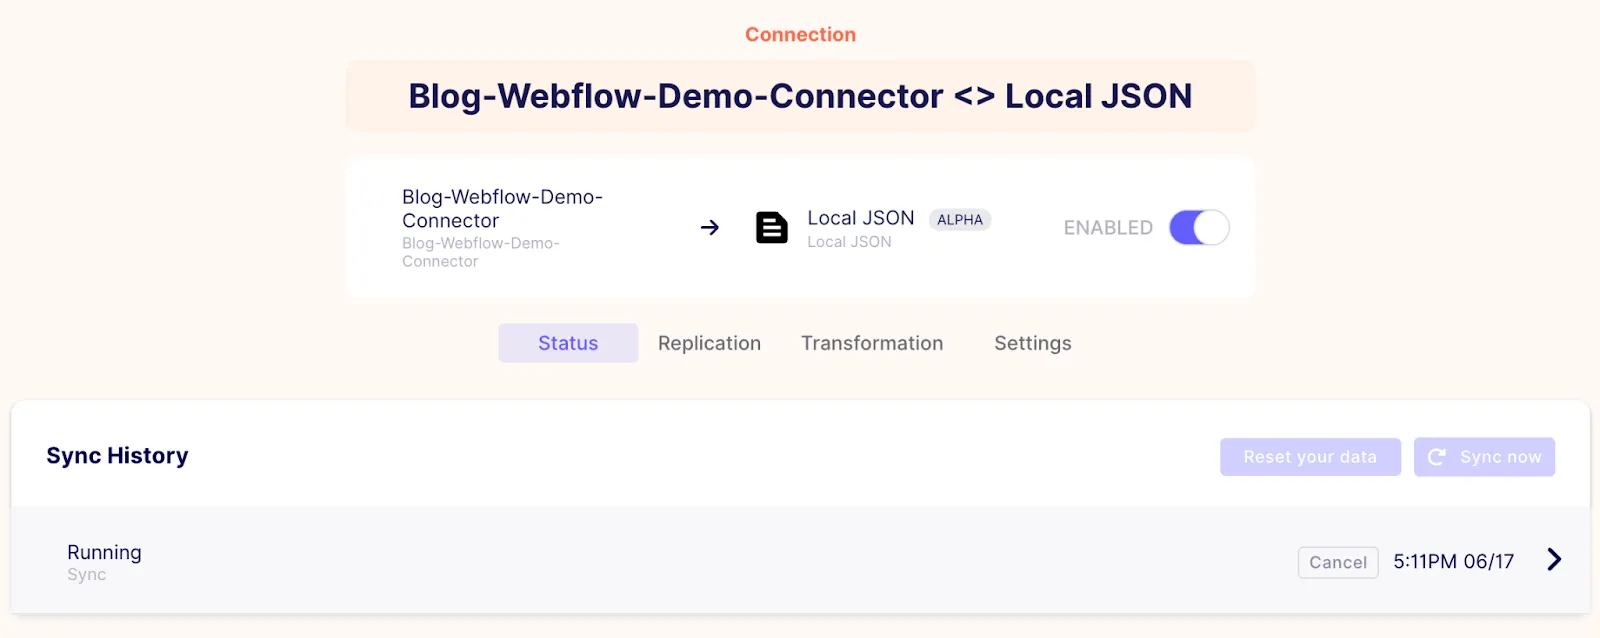
Once this is done, you will see that the first sync has already started as follows:
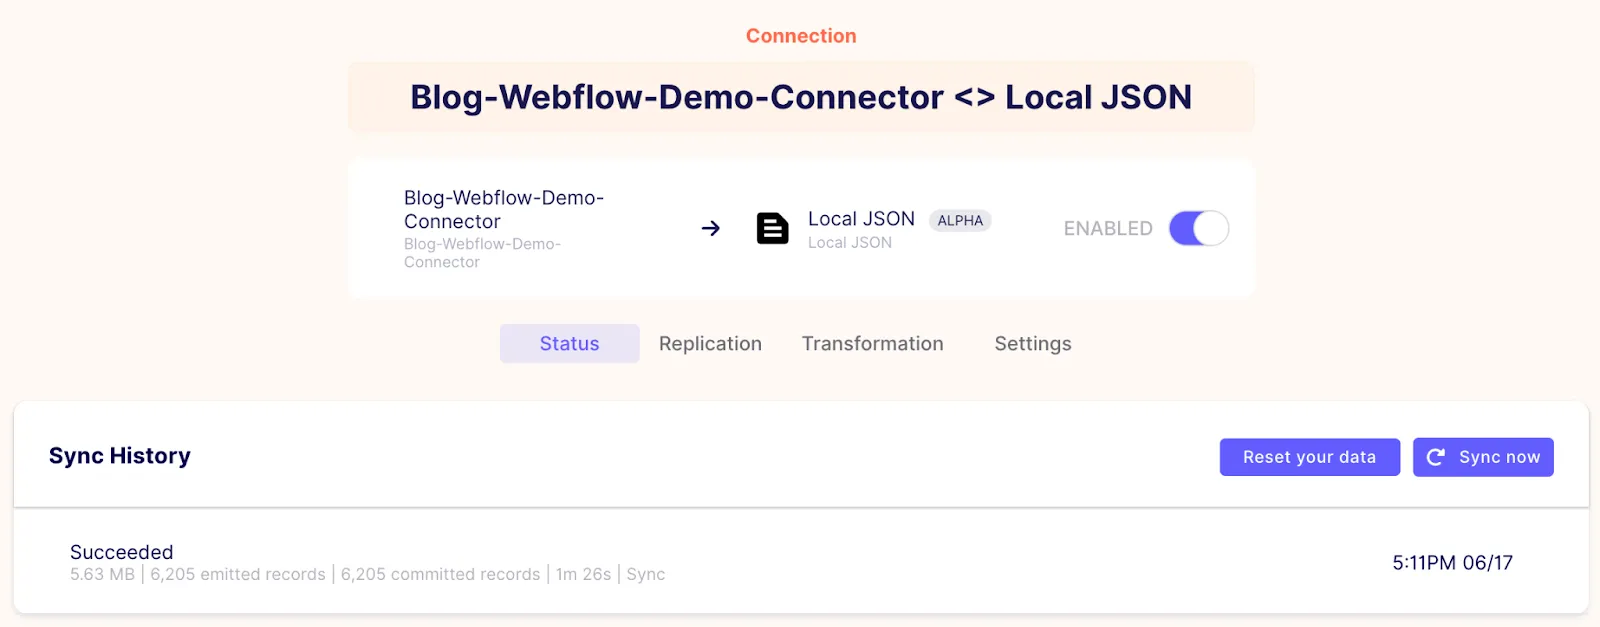
And after a few minutes, if everything has gone as expected, you should see that the connection succeeded as follows:
You can then look in the local directory at /tmp/airbyte_local/webflow-blog-test to verify that several json files have been created, with each file corresponding to a Webflow collection. In my case, the output looks as follows:

This confirms that all of the collections have been pulled from Webflow, and copied to a directory on my local host!
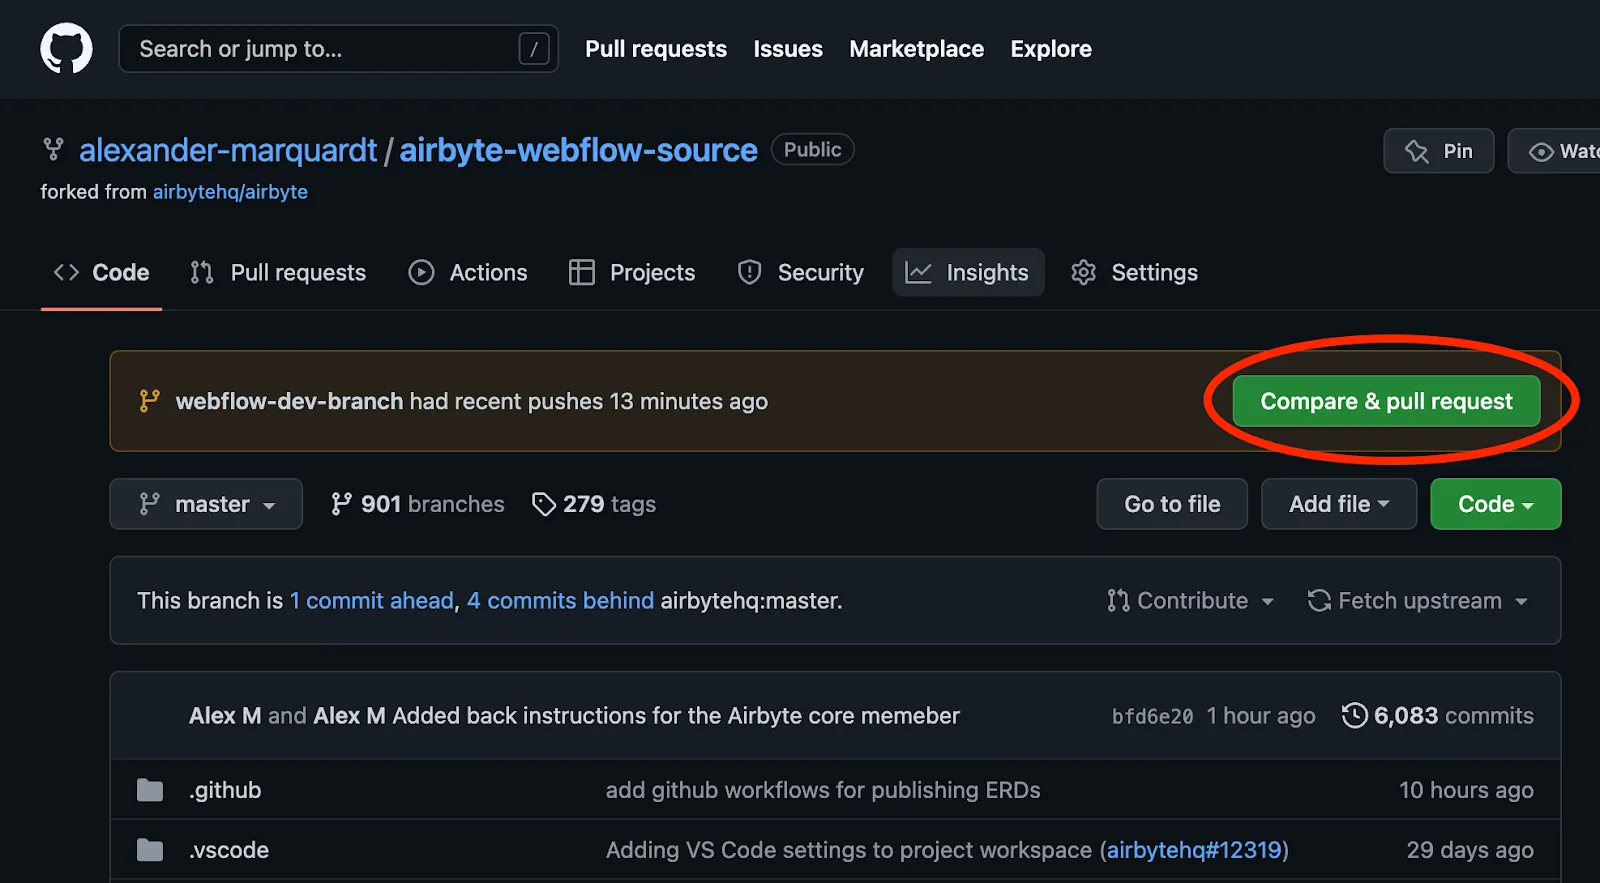
Assuming that you wish to contribute your connector back to the Airbyte community, once you have validated that your connector is working as expected, you can push your local branch to github and then click on the Compare & pull request button, as shown in the image below:
After you have created a pull request, one of Airbyte’s engineers will work with you to get your connector merged into the master branch so that it can be distributed and used by others.
Because of the open source nature of Airbyte, it is relatively easy to create your own connectors. In this article I presented the Webflow source connector implementation as an example of how to create a custom Airbyte source connector written in Python. Topics that I covered include authentication, pagination, dynamic stream generation, dynamic schema generation, connectivity checking, parsing of responses, and how to import a connector into the Airbyte UI.
If you are not able to find an existing source connector to meet your requirements, you can fork the Airbyte Github repo and build your own custom source connector – the steps that I have presented in this article should be generalizable to a large number of API data sources.
With Airbyte, the data integration possibilities are endless, and we can't wait to see what you will build! We invite you to join the conversation on our community Slack Channel, to participate in our discussions on Airbyte’s discourse, or to signup for our newsletter.
Alex is a Data Engineer and Technical writer at Airbyte, and was formerly employed as a Product Manager and as a Principal Consulting Architect at Elastic. Alex has an MBA from the IESE Business School in Barcelona, and a Masters degree in Electrical Engineering from the University of Toronto. Alex has a personal blog at https://alexmarquardt.com.
Alex is a Data Engineer and Technical writer at Airbyte, and was formerly employed as a Product Manager and as a Principal Consulting Architect at Elastic. Alex has an MBA from the IESE Business School in Barcelona, and a Masters degree in Electrical Engineering from the University of Toronto. Alex has a personal blog at https://alexmarquardt.com.
Download our free guide and discover the best approach for your needs, whether it's building your ELT solution in-house or opting for Airbyte Open Source or Airbyte Cloud.

Learn how to use Airbyte’s Python CDK to write a source connector that extracts data from the Webflow API.