Agent Engine Public Beta is now live!
Learn how to ingest and transform Github and Slack data with SQL and Python-based transformations.
Published on Feb 17, 2022
Summarize this article with:

Once you get data from your sources into your data warehouse, you’ll likely want to transform it in some way. Airbyte includes a built-in integration to run a dbt project after a single sync completes, but what if your dbt project depends on data from multiple different sources, or you want to transform your data using languages other than SQL?
Juggling these sorts of dependencies can quickly become a huge operational burden, leaving you with no single place to go to understand how each piece of your data platform interacts with the others. Dagster makes it easy to encode the interactions between your different tools, execute workflows on a schedule or ad-hoc, and view rich historical records of every run in a single unified place.
In this recipe, we’ll build a Dagster job that combines data from both Slack and Github together into a single metric (using Airbyte + dbt), then fits a predictive model to that transformed data (using Python). Dagster has deep integrations with both Airbyte and dbt, which go beyond just kicking off runs in these external environments, giving visibility into the tables that are produced using these tools.
This recipe will demonstrate how you can combine the flexibility of Python with the power of modern data stack tools, and view all the important metadata across these different domains.
First, we’ll want to get Dagster running on our local machine. Dagster is completely open source and free to use, with no need to create an account. Dagster comes with a UI tool, Dagit, which can be used to view and run your jobs. Dagster allows you to write Python code to define data pipelines as a series of interdependent steps. To get you started, the source code used for this demo is available on Github:
git clone https://github.com/OwenKephart/airbyte_demo.git
Once you have the code, you can install all the required dependencies (including Dagster and Dagit) using pip.
cd airbyte_demopip install -e .
To make sure that everything is working properly, navigate to the directory you just cloned, and run:
dagit -f airbyte_demo/slack_github_analytics.py
This will spin up a local Dagit instance in your browser, which should look something like:
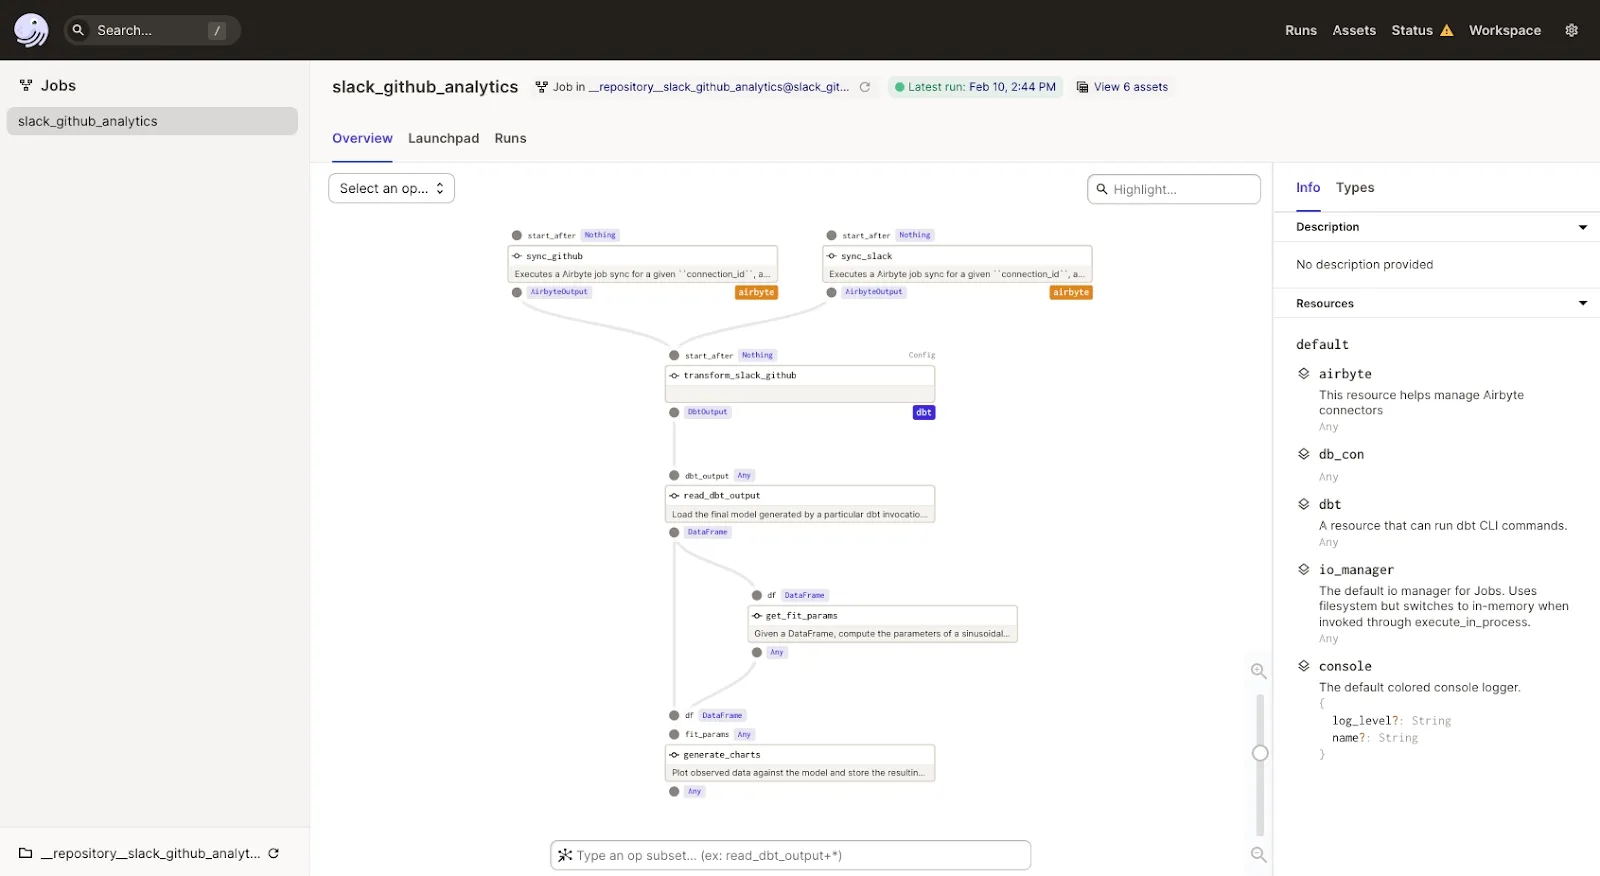
This contains a single data pipeline (called a “job” in Dagster), which is named “slack_github_analytics”. Already, you get a rich set of information about the steps in this job, the types of their inputs and outputs, and how they connect to each other.
However, if you try running this job right now, you’ll quickly hit an error, as we haven’t actually set up the Airbyte connections that this job is meant to update, so let’s do that now.
You can run Airbyte to configure data replication jobs from applications like Github and Slack to databases like Postgres. You can easily install Airbyte with Docker Compose and access the UI locally at http://localhost:8000:
$ git clone https://github.com/airbytehq/airbyte.git$ cd airbyte$ docker-compose up
Download our free guide and discover the best approach for your needs, whether it's building your ELT solution in-house or opting for Airbyte Open Source or Airbyte Cloud.

If you already have some Airbyte connections set up for other purposes, feel free to use those instead! All you need for this demo to work is the Airbyte connection ids. However, if you’re starting from scratch, or just want to follow along, read on.
While in reality, you’d probably want to ingest data into a cloud data warehouse such as Snowflake, we’ll use Postgres for this demo so you can run it entirely on your laptop. You can use docker to quickly get an empty Postgres database running on your local machine:
docker pull postgresdocker run --name airbyte-demo -p 5432:5432 -e POSTGRES_PASSWORD=password123 -d postgres
This will create a Postgres database with a user named “postgres”, whose password is “password123”. Once this is up and running, you can set up an Airbyte destination for this local instance:
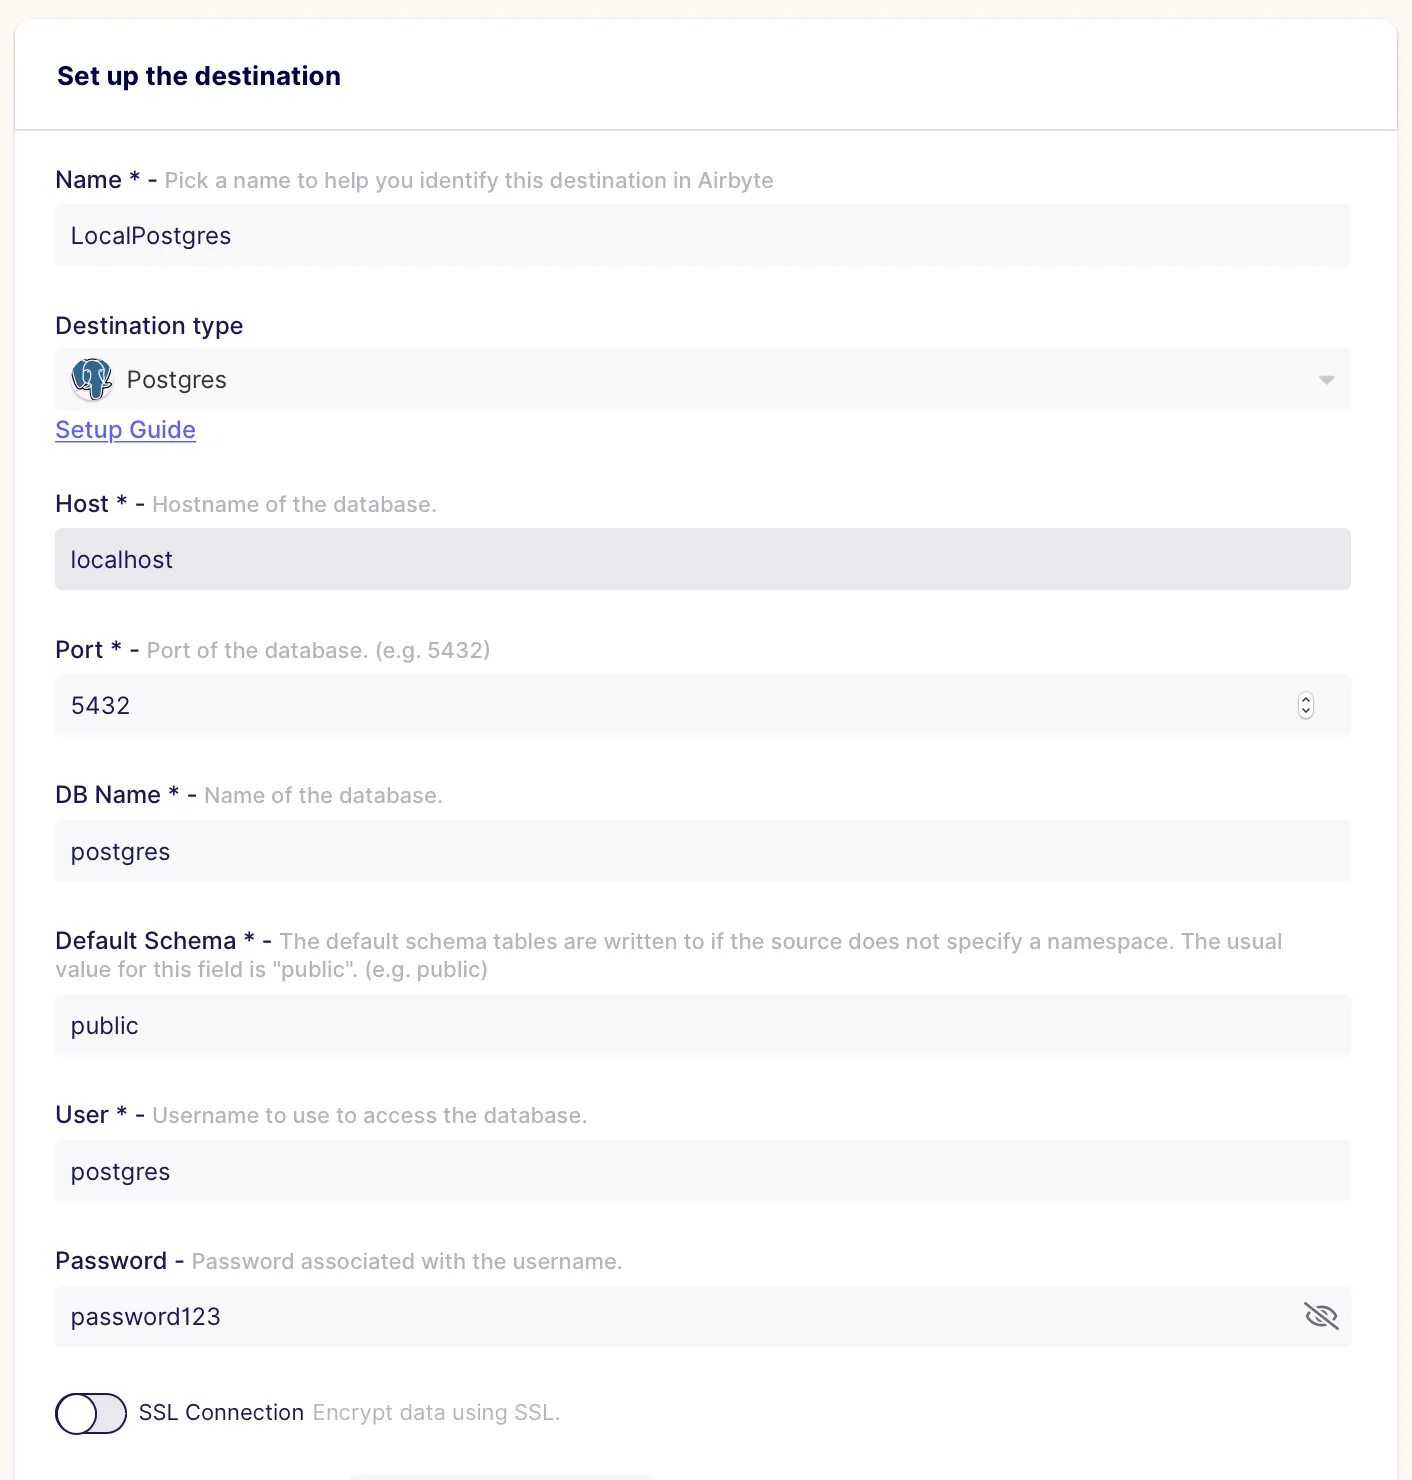
Just hit “Set up connection” at the bottom of the page, and you’re good to go.
Now that we have a destination to load our data, we’ll set up some data sources. For our first source, we’ll sync information about the commits to the Dagster Github repository. Full details on how to set up this source can be found here, but your configuration should look something like this:

This just points you at the official Dagster github repository, and sets a date for the earliest commit we want to ingest (just so that the initial sync doesn’t take too long). This uses a Github personal access token for authentication, which can be generated by following the instructions here, if you don’t already have one.
Once the source is set up, we can create a connection to create a data ingestion pipeline to load data from Github to Postgres:
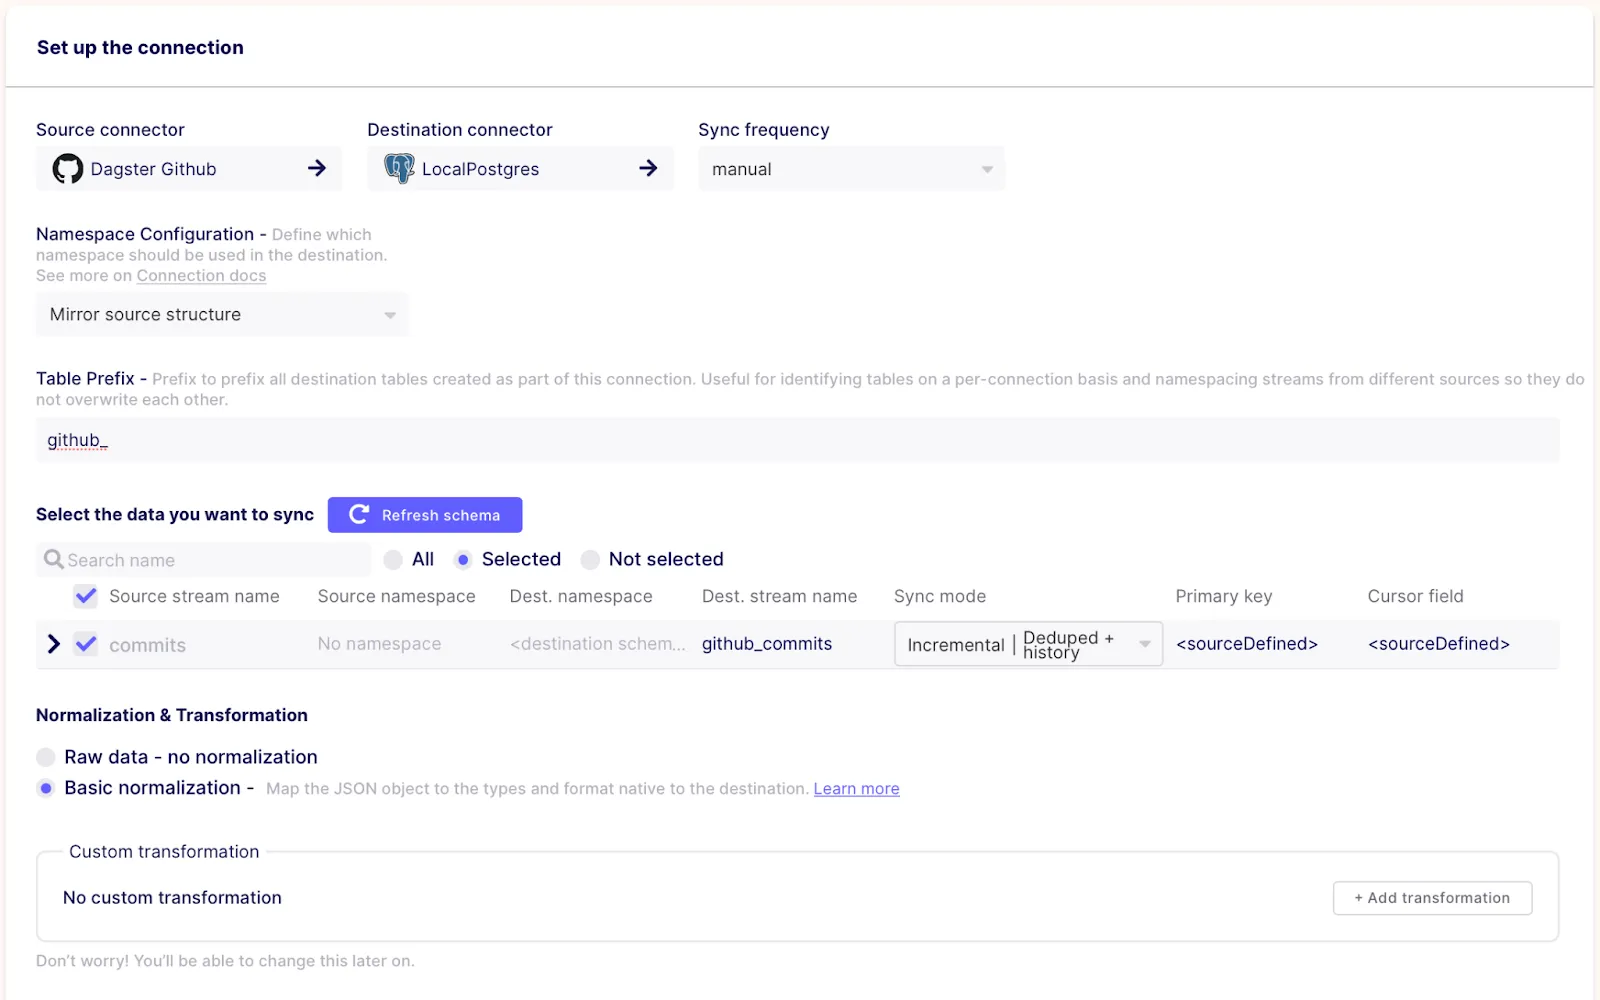
The most important bits here are to set the “Sync frequency” (at the top) to “manual”, as Dagster will handle triggering runs for this connection, and to select only the “commits” table (we won’t need data from any of the other streams). We also prefix the tables with “github_” to make it easier to tell where our data is coming from, and set this stream to “incremental” to make subsequent syncs more efficient.
Our second source is the public Dagster Slack, where we’ll ingest the messages sent to one of our public channels.
If you’re following along, you can just read from whatever Slack channels you have access to, and if you don’t have easy access to a Slack API token, feel free to skip this entirely and replace the `slack_github_analytics.py` file in the Dagster code you cloned with `github_analytics.py`.
Once again, full instructions for setting up this source and generating a token can be found in the Airbyte docs, but your configuration should end up looking like this:

Just like with the Github connection, we set a start date of 2022-01-01. Once this source is created, we can hook it up to our LocalPostgres destination:
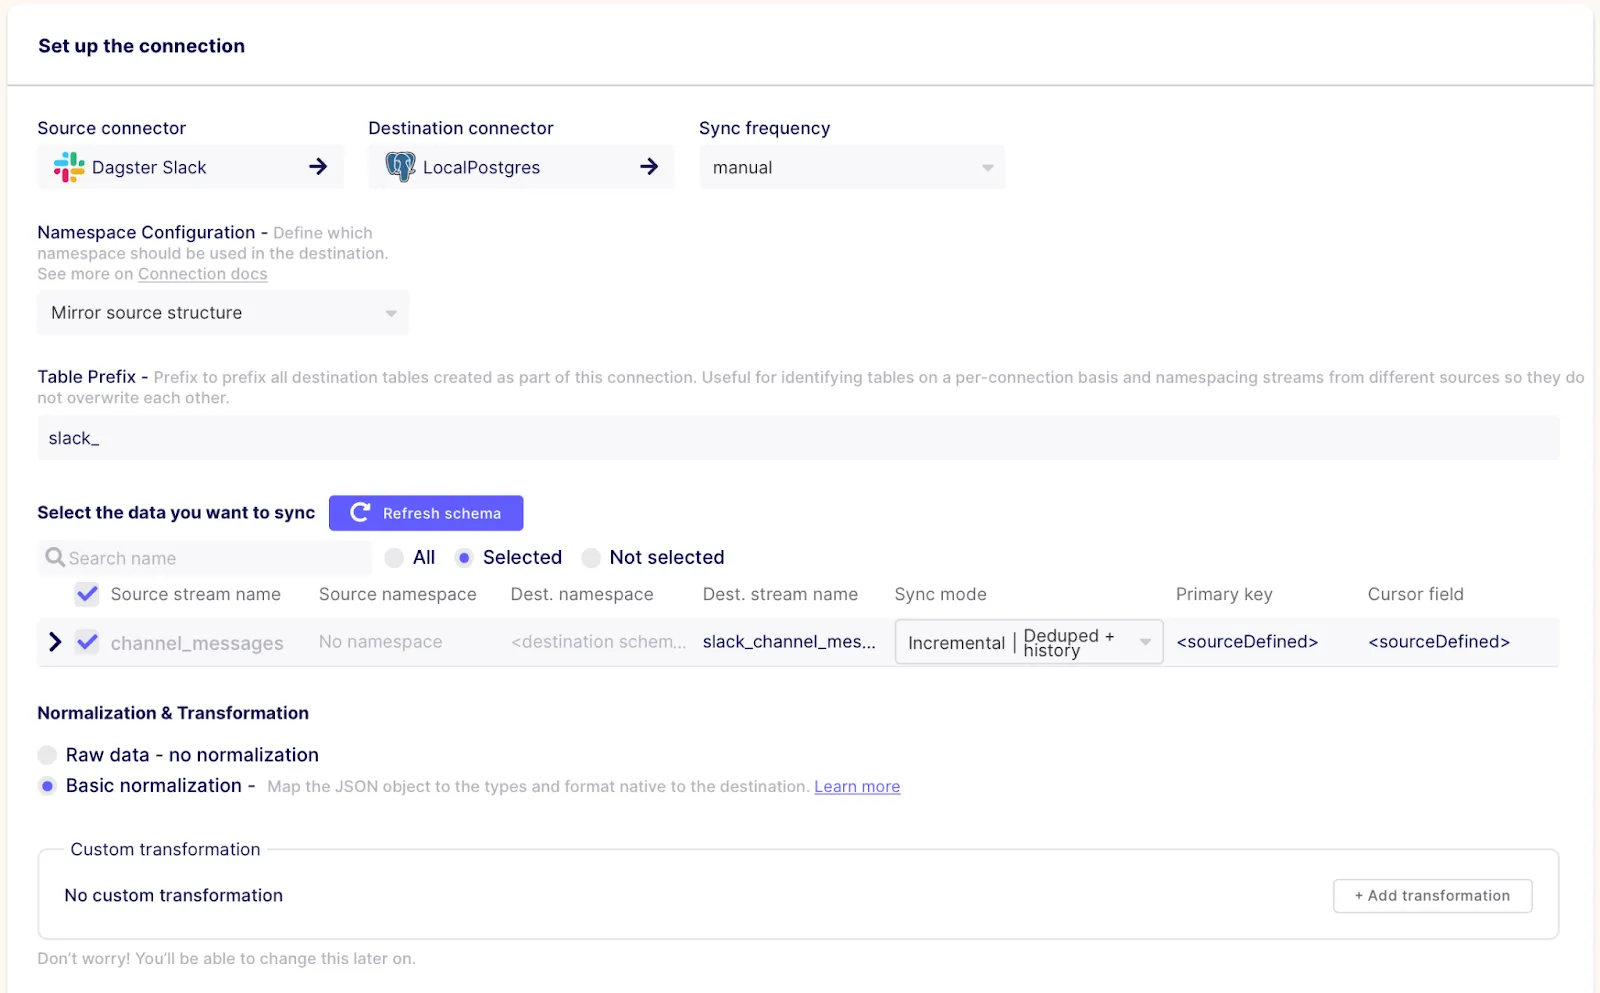
Now that we have some Airbyte connections to work with, we can get back to Dagster.
In the first few lines of slack_github_analytics.py, you’ll see the following code:
from dagster_airbyte import airbyte_resource, airbyte_sync_op

# …

sync_github = airbyte_sync_op.configured(
    {"connection_id": ""}, name="sync_github"
)
sync_slack = airbyte_sync_op.configured(
    {"connection_id": ""}, name="sync_slack"
)
Here, we define the first two operations (or “ops”, in Dagster) of our job. Dagster’s Airbyte integration offers a pre-built op that will, when configured with a particular connection id, kick off a sync of that connection and wait until it completes. We also give these ops names (“sync_github” and “sync_slack”) to help people looking at this job understand what they’re doing.
This is where you can substitute in the relevant connection ids for the connections you set up in the previous steps. A quick way to find the id for a given connection is to click on it in the Airbyte UI, and grab the last section of the URL, i.e.:

Once you’ve entered the correct values in for the `connection_id` fields, the code is ready to be executed! However, before that happens, let’s quickly explain what’s happening in the rest of the code.
Directly after the Airbyte ops, you’ll see the following code:
transform_slack_github = dbt_run_op.alias(name="transform_slack_github")
Here, we’re once again using a pre-built op imported from one of Dagster’s integration libraries. In this case, the op will run a dbt project that is configured to combine and transform the Slack and Github data together into a single table. The dbt project used here is included in the directory that you originally cloned, so no need to create your own, but feel free to modify / play around with it!
Strictly speaking, this line of code isn’t necessary (we could just directly include `dbt_run_op` in the job below), but this allows us to give the generic op a more specific name.
To launch a run of your job, simply click on the “Launchpad” tab in Dagit, then the “Launch Run” button. You can see how this looks in our community call recording.
While the job runs (and after it completes), you can view all of the Airbyte logs directly within Dagit, meaning there’s no need to juggle between multiple different UIs to understand what’s going on.
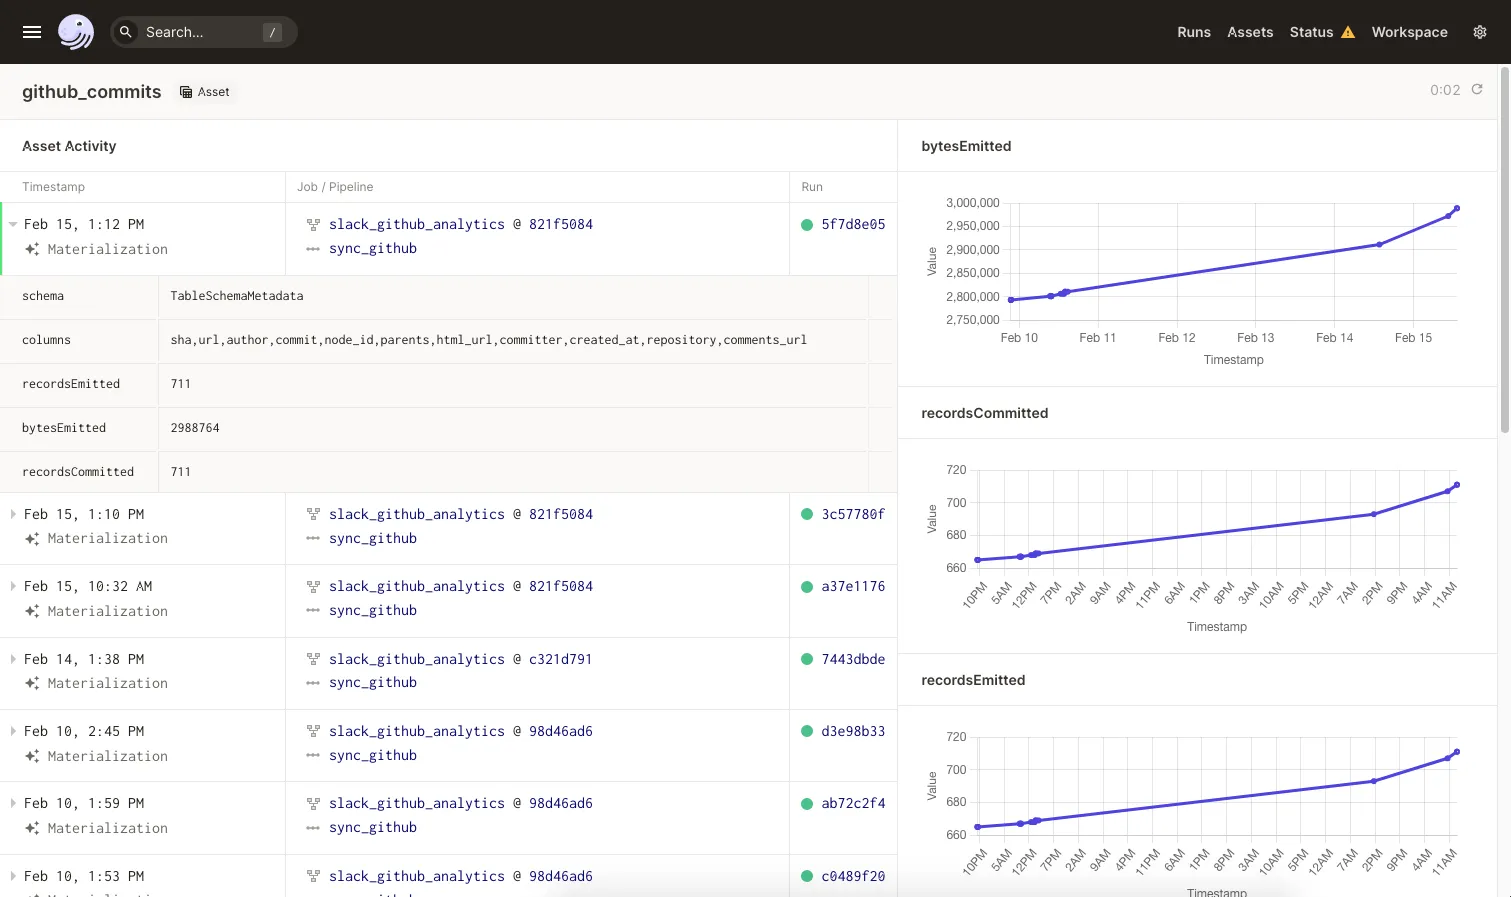
Dagster’s Airbyte integration will also automatically keep track of the streams in your destination over time. If you search for the name of a particular stream in the “Assets” tab, you’ll be brought to a page that shows you every time that this stream was updated, with links back to the relevant runs, and relevant metadata (like the names of the columns and the number of records) for each point in time:
Finally, we have a few custom Python ops. While it’s useful to be able to rely on external tools to do the heavy lifting in some scenarios, there’s always a time and a place for the flexibility of Python. Dagster allows you to annotate regular Python functions with the `@op` decorator, which turns them into operations that can be included in a job in the same way as the imported ops above.
One of those custom ops can be seen here (see `ops.py` for all of the code):
@op
def get_fit_params(df: pd.DataFrame):
    """
    Given a DataFrame, compute the parameters of a sinusoidal function that best fits the observed
    activity data.
    """
    params, _ = optimize.curve_fit(
        _fit_func, df.date.astype(np.int64), df.num_actions, p0=[1, 0.01]
    )
    return params
The specific Python code being run here isn’t all that important (in this case, we’re importing a library to fit a curve to some data that we pulled from our dbt output) – it can be any function that you want.
To summarize, this recipe shows you a simplified example of a workflow that combines a data ingestion pipeline with Airbyte and data transformation pipelines with dbt and Python. When you do this using Dagster, not only do you simplify your operational concerns, but you also get rich, detailed interfaces to better understand your data platform.
As with most orchestration tools, you can use Dagster to kick off your job on a schedule, or in response to specific events. Almost every aspect of Dagster is pluggable, from how each step is executed, to how intermediate values are stored, and this recipe just covers the basics.
If you have questions, or are interested in learning more, don’t hesitate to join the Airbyte Slack and the Dagster Slack!
Owen Kephart is a Data Infrastructure Engineer at Elementl, the company behind Dagster.
Download our free guide and discover the best approach for your needs, whether it's building your ELT solution in-house or opting for Airbyte Open Source or Airbyte Cloud.

Experience swift Postgres replication, effortlessly transferring data between databases in just 10 minutes.
Learn how to easily export Postgres data to CSV, JSON, Parquet, and Avro file formats stored in AWS S3.
Learn how to build robust ETL pipelines using Python, Docker, and Airbyte. A guide for data engineers covering setup, implementation, & best practices.