No items found.

Version control Airbyte configurations with Octavia CLI

Use Octavia CLI to import, edit, and apply Airbyte application configurations to replicate data from Postgres to BigQuery.

Should you build or buy your data pipelines?

Download our free guide and discover the best approach for your needs, whether it's building your ELT solution in-house or opting for Airbyte Open Source or Airbyte Cloud.

Download now

Note: This tutorial leverages Octavia CLI, which is an alpha unofficial CLI that won't be maintained. Since the publication of this tutorial, Airbyte has released an official Terraform Provider, which we would advise to use instead of the CLI.

Most Airbyte users get started with the Airbyte web app UI to configure sources, destinations, and connections to replicate data. The latest configuration is stored in a Postgres database installed with Airbyte.

Configuring resources in the UI is easy but becomes error-prone and inefficient as you onboard more users, add more connections, and manage several Airbyte instances. For example, by solely using the UI, data engineers cannot review the configuration changes done by a peer before applying them. Configuring an Airbyte resource on the UI is fast, but replicating changes between local, staging, and production environments is better handled with code.

To serve power users, Airbyte provides Configuration as Code (CaC) in YAML and a command line interface (Octavia CLI) to manage resource configurations. Octavia CLI uses the Airbyte API under the hood but provides a better developer experience through a command line interface (CLI) than directly interacting with the API. 

Octavia CLI use cases

Octavia CLI provides commands to import, edit, and apply Airbyte resource configurations: sources, destinations, and connections. Note that Octavia manages Airbyte Configurations as Code (CaC) and not Airbyte Infrastructure as Code (IaC). Thus, Octavia CLI can not provision an Airbyte instance. Here are the most popular Octavia CLI use cases.

Version control resource configurations

When Airbyte configurations are edited frequently, you may want to keep a history of the source, destination, and connection configurations in a Git repository.

Review resource configuration changes

When several users edit Airbyte configurations, you may want to review and test configuration changes in a Pull Request before applying them to production.

Copy resource configurations between Airbyte instances

When you have to manage multiple Airbyte instances, such as local, testing, staging, and production, you may want to copy configuration files manually or as part of your CI/CD pipeline.

Programmatically create resources

When you have more connections, or your connections contain several Airbyte streams (database tables or API endpoints), you may want to define configurations in YAML programmatically.

Since we announced the Octavia CLI in April this year, we’ve added support for extra features and have seen hundreds of open-source Airbyte users use it successfully in production. In this tutorial, you will learn how to use Octavia CLI to configure Airbyte resources to move data between Postgres and BigQuery. More precisely, you will learn how to:

  • Bootstrap an Octavia CLI project
  • Import the configuration of an existing instance
  • Create a Postgres source configuration in YAML
  • Create a BigQuery destination configuration in YAML
  • Create a Postgres to BigQuery connection configuration in YAML
  • Edit YAML configuration files
  • Apply configurations to a different instance

Prerequisites

  • Docker and Docker Compose installed.
  • An Airbyte open-source instance. This tutorial uses Airbyte v0:40:18 running locally with Docker Compose.
  • A Postgres instance or another source you can use instead. Follow this Postgres replication tutorial to create a Postgres database locally with sample data.
  • A BigQuery instance or another destination you can use instead. Follow this Postgres to BigQuery tutorial to configure a BigQuery project.

Bootstrap an Octavia CLI project

You can install Octavia CLI as a command available in your bash profile with Docker or modify your Airbyte docker-compose.yml file to apply the configuration on start. You can explore these three modes in the Octavia CLI documentation. Note that you should install the same Octavia version as the targetted Airbyte instance to avoid API incompatibility issues.

Here you can install the latest Octavia version as a bash command:


curl -s -o- https://raw.githubusercontent.com/airbytehq/airbyte/master/octavia-cli/install.sh | bash

octavia alias will be added to /home/ari/.bashrc
🐙 - 💾 The octavia env file was created at /home/ari/.octavia
❓ - Allow Airbyte to collect telemetry to improve the CLI? (Y/n)Y
🐙 - Pulling image for octavia 0.40.18
🐙 - 🎉 octavia 0.40.18 image was pulled
🐙 - 🎉 octavia alias was added to /home/ari/.bashrc!
🐙 - Please open a new terminal window or run source /home/ari/.bashrc

The .octavia file is where you configure environment variables and secrets. The file content will be used to set the environment variables of the Octavia CLI container that runs when you call the octavia command. Below you can inspect what was appended to my .bashrc file in case you want to need to run Octavia CLI without the alias.


cat ~/.bashrc | tail -n 4

# OCTAVIA CLI 0.40.18
OCTAVIA_ENV_FILE=/home/ari/.octavia
export OCTAVIA_ENABLE_TELEMETRY=True
alias octavia="docker run -i --rm -v \$(pwd):/home/octavia-project --network host --env-file \${OCTAVIA_ENV_FILE} --user \$(id -u):\$(id -g) airbyte/octavia-cli:0.40.18"

If you are using Airbyte version 0.40.16 or above that comes with Basic Authentication for the webapp, API and CLI, you need to add the AIRBYTE_USERNAME and AIRBYTE_PASSWORD environment variables in the .octavia file. 


cat  ~/.octavia

OCTAVIA_ENABLE_TELEMETRY=True
AIRBYTE_USERNAME=airbyte
AIRBYTE_PASSWORD=password 

Then you can bootstrap an Octavia project on a new folder with the octavia init command.


mkdir airbyte-configuration && cd airbyte-configuration

octavia init

🐙 - Octavia is targetting your Airbyte instance running at http://localhost:8000 on workspace 36ddb450-66e4-4988-91bf-67279eed5098.
🐙 - Project is not yet initialized.
🔨 - Initializing the project.
✅ - Created the following directories: destinations, sources, connections.
✅ - Created API HTTP headers file in api_http_headers.yaml

This will create folders for the source, destination, and connection resource definitions. It also creates an api_http_headers.yaml file.


tree .
.
├── api_http_headers.yaml
├── connections
├── destinations
└── sources

3 directories, 1 file

If you have an existing Airbyte instance that you want to version control, you can get the configurations with the octavia import all command after you init an Octavia CLI project.

Create a Postgres source with Octavia CLI

Next, you will configure a Postgres source. To create a source definition with Octavia CLI you can use the octavia generate source command. You will need to pass a DEFINITION_ID and RESOURCE_NAME. Due to a current limitation, to create a source, you first need to get the definition id for the source. You can run the command octavia list connectors sources to get the connector id:


octavia list connectors sources | grep postgres

Postgres                                airbyte/source-postgres                        1.0.22            decd338e-5647-4c0b-adf4-da0e75f5a750

Then you can bootstrap a Postgres source with the octavia generate source command:


octavia generate source decd338e-5647-4c0b-adf4-da0e75f5a750 postgres

🐙 - Octavia is targetting your Airbyte instance running at http://localhost:8000 on workspace 36ddb450-66e4-4988-91bf-67279eed5098.
✅ - Created the source template for postgres in sources/postgres/configuration.yaml.

The CLI creates a postgres folder under sources with a configuration.yaml file.


tree .
.
├── api_http_headers.yaml
├── connections
├── destinations
└── sources
    └── postgres
        └── configuration.yaml

4 directories, 2 files

The YAML file contains all the fields with the default values you see on the UI, and the description for each field as a comment. Below you can see the beginning of the file.


more sources/postgres/configuration.yaml 

# Configuration for airbyte/source-postgres
# Documentation about this connector can be found at https://docs.airbyte.com/integrations/sources/postgres
resource_name: "postgres"
definition_type: source
definition_id: decd338e-5647-4c0b-adf4-da0e75f5a750
definition_image: airbyte/source-postgres
definition_version: 1.0.22

# EDIT THE CONFIGURATION BELOW!
configuration:
  ssl: # OPTIONAL | boolean | Encrypt data using SSL. When activating SSL, please select one of the connection modes.
  host: # REQUIRED | string | Hostname of the database.
  port: 5432 # REQUIRED | integer | Port of the database. | Example: 5432
  schemas: ["public"] # OPTIONAL | array | The list of schemas (case sensitive) to sync from. Defaults to public.
  database: # REQUIRED | string | Name of the database.
  password: ${PASSWORD} # SECRET (please store in environment variables) | OPTIONAL | string | Password associated with the username.

You must edit the configuration above before applying the changes to your Airbyte instance. You must fill in the values for the REQUIRED fields and edit, comment, or delete the lines for the OPTIONAL fields. Commenting on the OPTIONAL fields may be useful when you want to edit the configuration in the future as you keep all options like in the UI. Otherwise, you can generate a new source configuration to see all available options.

Source and destination configurations have credential fields you want to store as something other than plain text. Octavia offers secret management through environment variables expansion on configuration files. You can set environment variables in your ~/.octavia file. Then you can reference these variables on your configuration files with ${POSTGRES_PASSWORD}. After editing the configuration, it should look like this:


cat sources/postgres/configuration.yaml

resource_name: "postgres"
definition_type: source
definition_id: decd338e-5647-4c0b-adf4-da0e75f5a750
definition_image: airbyte/source-postgres
definition_version: 1.0.14

configuration:
  host: ${POSTGRES_HOST}
  port: 2000
  schemas: ["public"]
  database: ${POSTGRES_DATABASE}
  password: ${POSTGRES_PASSWORD}
  ssl_mode:
    mode: "disable"
  username: ${POSTGRES_USERNAME}
  tunnel_method:
    tunnel_method: "NO_TUNNEL"
  replication_method:
    method: "Standard"

To apply the changes to your local Airbyte instance, you can run octavia apply. Octavia will validate the configuration against a JSON schema and will fail to apply the changes if finding any configuration error. If an error occurs, you will get a stack trace from the API response.


octavia apply

🐙 - Octavia is targetting your Airbyte instance running at http://localhost:8000 on workspace 36ddb450-66e4-4988-91bf-67279eed5098.
🐙 - postgres does not exists on your Airbyte instance, let's create it!
🎉 - Successfully created postgres on your Airbyte instance!
💾 - New state for postgres saved at ./sources/postgres/state_36ddb450-66e4-4988-91bf-67279eed5098.yaml

Then you can check that the configuration is also available in the UI.
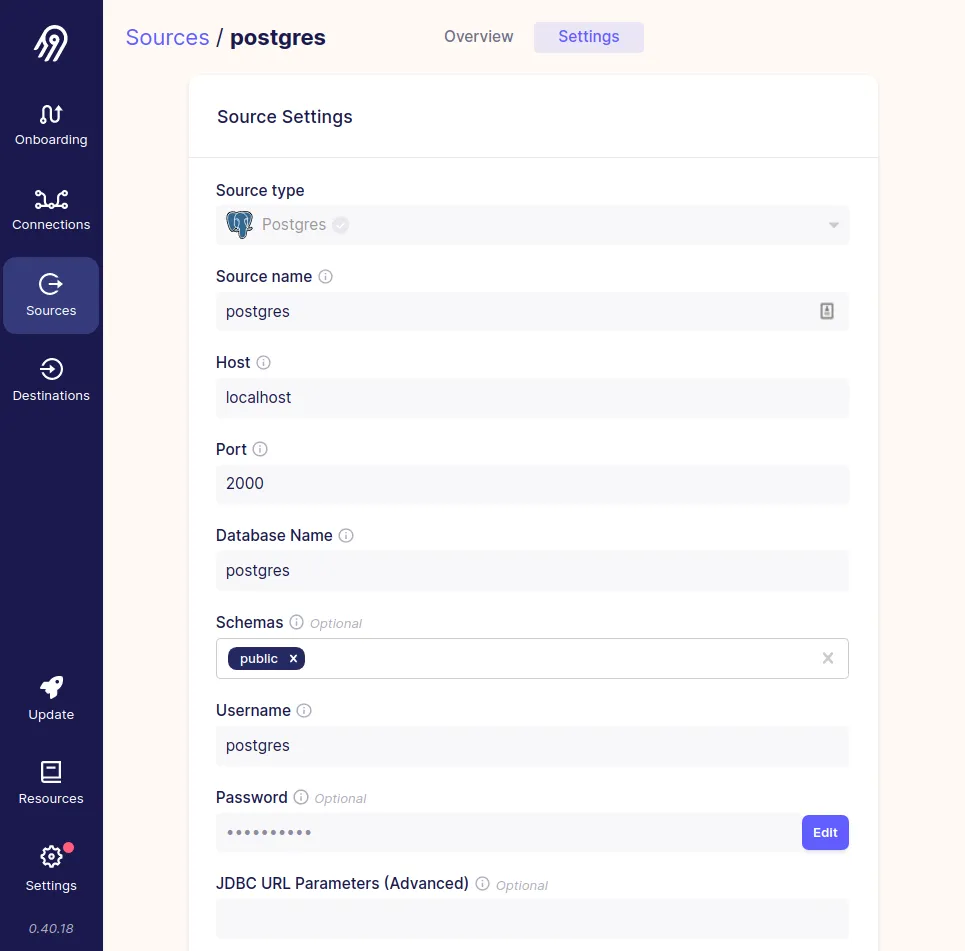
After you apply some configuration changes with Octavia, no connection test will be run like when you save connector settings in the UI (see GitHub issue). You can still use the UI to test that the source setting allows Airbyte to connect.

After you apply some changes, Octavia creates a state.yaml file in the resource directory with the checksum of the latest configuration applied and the generation timestamp. The state files are instance and workspace specific so they are only useful when multiple users or Octavia CLI processes work on the same instance and workspace. If you apply the same configuration across multiple instances, then you don’t need to commit state files in your Git repository.

Each time you run the apply command, Octavia will also compute and display differences between the current resource state locally including changes since you last run the apply command, and the state in your Airbyte instance including changes you may have done on the UI.


cat sources/postgres/state_36ddb450-66e4-4988-91bf-67279eed5098.yaml

configuration_hash: 99f162392a75094ad28bfdb34d220299b2a0b62376151fd576488803210e9de6
configuration_path: ./sources/postgres/configuration.yaml
generation_timestamp: 1667385089
resource_id: 076a086b-167f-4a86-890f-cbe5fb1e7204
workspace_id: 36ddb450-66e4-4988-91bf-67279eed5098

After editing the YAML configuration file for your Airbyte source, you can run git add and git commit to version control your Airbyte configuration.

Create a BigQuery destination with Octavia CLI

Next, you can configure a BigQuery destination. After you get the BigQuery definition id with the octavia list connectors destinations command, you can bootstrap the configuration file sources/bigquery/configuration.yaml for the BigQuery destination.


octavia generate destination 22f6c74f-5699-40ff-833c-4a879ea40133 bigquery

🐙 - Octavia is targetting your Airbyte instance running at http://localhost:8000 on workspace 36ddb450-66e4-4988-91bf-67279eed5098.
✅ - Created the destination template for bigquery in destinations/bigquery/configuration.yaml.

After you edit the destination template, it will look something like this:


cat destinations/bigquery/configuration.yaml

resource_name: "bigquery"
definition_type: destination
definition_id: 22f6c74f-5699-40ff-833c-4a879ea40133
definition_image: airbyte/destination-bigquery
definition_version: 1.2.4

configuration:
  dataset_id: ${BIGQUERY_DATASET}
  project_id: ${BIGQUERY_PROJECT}
  loading_method:
    method: "Standard"
  credentials_json: ${BIGQUERY_CEDENTIALS_JSON}
  dataset_location: "US"

After adding the environment variables in your .octavia file, you can apply the changes to your instance.


octavia apply

🐙 - Octavia is targetting your Airbyte instance running at http://localhost:8000 on workspace 36ddb450-66e4-4988-91bf-67279eed5098.
🐙 - bigquery does not exists on your Airbyte instance, let's create it!
🎉 - Successfully created bigquery on your Airbyte instance!
💾 - New state for bigquery saved at ./destinations/bigquery/state_36ddb450-66e4-4988-91bf-67279eed5098.yaml
🐙 - postgres exists on your Airbyte instance according to your state file, let's check if we need to update it!
😴 - Did not update because no change detected.

Then you can see that the changes were applied in the UI. Remember to test the connection.
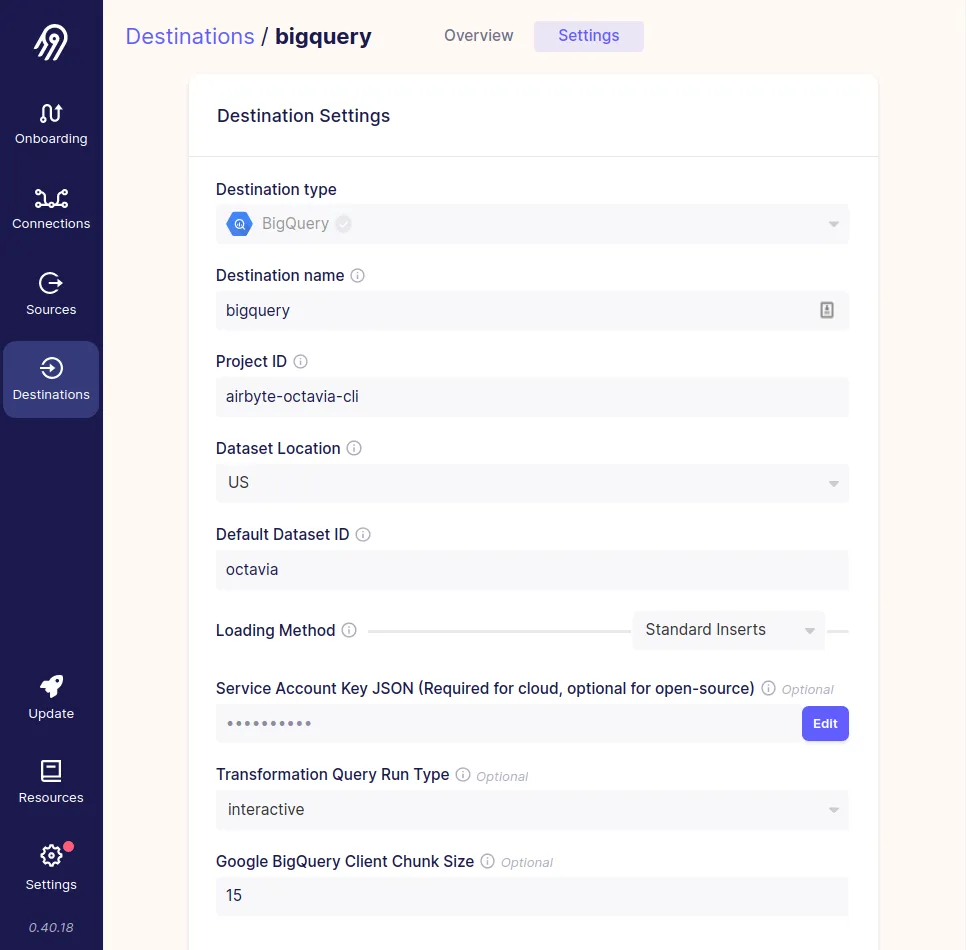
Create a connection with Octavia CLI

Once you have source and destination configuration files, you can create a connection template with the octavia generate connection command.


octavia generate connection --source sources/postgres/configuration.yaml --destination destinations/bigquery/configuration.yaml postgres-to-bigquery

🐙 - Octavia is targetting your Airbyte instance running at http://localhost:8000 on workspace 36ddb450-66e4-4988-91bf-67279eed5098.
✅ - Created the connection template for postgres-to-bigquery in connections/postgres_to_bigquery/configuration.yaml.

After editing the configuration, your configuration should look like this:


cat connections/postgres_to_bigquery/configuration.yaml

definition_type: connection
resource_name: "postgres-to-bigquery"
source_configuration_path: sources/postgres/configuration.yaml
destination_configuration_path: destinations/bigquery/configuration.yaml

configuration:
  status: active
  namespace_definition: source
  namespace_format: "${SOURCE_NAMESPACE}"
  prefix: ""
  resource_requirements:
    cpu_limit: ""
    cpu_request: ""
    memory_limit: ""
    memory_request: ""
  schedule_type: manual
  sync_catalog: # OPTIONAL | object | 🚨 ONLY edit streams.config, streams.stream should not be edited as schema cannot be changed.
    streams:
      - config:
          alias_name: cities
          cursor_field: []
          destination_sync_mode: overwrite
          primary_key: []
          selected: true
          sync_mode: full_refresh
        stream:
          default_cursor_field: []
          json_schema:
            properties:
              city:
                type: string
              city_code:
                type: string
            type: object
          name: cities
          namespace: public
          source_defined_primary_key: []
          supported_sync_modes:
            - full_refresh
            - incremental

Notice that the stream configuration was generated automatically and, as stated in the comments, “ONLY edit streams.config, streams.stream should not be edited as schema cannot be changed". After editing the configuration, you can apply the changes to your Airbyte instance. Note that you can specify a unique configuration file to the apply command with the -f option.


octavia apply -f connections/postgres_to_bigquery/configuration.yaml

🐙 - Octavia is targetting your Airbyte instance running at http://localhost:8000 on workspace 36ddb450-66e4-4988-91bf-67279eed5098.
🐙 - postgres-to-bigquery does not exists on your Airbyte instance, let's create it!
🎉 - Successfully created postgres-to-bigquery on your Airbyte instance!
💾 - New state for postgres-to-bigquery saved at connections/postgres_to_bigquery/state_36ddb450-66e4-4988-91bf-67279eed5098.yaml

As before, this will create a state file with a configuration hash. You can now see the configuration on Airbyte UI as well.
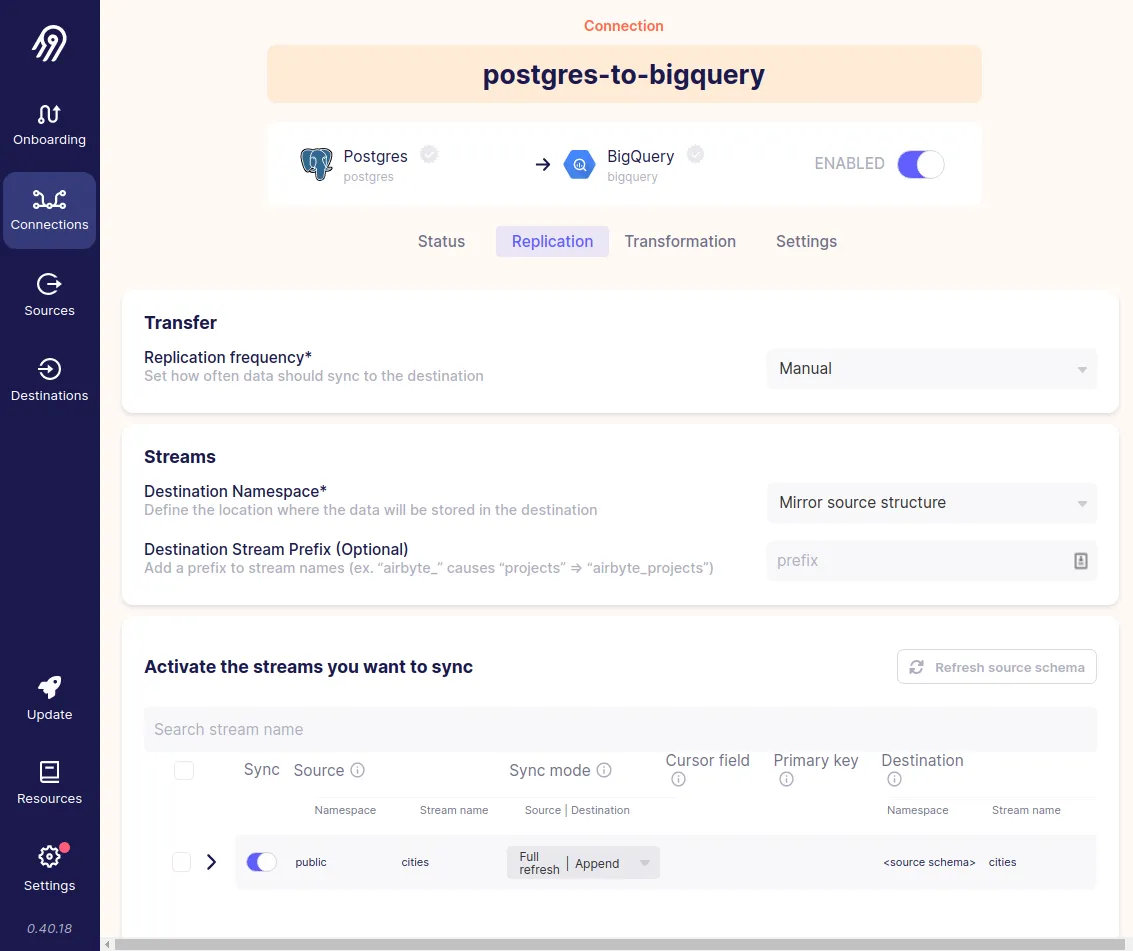
Edit resources YAML configuration

When you edit the YAML configuration files, Octavia will validate the new configuration and compute a diff before applying the changes.

Imagine that, for example, you want to change the connection scheduling from manual to hourly. Here it comes in handy to comment the default configuration template instead of removing optional fields. If you edit a field with the wrong syntax, Octavia will fail to apply the changes and display an error message with the field that failed to validate.


cat connections/postgres_to_bigquery/configuration.yaml | sed -n '16,20p'

schedule_type: basic
  schedule_data:
    basic_schedule:
      time_unit: hour
      units: 1

Above, I misspelled the time_unit value to be hour instead of hours. When running octavia apply -f connections/postgres_to_bigquery/configuration.yaml you will get a long stack trace and error message at the end.


octavia apply -f connections/postgres_to_bigquery/configuration.yaml | tail -n 1

airbyte_api_client.exceptions.ApiValueError: Invalid value for `time_unit` (hour), must be one of ['minutes', 'hours', 'days', 'weeks', 'months']

After fixing the error, Octavia will compute a difference, and display it. It will also ask you to confirm the changes unless you use the –force option.


octavia apply -f connections/postgres_to_bigquery/configuration.yaml

🐙 - Octavia is targetting your Airbyte instance running at http://localhost:8000 on workspace 36ddb450-66e4-4988-91bf-67279eed5098.
🐙 - postgres-to-bigquery exists on your Airbyte instance according to your state file, let's check if we need to update it!
👀 - Here's the computed diff (🚨 remind that diff on secret fields are not displayed):
	+ - Item root['schedule_data'] added to dictionary.
	- - Item root['schema_change'] removed from dictionary.
	- - Item root['notify_schema_changes'] removed from dictionary.
	- - Item root['non_breaking_changes_preference'] removed from dictionary.
	- - Item root['geography'] removed from dictionary.
	E - Value of root['schedule_type'] changed from "manual" to "basic".
❓ - Do you want to update postgres-to-bigquery? [y/N]: y
🟢 - Running update because you validated the changes.
🎉 - Successfully updated postgres-to-bigquery on your Airbyte instance!
💾 - New state for postgres-to-bigquery stored at connections/postgres_to_bigquery/state_36ddb450-66e4-4988-91bf-67279eed5098.yaml.

Above, you will notice the two differences related to our configuration changes locally:  root['schedule_data'] and root['schedule_type']. The rest of the differences come from Airbyte adding some extra changes after applying the local config. To avoid this difference, you must import the Airbyte config locally and commit these fields.

Import an existing Airbyte YAML configuration

If you have already configured an Airbyte instance and want to version control changes or manage configurations with Octavia, you can get the instance configuration with the octavia import all command. This command will retrieve all sources, destinations, and connection configurations. You can then commit this to a Git repository. Once you start to edit Airbyte resources with Octavia CLI then is better to avoid using the UI as well as you will continue to see some differences when importing changes.

Before retrieving the configurations, you have to bootstrap an Octavia project. For example, if you change to a new folder locally, create an octavia project with octavia init and run the import command, you will get this output.


octavia init

🐙 - Octavia is targetting your Airbyte instance running at http://localhost:8000 on workspace 36ddb450-66e4-4988-91bf-67279eed5098.
🐙 - Project is not yet initialized.
🔨 - Initializing the project.
✅ - Created the following directories: sources, destinations, connections.
✅ - Created API HTTP headers file in api_http_headers.yaml

octavia import all

🐙 - Octavia is targetting your Airbyte instance running at http://localhost:8000 on workspace 36ddb450-66e4-4988-91bf-67279eed5098.
✅ - Imported source postgres in sources/postgres/configuration.yaml. State stored in sources/postgres/state_36ddb450-66e4-4988-91bf-67279eed5098.yaml
⚠️  - Please update any secrets stored in sources/postgres/configuration.yaml
✅ - Imported destination bigquery in destinations/bigquery/configuration.yaml. State stored in destinations/bigquery/state_36ddb450-66e4-4988-91bf-67279eed5098.yaml
⚠️  - Please update any secrets stored in destinations/bigquery/configuration.yaml
✅ - Imported connection postgres-to-bigquery in connections/postgres_to_bigquery/configuration.yaml. State stored in connections/postgres_to_bigquery/state_36ddb450-66e4-4988-91bf-67279eed5098.yaml

This will create the following files.


tree .
.
├── api_http_headers.yaml
├── connections
│   └── postgres_to_bigquery
│       ├── configuration.yaml
│       └── state_819c7684-d353-45a1-b2e7-5eb42d8461c0.yaml
├── destinations
│   └── bigquery
│       ├── configuration.yaml
│       └── state_819c7684-d353-45a1-b2e7-5eb42d8461c0.yaml
└── sources
    └── postgres
        ├── configuration.yaml
        └── state_819c7684-d353-45a1-b2e7-5eb42d8461c0.yaml

6 directories, 7 files

Note that when importing resources Octavia overwrites the environment variables that you configured originally with the real value and replace secrets with '**********'. The configuration file will look like this:


more sources/postgres/configuration.yaml

resource_name: postgres
definition_type: source
definition_id: decd338e-5647-4c0b-adf4-da0e75f5a750
definition_image: airbyte/source-postgres
definition_version: 1.0.14
configuration:
  ssl: false
  host: localhost
  port: 2000
  schemas:
  - public
  database: postgres
  password: '**********'
  ssl_mode:
    mode: disable
  username: postgres
  tunnel_method:
    tunnel_method: NO_TUNNEL
  replication_method:
    method: Standard

Given the above limitation you can still version control Airbyte configs, but you won’t be able to push this new configuration to a different instance without editing the secrets in the template and adding the environment variables that may change between instances.

You can then apply these changes to a different Airbyte instance.


octavia apply –airbyte-url http://production.myairbyte.com –force –airbyte-username YOUR_USERNAME –airbyte-password YOUR_PASSWORD

Conclusion

You can manage Airbyte resources in the web app or with YAML files. The web app makes it easy to get started and create configurations. When used in combination with Octavia CLI you can get both an accessible ELT tool and support for Configuration as Code.

For more details, you can check the Octavia CLI documentation and join the #octavia-cli channel in our community slack. As demonstrated in this tutorial, it’s easy to version control your existing Airbyte configuration with Octavia CLI commands.

You can track upcoming Octavia features on Github Issues. To support Airbyte deployments that grow the number of users, connections, and instances we want to expand support for other GitOps use cases such as managing Airbyte Infrastructure as Code (IaC), showcasing how to build CI/CD pipelines to deploy Airbyte, and testing Airbyte configurations.

Should you build or buy your data pipelines?

Download our free guide and discover the best approach for your needs, whether it's building your ELT solution in-house or opting for Airbyte Open Source or Airbyte Cloud.

Download now

Similar use cases

How to Scrape LinkedIn Profiles Using Airflow & BeautifulSoup

Learn how to easily automate your LinkedIn Scraping with Airflow and Beautiful Soup.

How to Perform PostgreSQL Replication in 4 Quick Steps

Experience swift Postgres replication, effortlessly transferring data between databases in just 10 minutes.

How to Load Data Into Databricks Lakehouse

Learn how to load data to a Databricks Lakehouse and run simple analytics.