Experience swift Postgres replication, effortlessly transferring data between databases in just 10 minutes.
Published on Jul 21, 2021
Summarize this article with:


PostgreSQL database replication has several purposes. It can help with high availability (if a server fails, a backup one can take over) and load-balancing (distributing traffic across multiple servers that provide the same data).
Enabling analytics is another increasingly popular purpose of database replication. Imagine that you have a Django application that uses PostgreSQL as an operational database. If you’d like to enable reporting and analytics on top of that database, it’s best to replicate it to another server not to interfere with the production application.
Data Replication offers a plethora of advantages, and leveraging a robust data replication tool like Airbyte adds an extra touch of finesse to its repertoire. It's like giving data replication a power boost with an array of impressive feathers in its cap! With data replication tools, businesses can ensure data consistency, improve availability, and enhance disaster recovery capabilities.
No matter your replication purpose, this tutorial will show you how to easily replicate data from a PostgreSQL source to a PostgreSQL destination using Airbyte.
We will also introduce PostgreSQL native replication and the advantages of using Airbyte. If you want to skip those sections, feel free to jump to the prerequisites.
If you prefer to follow along with a video instead, we have created one, too!
PostgreSQL replication is the process of copying and maintaining a duplicate set of data from one PostgreSQL database to another in real-time or near-real-time. This replication allows for data redundancy, fault tolerance, and load balancing, among other benefits. There are various methods of PostgreSQL replication, including streaming replication, logical replication, and trigger-based replication, each offering different capabilities and use cases.
Automatic failover in PostgreSQL replication ensures seamless continuity of database operations by automatically switching to a standby server when the primary server fails. It constantly monitors server health, swiftly activating the standby server upon detection of primary server failure.
This process guarantees uninterrupted availability of database services, minimizing downtime and operational disruptions. It's a crucial feature for maintaining high availability and fault tolerance in PostgreSQL environments.
To overcome automatic failover challenges in PostgreSQL replication:
PostgreSQL replication is a process that involves copying data from one PostgreSQL database to another in real-time or near-real-time. It ensures data consistency, availability, and scalability by maintaining multiple synchronized copies of the database.
Discover the advantages of implementing PostgreSQL replication for your database infrastructure.
When it comes to PostgreSQL replication, there are various techniques to achieve it. Such techniques can be divided into disk-based, log-based, and SQL-based replication. We will primarily focus on log-based replication techniques.
PostgreSQL replication operates through different classes:
At the same time, PostgreSQL provides several kinds of log-based replication: log-shipping, streaming, and logical replication. Let's explore:
Log-shipping replication handles synchronization by allowing a primary server to change the data and standby server(s) to track changes in the primary server. The primary server is in continuous archiving mode, generating Write-Ahead Logging (WAL) files that the standby reads to keep in sync. Therefore, the standby is in recovery mode (which is read-only).
Because no modifications to the database tables are necessary to activate this functionality, it has a lower administrative overhead than alternative replication methods.
Streaming replication is similar to log-shipping, with the difference that the standby connects to the primary, which transmits WAL records in real-time, rather than waiting for the WAL file to be full.
The fundamental disadvantage of log-shipping and streaming replication is that the standby server remains in recovery mode, and modifications are not permitted. Any changes made to the primary server are replicated on standby, making it impossible to replicate tables or databases selectively.
Logical replication is PostgreSQL’s technique for replicating data objects and modifications based on their identity, often a primary key. This type of replication also uses WAL files to build a stream of logical data changes, and it implements a publish-and-subscribe approach. Changes in the publisher are delivered to subscribers in real-time.
Unlike log-shipping and streaming, logical replication allows for per-table replication.
The most significant disadvantage of logical replication is that schema changes are not replicated and must be kept in sync manually. Tables lacking primary keys or unique identifiers will also have issues. You can read more about logical replication restrictions here.
Challenges of replicating PostgreSQL database natively include:
Physical (Streaming) Replication is optimal when you need an exact copy of the entire database, particularly for disaster recovery or read scaling. Choose this if you need guaranteed data consistency across all objects (including sequences, users, and permissions) or if you're dealing with high-throughput OLTP workloads.
Logical Replication is best when you need selective replication (specific tables only), data integration between different PostgreSQL versions, or zero-downtime upgrades. This is particularly useful for scenarios like moving subset of data to data warehouses, creating subset replicas for reporting, or when using Airbyte CDC for incremental data syncs with fine-grained control.
The key decision factors are: completeness of replication needed (full vs. selective), performance requirements (physical is generally faster), and flexibility needs (logical offers more control but with higher overhead).
Loading data between PostgreSQL databases can be done natively, but Airbyte offers flexibility and ease of use. While native replication solutions have minimal overhead, they come with limitations.
Airbyte allows different sync modes for each table within the same database, supporting full, incremental, and logical replication. This flexibility is beneficial when dealing with tables of varying sizes or requirements, such as those without primary keys.
With Airbyte, you can tailor replication methods to specific tables, ensuring efficient data synchronization. Let's dive into using Airbyte for PostgreSQL CDC.
If you don’t have a readily available Postgres database to sync, here are some quick instructions. Run the following commands in a new terminal window to start backgrounded source and destination databases:
docker run --rm --name airbyte-source -e POSTGRES_PASSWORD=password -p 2000:5432 -d postgres
docker run --rm --name airbyte-destination -e POSTGRES_PASSWORD=password -p 3000:5432 -d postgres
Add two tables with a few rows to the source database:
docker exec -it airbyte-source psql -U postgres -c "CREATE TABLE users(id SERIAL PRIMARY KEY, col1 VARCHAR(200));"
docker exec -it airbyte-source psql -U postgres -c "INSERT INTO public.users(col1) VALUES('record1');"
docker exec -it airbyte-source psql -U postgres -c "INSERT INTO public.users(col1) VALUES('record2');"
docker exec -it airbyte-source psql -U postgres -c "INSERT INTO public.users(col1) VALUES('record3');"

docker exec -it airbyte-source psql -U postgres -c "CREATE TABLE cities(city_code VARCHAR(8), city VARCHAR(200));"
docker exec -it airbyte-source psql -U postgres -c "INSERT INTO public.cities(city_code, city) VALUES('BCN', 'Barcelona');"
docker exec -it airbyte-source psql -U postgres -c "INSERT INTO public.cities(city_code, city) VALUES('MAD', 'Madrid');"
docker exec -it airbyte-source psql -U postgres -c "INSERT INTO public.cities(city_code, city) VALUES('VAL', 'Valencia');"
You now have a Postgres database ready to be replicated.
Alternatively, you can use a local Postgres database on your computer: use host.docker.internal (if you are on Mac) as the host instead of localhost when setting up the source and destination.
If you didn’t do it before when deploying Airbyte, go to http://localhost:8000 to launch the UI.
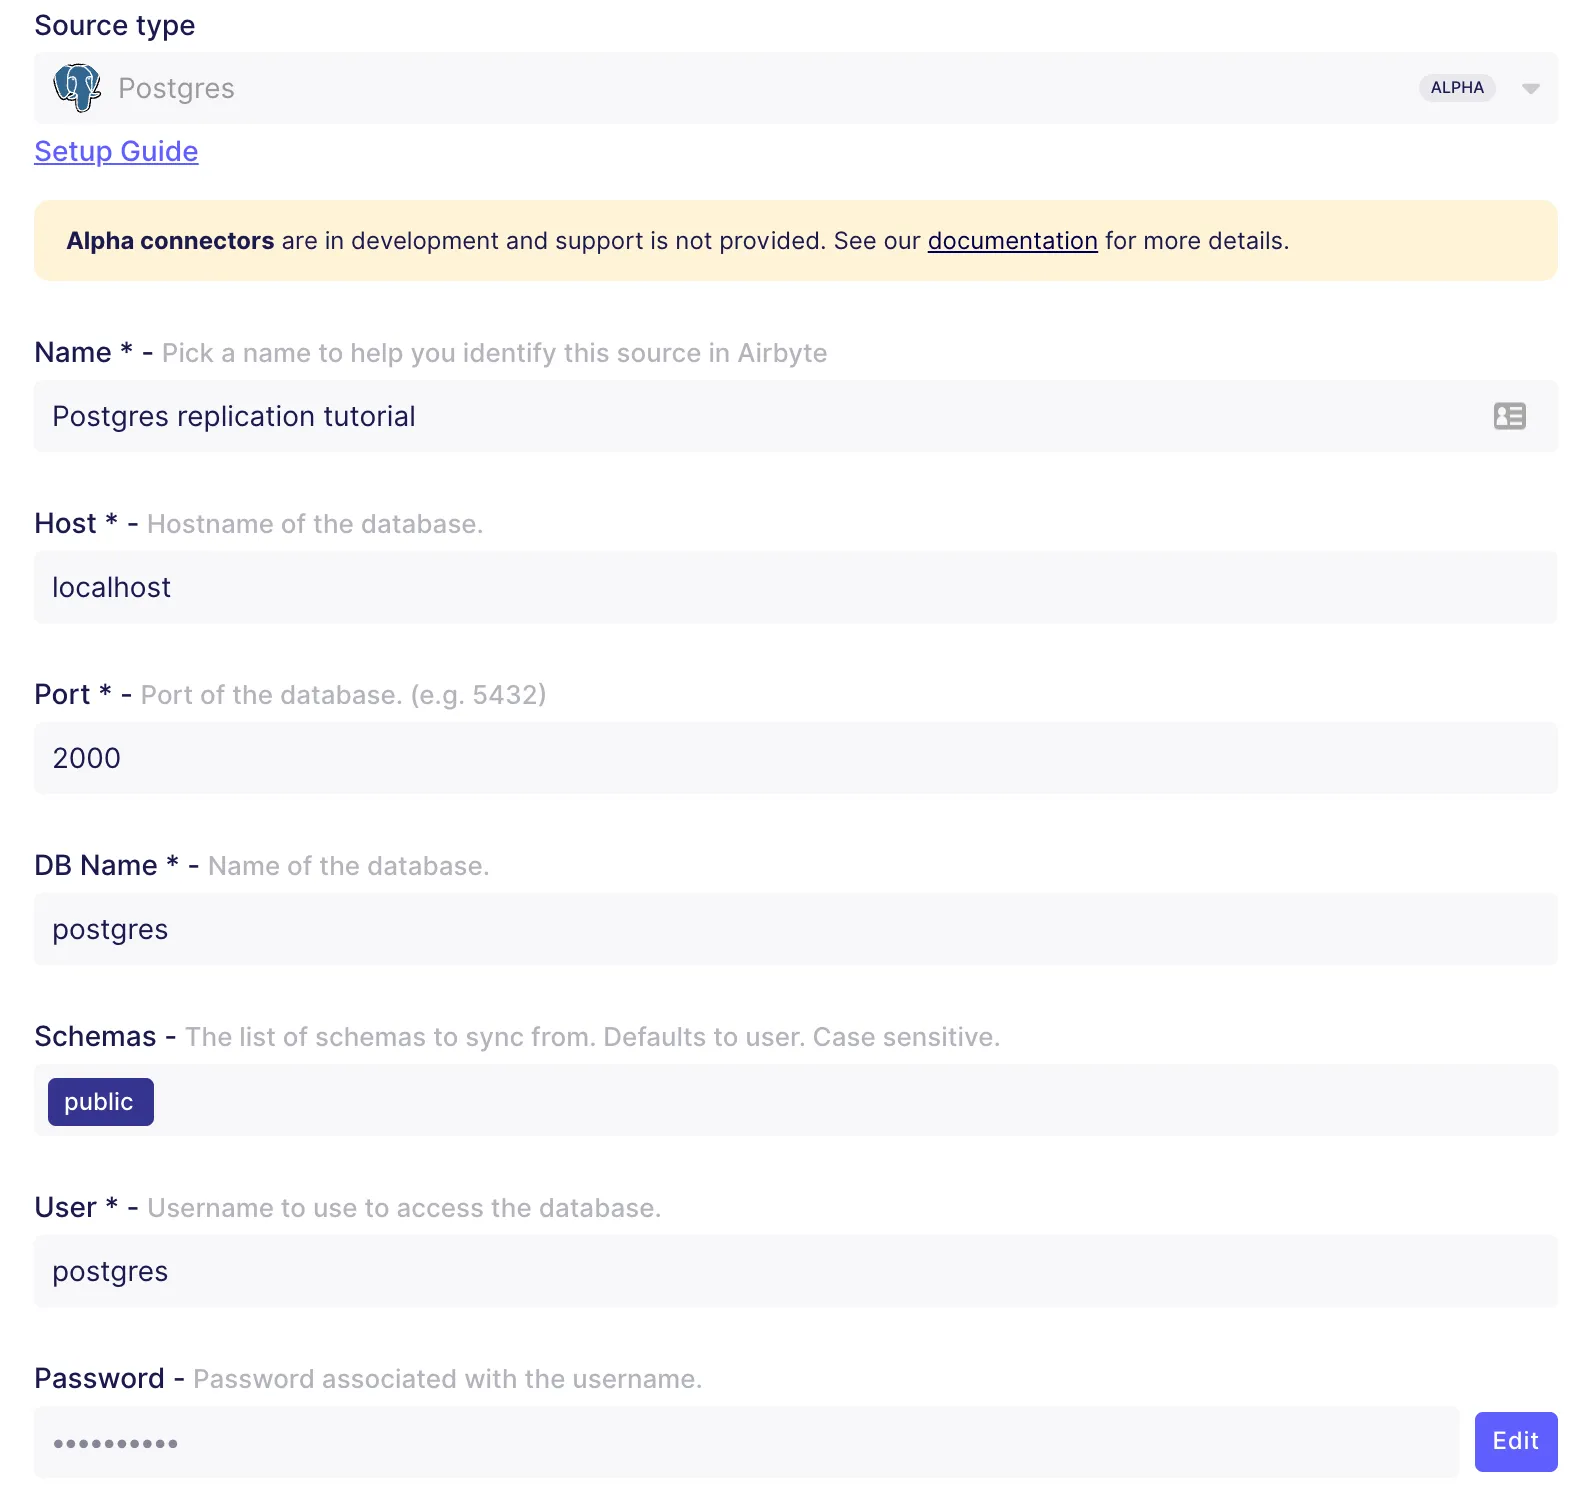
Then, click on sources and add a new source. As the connector type, select Postgres. If you used our instructions above to create a Postgres database, fill in the following configuration fields.


We will use the “Standard” replication method to keep things simple for this tutorial. But you can use logical replication if needed. Follow along with this video to configure it for Postgres.
We will also use “No Tunnel” as the SSH option. If you want to use SSH, check out our documentation.
Click on "Set up source", and now you’re ready to configure a destination.
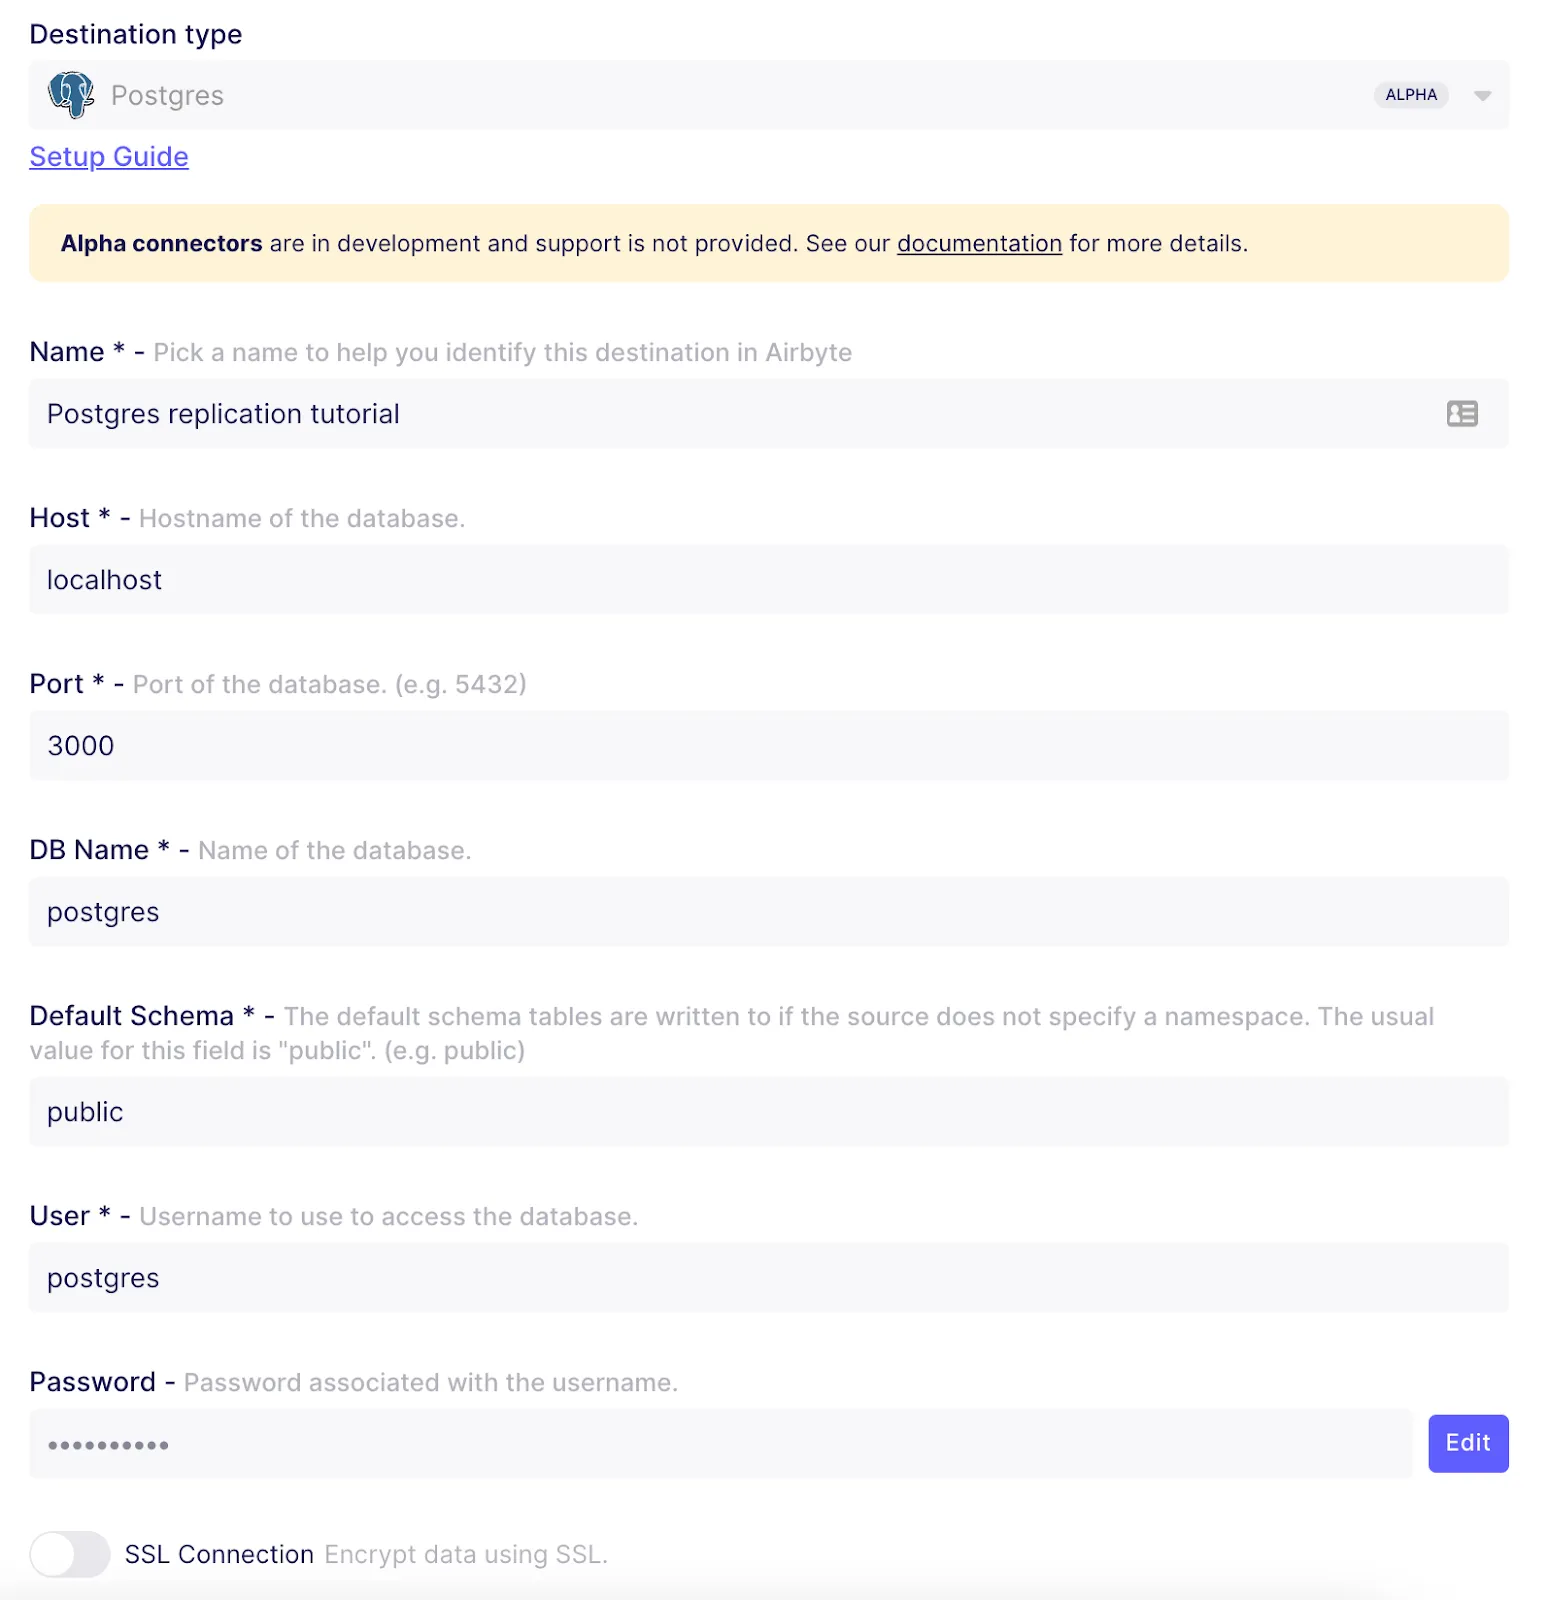
Go to destinations and add a new one. Select Postgres as the destination type and fill in with the following details.

That’s it. You have configured the source and destination.
Download our free guide and discover the best approach for your needs, whether it's building your ELT solution in-house or opting for Airbyte Open Source or Airbyte Cloud.

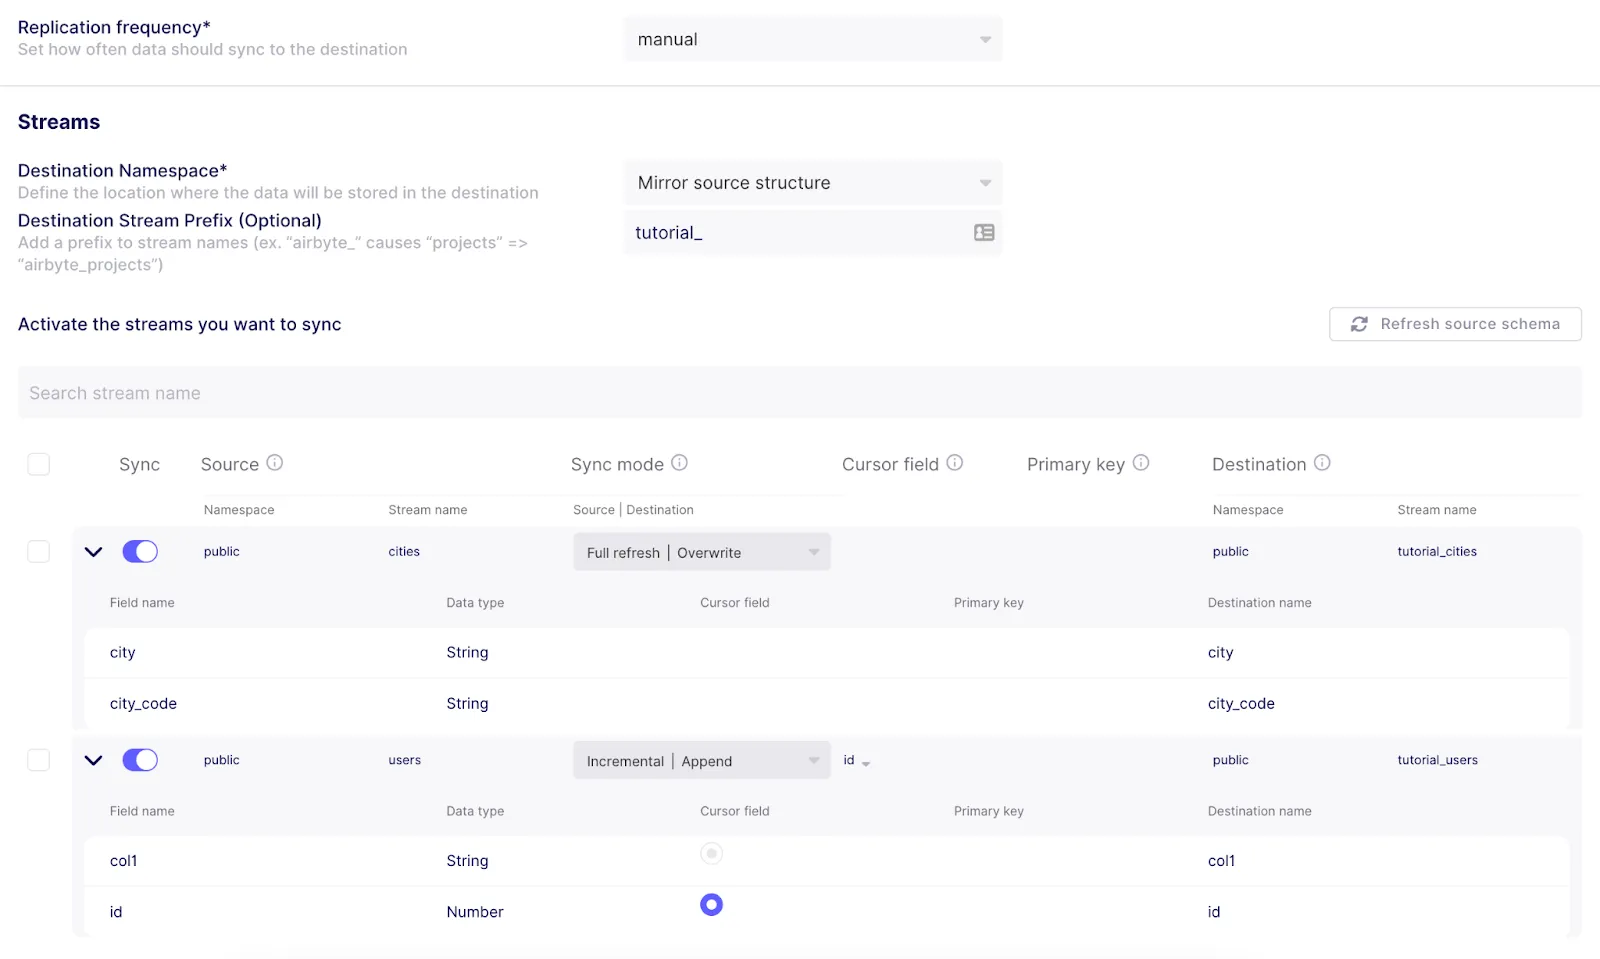
Go to connections and create a new connection. Then, select the existing Postgres source you have just created and then do the same for the destination. Once you’re done, you can set up the connection as follows.
Then, it’s time to configure the streams, which in this case are the tables in our database. If we expand the tables, we can see the columns they have. We can also see they’re part of the public namespace or schema. The destination schema will be also public.

Now, you should select a sync mode. I chose Full refresh | Overwrite to sync the cities table and Incremental | Append for the users table since it has an id column (primary key) suitable for the incremental cursor field. The most important thing to note is that you can have different sync modes for each table! Learn more about sync modes in our documentation.
Once you’re ready, save the changes. Then, you can run your first sync by clicking on “Sync now.” You can check your run logs to verify everything is going well. Just wait for the sync to be completed, and that’s it! You’ve synchronized two Postgres databases.

Now, let's verify that this worked. Let's output the contents of the destination database:
docker exec airbyte-destination psql -U postgres -c "SELECT * FROM public.tutorial_users;"

docker exec airbyte-destination psql -U postgres -c "SELECT * FROM public.tutorial_cities;"

You should see the rows from the source database inside the destination database. Note that Airbyte added extra columns which contain metadata used to support synchronization.
In this tutorial, you learned about PostgreSQL native replication and how to synchronize two Postgres databases with Airbyte. Apart from being straightforward, Airbyte is also highly flexible when it comes to selecting different synchronization methods for your replication.
If you enjoyed using Airbyte, you might want to check our fully managed solution: Airbyte Cloud.
We also invite you to join the conversation on our community Slack Channel to share your ideas with thousands of data engineers and help make everyone’s project a success. With Airbyte, the integration possibilities are endless, and we can't wait to see what you will build.
PostgreSQL supports two main replication models: Physical (Streaming) Replication, which replicates the entire database cluster at the block level using WAL shipping, and Logical Replication, which replicates specific tables using a publish/subscribe model. For streaming replication, we can use either synchronous or asynchronous modes, where synchronous ensures data is written to one or more standby servers before committing.
Logical replication in PostgreSQL works through a publish/subscribe model where publishers (source) define publications (sets of tables) using CREATE PUBLICATION, and subscribers (destinations) subscribe to these publications using CREATE SUBSCRIPTION. The publisher decodes changes from the WAL into a logical format, and subscribers apply these changes. This allows for selective replication of tables and is what Airbyte leverages for its CDC (Change Data Capture) implementation.
For large databases (especially those >500GB), CDC using logical replication is the most efficient method. This is because it only replicates actual data changes rather than entire tables, significantly reducing network bandwidth and processing overhead. The logical replication method tracks changes using Write-Ahead Logs (WAL), ensuring minimal impact on the source database's performance.
Airbyte's checkpointing feature in PostgreSQL replication helps maintain data integrity. Wherever a sync stops, the next time the Source attempts to extract data it can pick up where it left off and not have to go back to the beginning.

Thalia Barrera is a data engineer and technical writer at Airbyte. She has over a decade of experience as an engineer in the IT industry. She enjoys crafting technical and training materials for fellow engineers. Drawing on her computer science expertise and client-oriented nature, she loves turning complex topics into easy-to-understand content.

Thalia Barrera is a data engineer and technical writer at Airbyte. She has over a decade of experience as an engineer in the IT industry. She enjoys crafting technical and training materials for fellow engineers. Drawing on her computer science expertise and client-oriented nature, she loves turning complex topics into easy-to-understand content.
Download our free guide and discover the best approach for your needs, whether it's building your ELT solution in-house or opting for Airbyte Open Source or Airbyte Cloud.

Experience swift Postgres replication, effortlessly transferring data between databases in just 10 minutes.
Learn how to easily automate your LinkedIn Scraping with Airflow and Beautiful Soup.
Learn how to ingest and transform Github and Slack data with SQL and Python-based transformations.