Agent Engine Public Beta is now live!
Learn how to easily automate your LinkedIn Scraping with Airflow and Beautiful Soup.
Published on Aug 02, 2021
Summarize this article with:


Extracting data from LinkedIn can provide organizations with powerful business intelligence. Whether you're a recruiter looking to streamline candidate sourcing, a marketer seeking to understand your target audience, or a researcher analyzing professional trends, scraping LinkedIn profiles using Python can be invaluable. This tutorial will guide you through building a robust LinkedIn profile scraper using Apache Airflow and Python's BeautifulSoup library, complete with automated data extraction and storage workflows.
We'll combine the orchestration capabilities of Apache Airflow with the parsing power of BeautifulSoup to create a reliable, scalable scraping solution that can handle multiple profiles while respecting LinkedIn's platform guidelines. By the end of this guide, you'll have a fully functional data pipeline that can extract profile information and store it in a PostgreSQL database for further analysis.
Data scraping is an automated technique for extracting data from websites, applications, or documents. This process enables the efficient collection of large volumes of data, making it invaluable for tasks like market research, lead generation, or data analysis. While Python libraries like Beautiful Soup and Selenium make web scraping more accessible, it's important to note that scraping should always be done ethically, respecting website terms of service and rate limits.
Below are the prerequisite tools you’ll need to build your own LinkedIn profile data scraper:
Here is a quick command-line snippet that can help you install Apache Airflow on your local machine:
virtualenv airflow -p python3
source airflow/bin/activate
pip3 install apache-airflow
pip3 install apache-airflow-providers-airbyte
pip3 install beautifulsoup4
docker run --rm -P -p 127.0.0.1:5432:5432 -e POSTGRES_PASSWORD=password --name postgres postgres:alpine
Initiate the Airflow DB by running the following command:
airflow db init
Create a user for Airflow using the following command while making sure to update the required values with your own.
airflow users create --username {YOUR_USERNAME} --firstname {YOUR_NAME} --lastname {YOUR_LAST_NAME} --role Admin --email {YOUR_EMAIL}
Once the packages are installed start the airflow web server and scheduler by running the following commands in two separate terminal windows. Ensure that the virtual environment is active in both windows.
airflow webserver
airflow scheduler
Once the setup is complete, visit http://localhost:8080 to access the Airflow Web UI.
Enter the credentials used to create the user in the previous step. Once logged in you will have access to the Airflow UI as shown below.

In this recipe, the python scraper will parse and process the LinkedIn page and store data in JSON to be loaded into PostgreSQL. It will then trigger an Airbyte connection that will migrate the scraped data from that file to a PostgreSQL database.
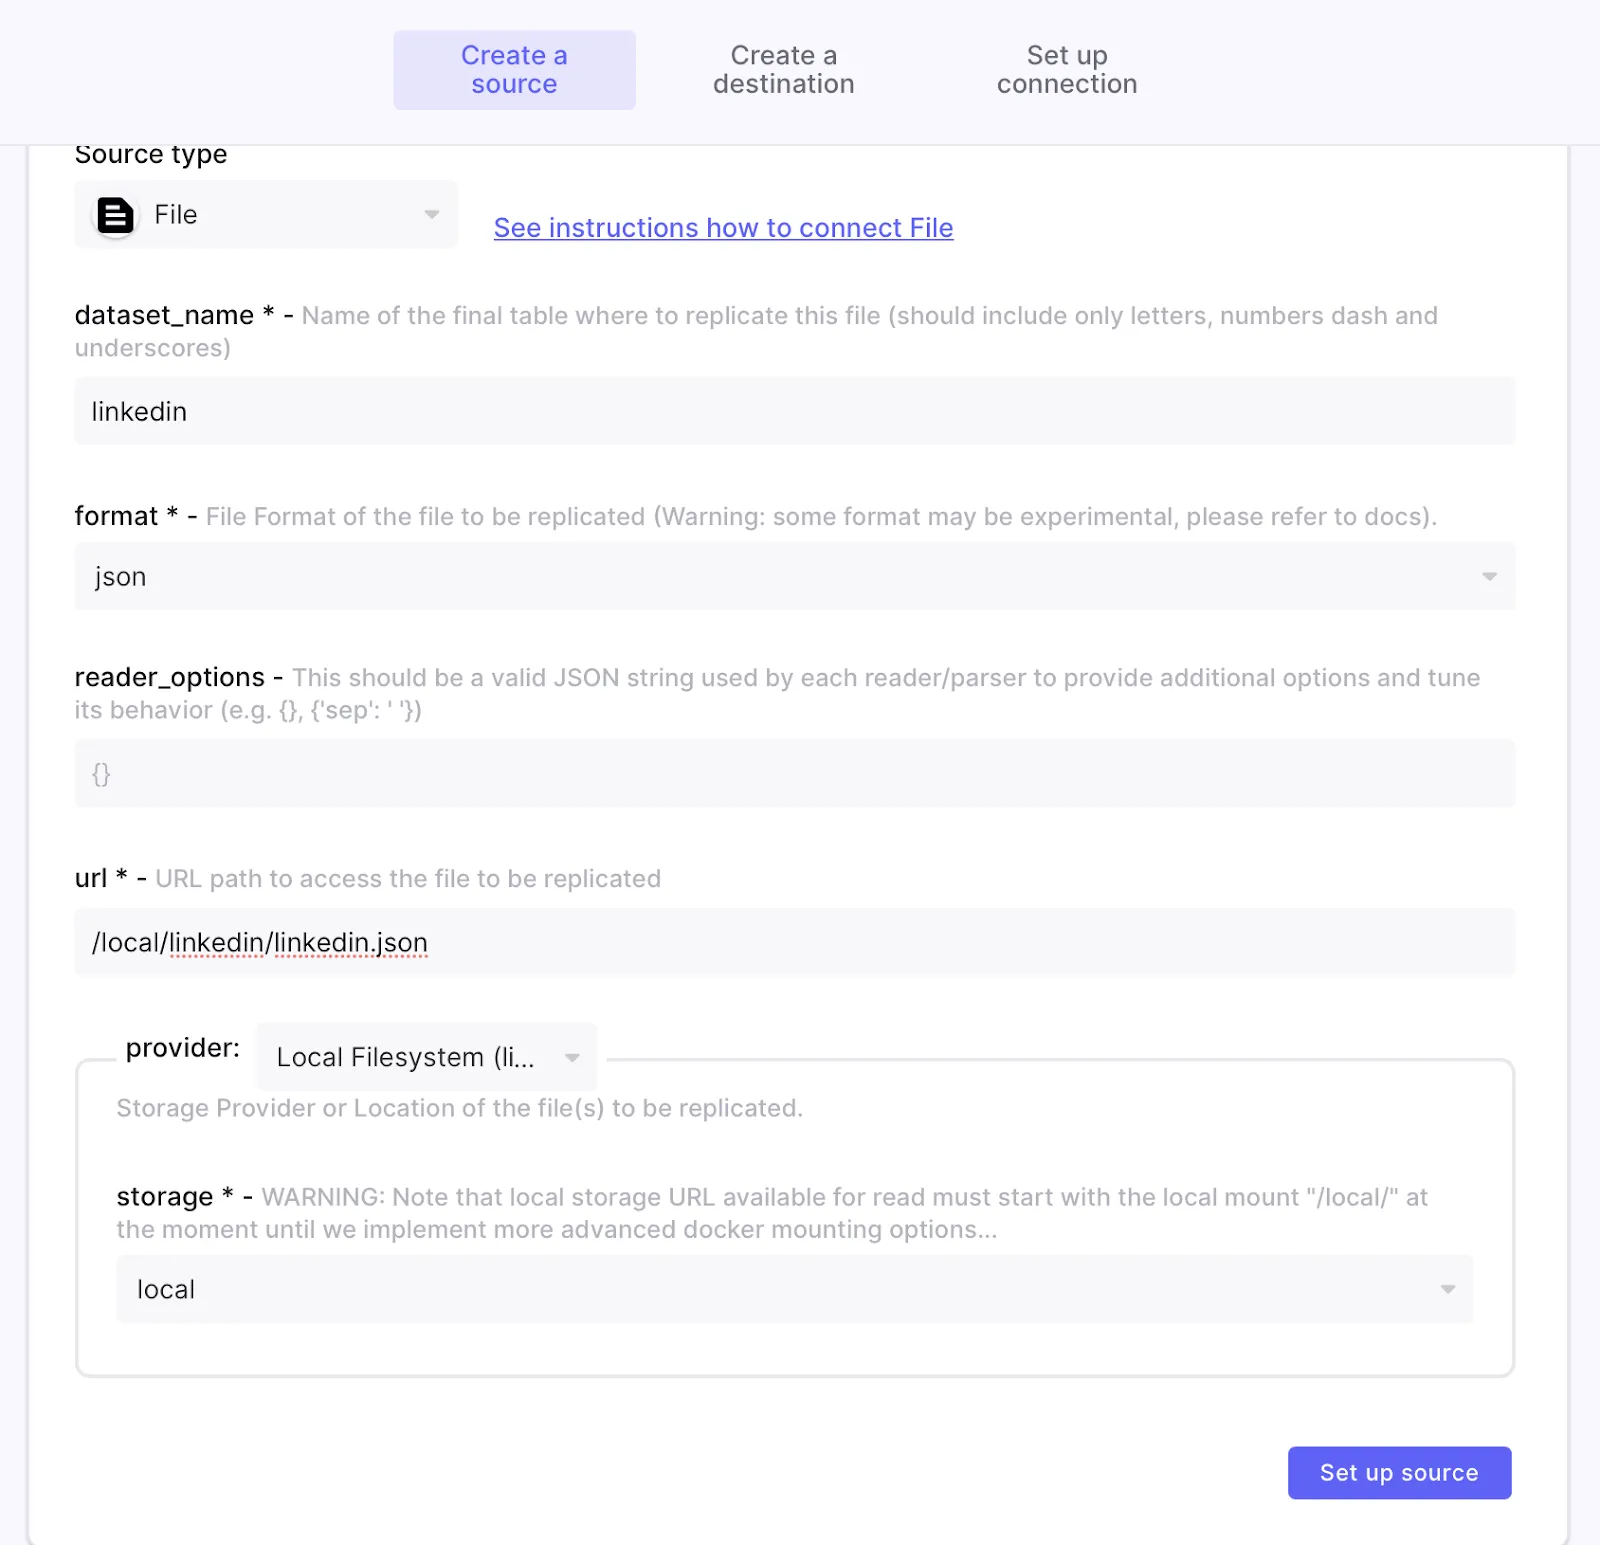
Setup the source for Airbyte by going to Connections > new connection.
Provide a name for the source, and select Source Type as File and then Local Filesystem under provider.
This input file needed by Airbyte needs to be located at the following physical local machine mount path (/tmp/airbyte_local/) which Airbyte mounts to ‘/local’. In this example, we have created a subdirectory under that physical mount path called linkedin and a JSON file called linkedin.json.
The effective logical URL that you can use in Airbyte is /local/linkedin/linkedin.json.
The source configuration should look something like this:
Once the file source is properly configured, the connection can be tested.

Download our free guide and discover the best approach for your needs, whether it's building your ELT solution in-house or opting for Airbyte Open Source or Airbyte Cloud.

The next step is to configure the destination for the scraped data, in this case a PostgreSQL database. If you do not have PostgreSQL set up, you can quickly set one with docker using the following command:
docker run --rm -P -p 127.0.0.1:5432:5432 -e POSTGRES_PASSWORD=password --name postgres postgres:alpine
Once you have PostgreSQL running, you will need a database created that will be used by Airbyte to write the data. Run the following commands to connect to PostgreSQL and create a new database called linkedin.
docker exec -ti postgres psql -U postgres
CREATE DATABASE linkedin;
In the Airbyte UI select PostgreSQL as your destination and enter the following values for your configuration.
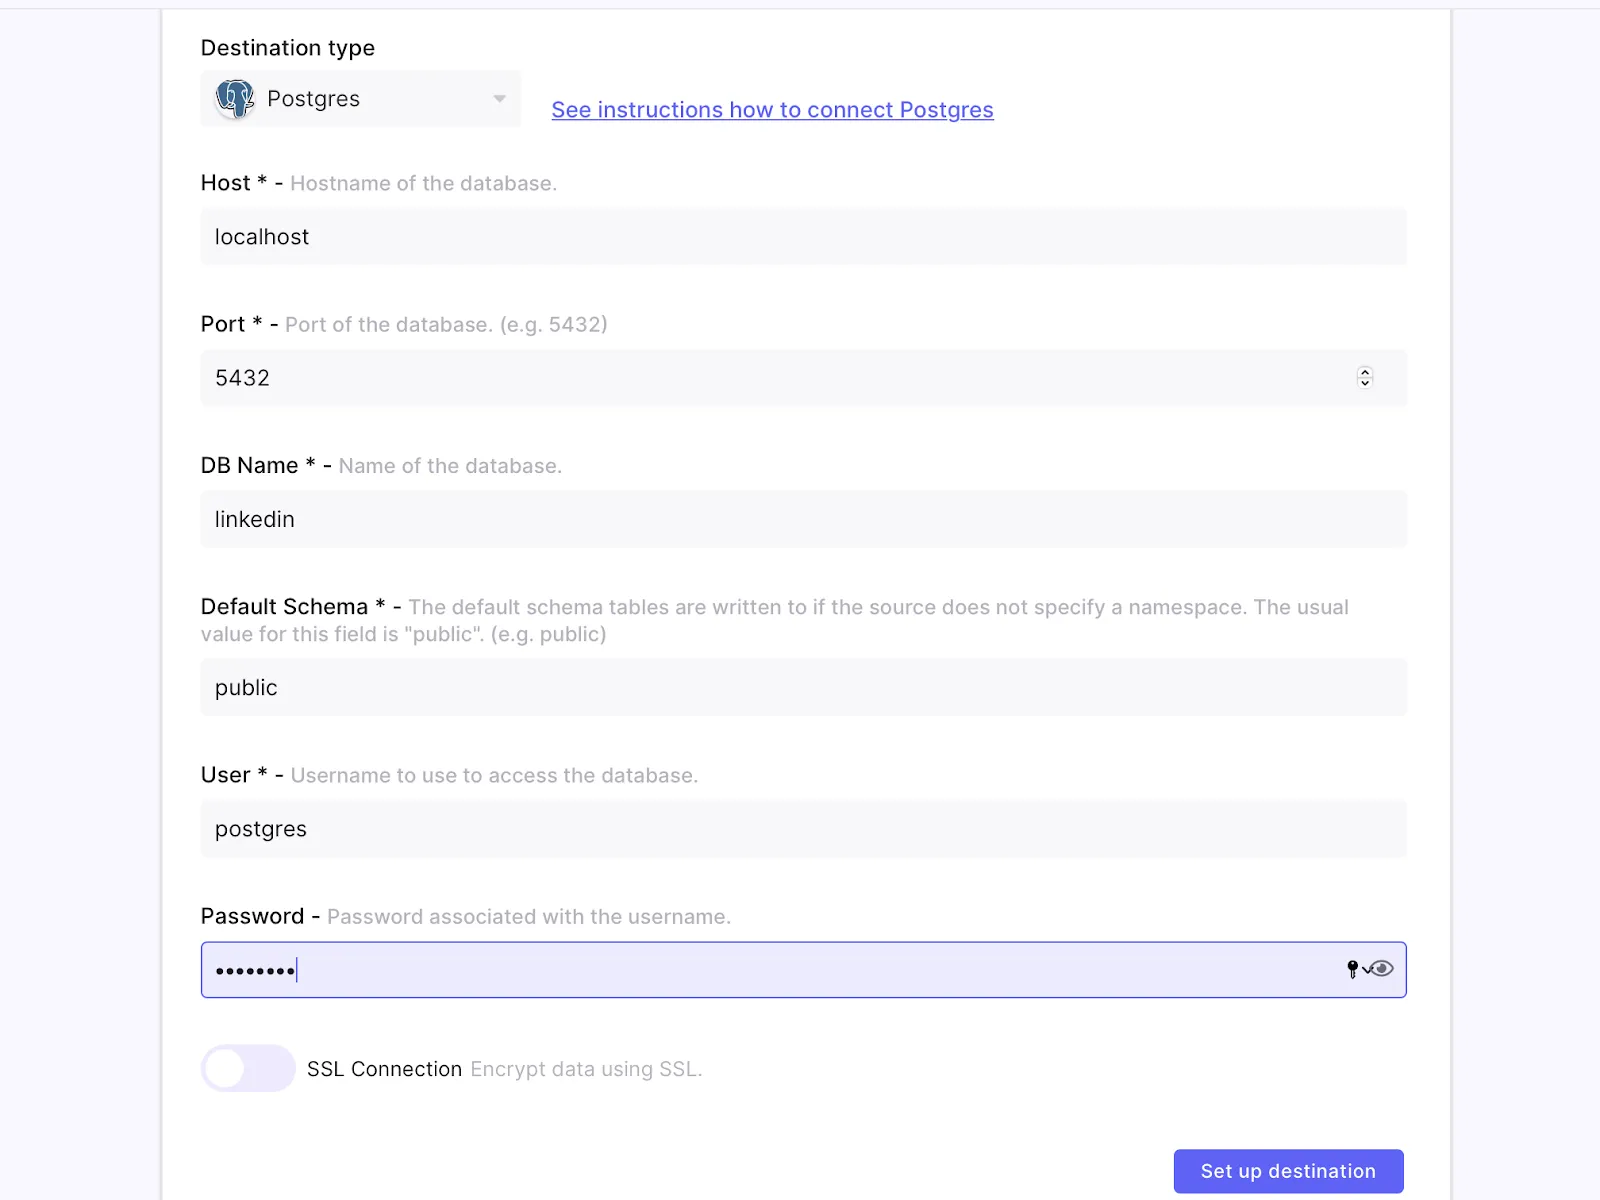
Before proceeding, ensure that the connection is successful.
Once the destination is set up, you can create the connection. Set the sync frequency to manual and the sync mode to append.
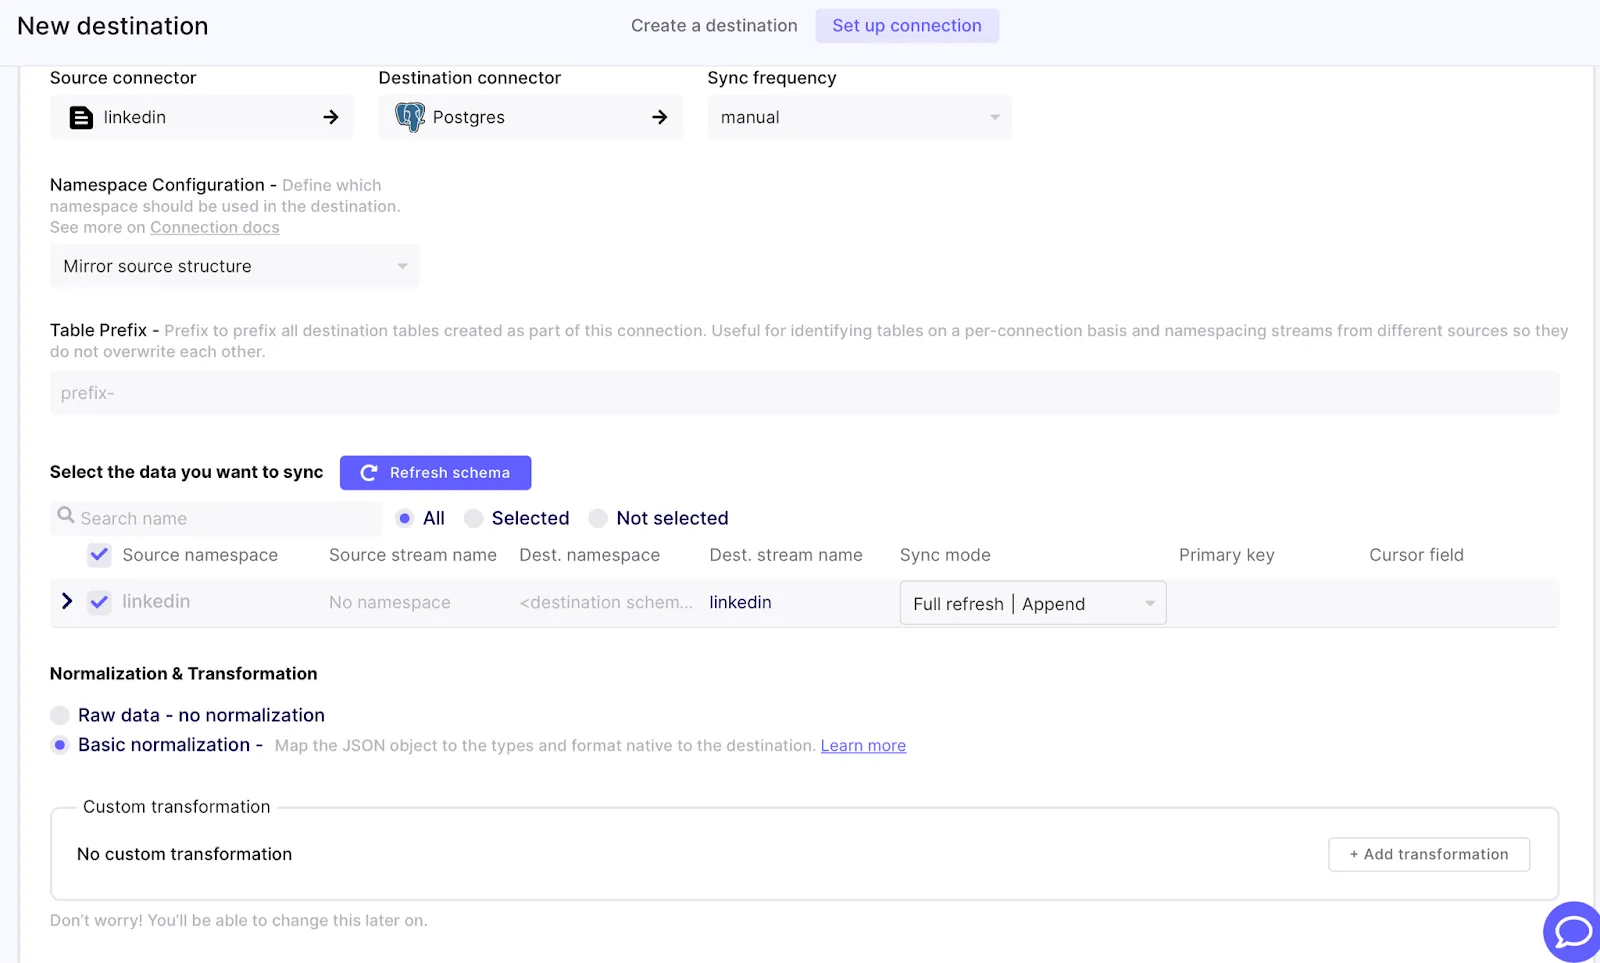
Once the connection is successfully set up, make a note of the connection ID which will be required for later for configuring Apache Airflow to trigger that connection. The ID can be found in the URL for that connection page.

The next step is to set up Apache Airflow so that it can trigger the Airbyte API endpoints.
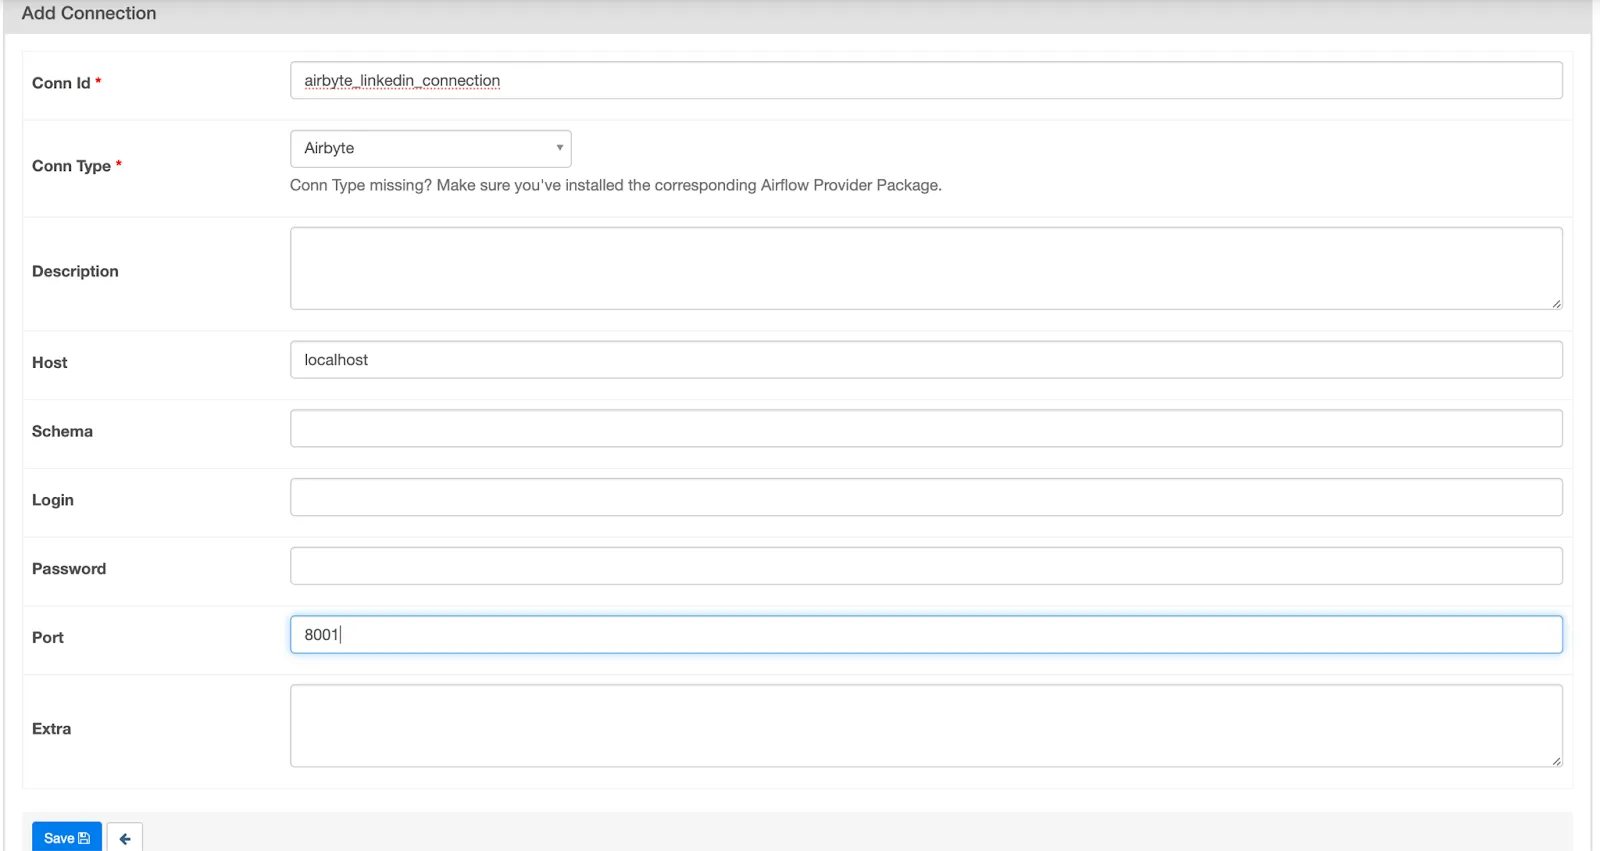
First go to Admin > Connection > Add Connection.
Give the connection ID a name (like airbyte_linkedin_connection in our case) and select Airbyte as the connection type. Enter localhost for host and 8001 for the port. Hit Save.
Now that the Airflow connection to trigger Airbyte is set up, we need to create a DAG inside Airflow that upon execution will run our python scraper, store the data in the JSON file and then trigger the Airbyte sync.
Create a dags folder and the dag file by running the following commands in your terminal. Airflow will automatically pick up the dag created in the folder upon restart.
cd airflow
mkdir dags && cd dags
touch airbyte_airflow_dag.py
To figure out which Linkedin profiles to scrape, the script needs a simple CSV file that contains the URLs to the required profiles as shown. Create a csv file with the following data on your local machine. More profiles can easily be added to the bottom of this file. Keep track of the location of this file since it is needed by the python script.
person_id,profile_url
1,https://www.linkedin.com/in/micheltricot/
2,https://www.linkedin.com/in/jean-lafleur-294083185/
3,https://www.linkedin.com/in/jrhizor/
Download Chrome driver and keep track of its location on your file system. This is an open source tool for automated testing of web apps across many browsers, and in this case we will use it for accessing LinkedIn programmatically in our Python web scraper.
Next copy the following into a file called airbyte_airflow_dag.py. Make sure to update the highlighted values.
import requests
from bs4 import BeautifulSoup
import pandas as pd
import re
import os
from datetime import datetime

import json
from selenium import webdriver
from airflow import DAG
from airflow.utils.dates import days_ago
from airflow.providers.airbyte.operators.airbyte import AirbyteTriggerSyncOperator

with DAG(dag_id='trigger_linkedin_airbyte_job',
        default_args={'owner': 'admin'},
        schedule_interval='@daily',
        start_date=days_ago(1)
   ) as dag:

df=pd.read_csv('{PATH_TO}/profiles.csv')
driver = webdriver.Chrome('{PATH_TO}/chromedriver')

#login using webdriver
driver.get('https://www.linkedin.com/login?trk=guest_homepage-basic_nav-header-signin')
username = driver.find_element_by_id('username')
username.send_keys('{YOUR_LINKEDIN_USERNAME}')
password = driver.find_element_by_id('password')
password.send_keys('{YOUR_LINKEDIN_PASSWORD}')
sign_in_button = driver.find_element_by_xpath('//*[@type="submit"]')
sign_in_button.click()
Json_data = []
for i in range(df.shape[0]):

   URL = df['profile_url'][i] #change profile_url here
   driver.get(URL)

   soup = BeautifulSoup(driver.page_source, 'html.parser')

   person_id = df['person_id'][i]
   name = soup.find('div', {'class': 'display-flex justify-space-between pt2'}).find("h1").text.strip().encode('ascii', 'ignore').decode()
   position = soup.find('div', {'class': 'display-flex justify-space-between pt2'}).find('div', {'class': 'text-body-medium break-words'}).text.strip().encode('ascii', 'ignore').decode()
   location =soup.find('div', {'class': 'display-flex justify-space-between pt2'}).find('span', {'class': 'text-body-small inline t-black--light break-words'}).text.strip().encode('ascii', 'ignore').decode()
   company = soup.find('div', {'class': 'display-flex justify-space-between pt2'}).find('div', {'aria-label': 'Current company'}).text.strip().encode('ascii', 'ignore').decode()
   try:
       connec = soup.find('div', attrs={'class' : 'ph5'}).find('span', {'class': 'link-without-visited-state'}).text.strip().encode('ascii', 'ignore').decode()
   except:
       connec = soup.find('div', {'class': 'ph5 pb5'}).find('span', {'class': 't-bold'}).text.strip().encode('ascii', 'ignore').decode()
   no_conn=connec.split()[0]
   no_conn=no_conn[:3]
   no_conn=int(no_conn)

  user_data = dict()
  user_data['Person ID'] = str(person_id)
  user_data['Name'] = str(name)
  user_data['Role'] = str(position)
  user_data['Location'] = str(location)
  user_data['Current Company'] = str(company)
  user_data['Number of Connections'] = int(no_conn)
  json_data.append(user_data)


with open('/tmp/local_airbyte/linkedin/linkedin.json', 'w') as fp:
   json.dump(json_data, fp, sort_keys=True, indent=4)


   json_to_postgres = AirbyteTriggerSyncOperator(
       task_id='airbyte_airflow_linkedin',
       airbyte_conn_id='airbyte_linkedin_connection',
       connection_id='{YOUR_AIRBYTE_CONNECTION_ID}',
       asynchronous=False,
       timeout=3600,
       wait_seconds=3
Once the file is saved, restart the airflow webserver and scheduler and login to the Airflow UI again.
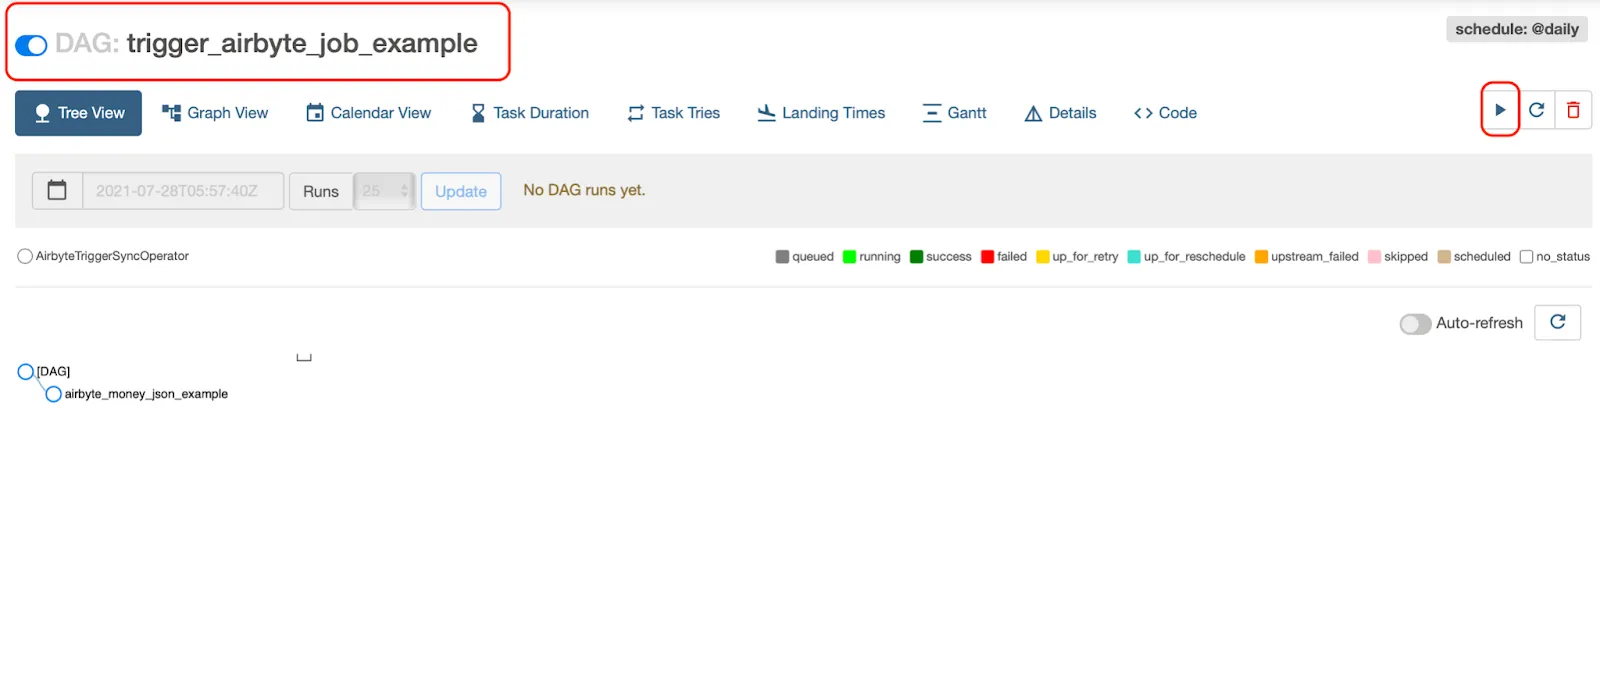
Once logged in, the newly added DAG should be visible. The DAG is scheduled to be run once a day but can also be triggered manually.
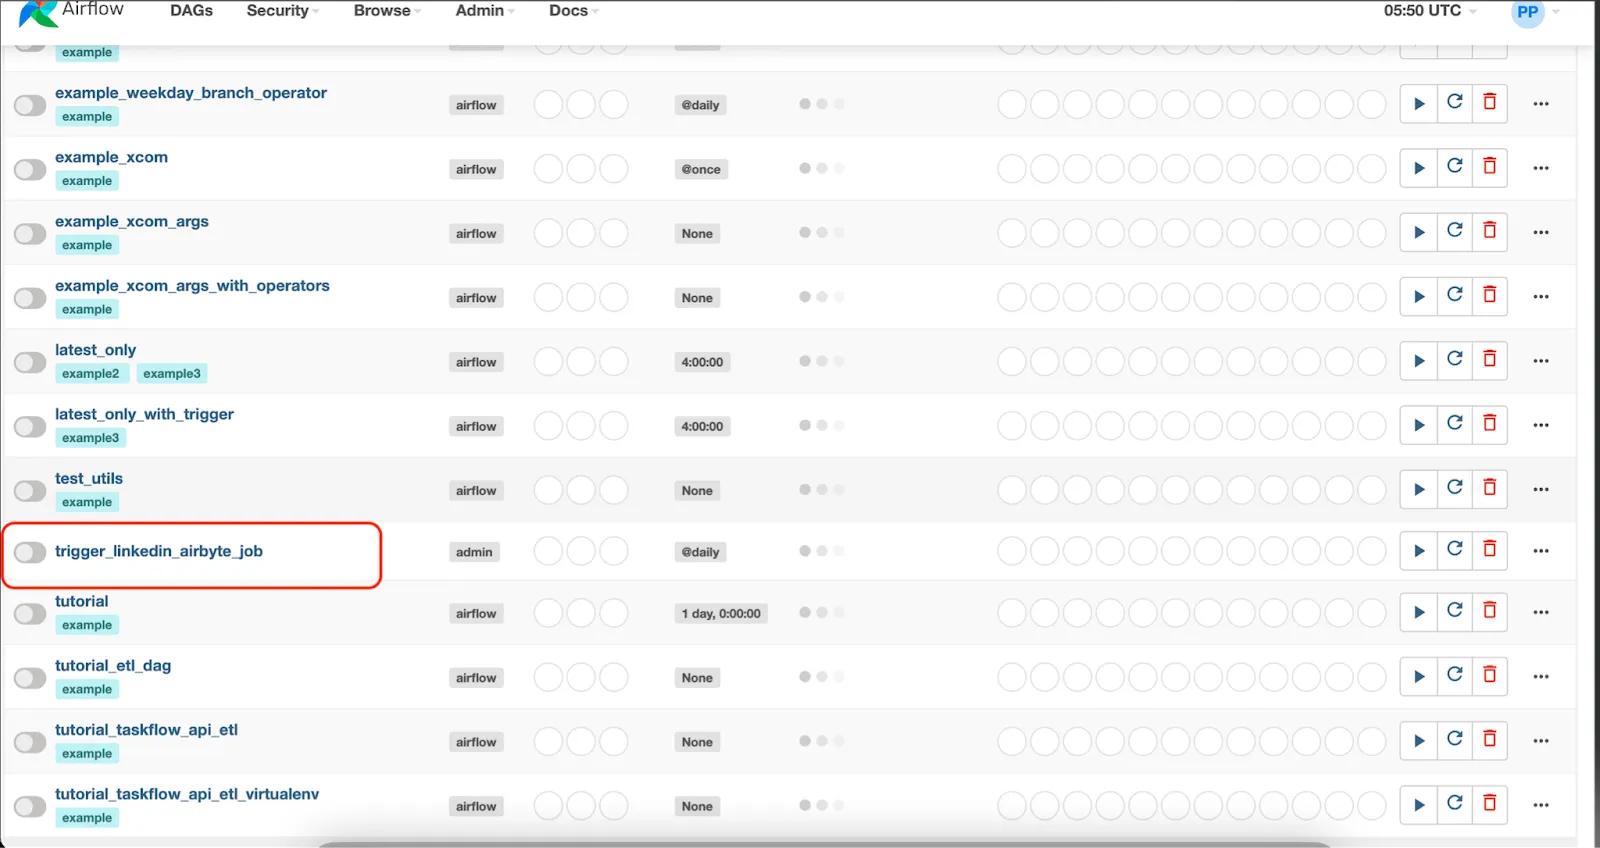
Click on the DAG to open up the DAG page. Here turn on the DAG and click on Play Button > Trigger DAG. This will begin the LinkedIn scraping.
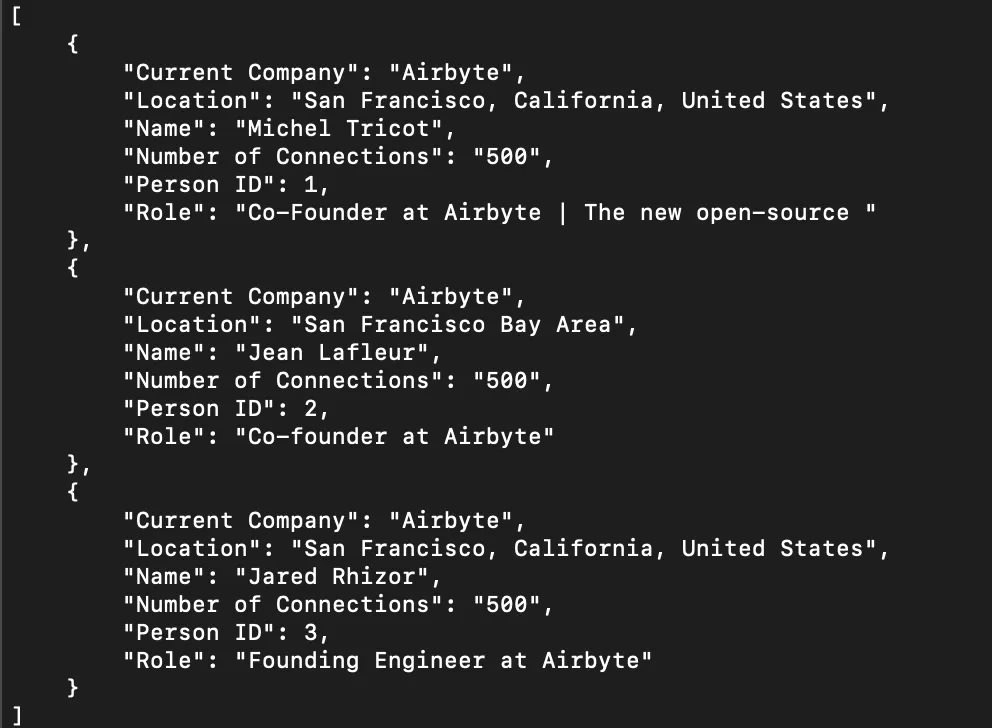
During the scraping the script will write data into the /tmp/airbyte_local/linkedin/linkedin.json and should look something like this.
Once the scraping is complete, it will trigger the Airbyte sync.
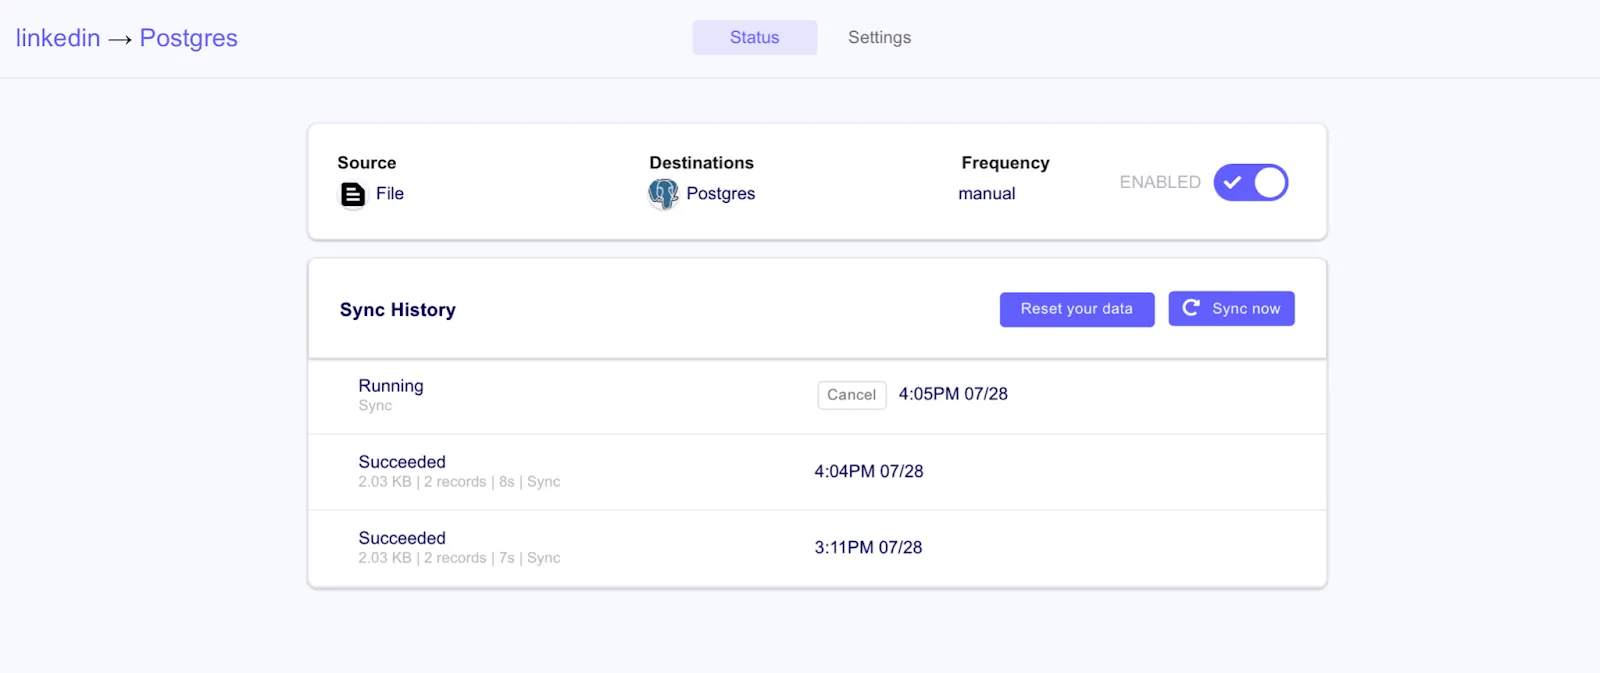
Once the sync is complete, you can verify that the Airflow job ran successfully in the UI.

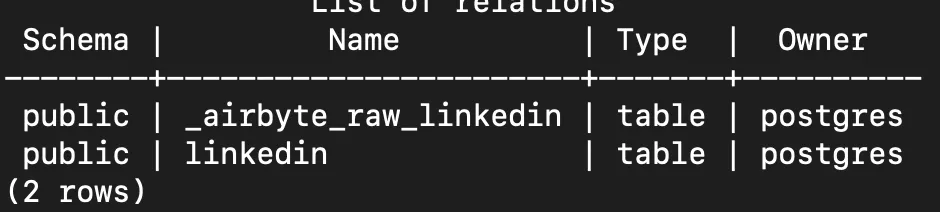
You can view the tables created by Airbyte by running the following commands:
docker exec -ti postgres psql -U postgres
c linkedin
dt
You can view the data imported to the table by running the following SQL table query on the linked table in postgreSQL
SELECT * FROM linkedin;

By querying this data, marketing campaigns can be executed to raise awareness for a new product feature based on job titles.
Here’s what we’ve accomplished during this recipe:
This was just one example of how Apache Airflow along with Airbyte can be used to create robust and complex workflows using open source tools.
We know that development and operations teams working on fast-moving projects with tight timelines need quick answers to their questions from developers who are actively developing Airbyte. They also want to share their learnings with experienced community members who have “been there and done that.”
Join the conversation at Airbyte’s community Slack Channel to share your ideas with over 1000 data engineers and help make everyone’s project a success.
Good luck, and we wish you all the best using Airbyte!


Download our free guide and discover the best approach for your needs, whether it's building your ELT solution in-house or opting for Airbyte Open Source or Airbyte Cloud.
Learn how to ingest and transform Github and Slack data with SQL and Python-based transformations.
Learn how to load data to a Databricks Lakehouse and run simple analytics.
Learn how Airbyte’s incremental synchronization replication modes work.