Use the integrated machine learning in MindsDB to forecast Shopify store metrics.
Published on Jul 21, 2021
Summarize this article with:


With the volume of data increasing exponentially, it's critical for businesses focused on e-commerce to leverage that data as quickly and efficiently as possible. Machine learning represents a disruption to increase predictive capabilities and augment human decision making for use cases like price, assortment and supply chain optimization, inventory management, delivery management, and customer support. In this ‘how-to’ guide, we’ll provide step-by-step instructions showing you how to simply and inexpensively integrate machine learning into an existing Shopify account using Airbyte, an open-source data integration platform, and MindsDB, an open-source AutoML framework that runs on top of any database.
Our guide will consist of two parts:
Let’s get started!
We will assume you already have Airbyte set up via Docker. If not, here’s a link to a Getting Started article that shows how to do it.
Airbyte’s Shopify connector is going to allow us to get your Shopify data and store it in a database or data warehouse. For this article, we will be storing the data obtained via the Shopify connector into a PostgreSQL database.
The Airbyte Shopify connector is capable of syncing abandoned checkouts, collections, custom collections, customers, metafields, orders, products and transactions to the destination of your choice.
Let’s get started by spinning up the Airbyte web app. First, go into the directory where you cloned the Airbyte repository, and then run the following in your terminal:
docker-compose upThen, visit http://localhost:8000 in your browser to see the Airbyte dashboard.
In the Sources section, click on the + new source button in the top right corner of the dashboard to add a new source.
In the new screen, enter the name of the source—we’ll call the source shopify-source, but you can name it anything you want. Then, in the Source type dropdown, select Shopify.

Selecting the Shopify connector will prompt Airbyte to load the configuration parameters that the Airbyte Shopify connector needs. This might take a while if it is the first time you are selecting the Shopify connector. Airbyte will pull the Shopify connector image from Docker Hub behind the scenes.
When it’s done pulling the image, you will see the following:
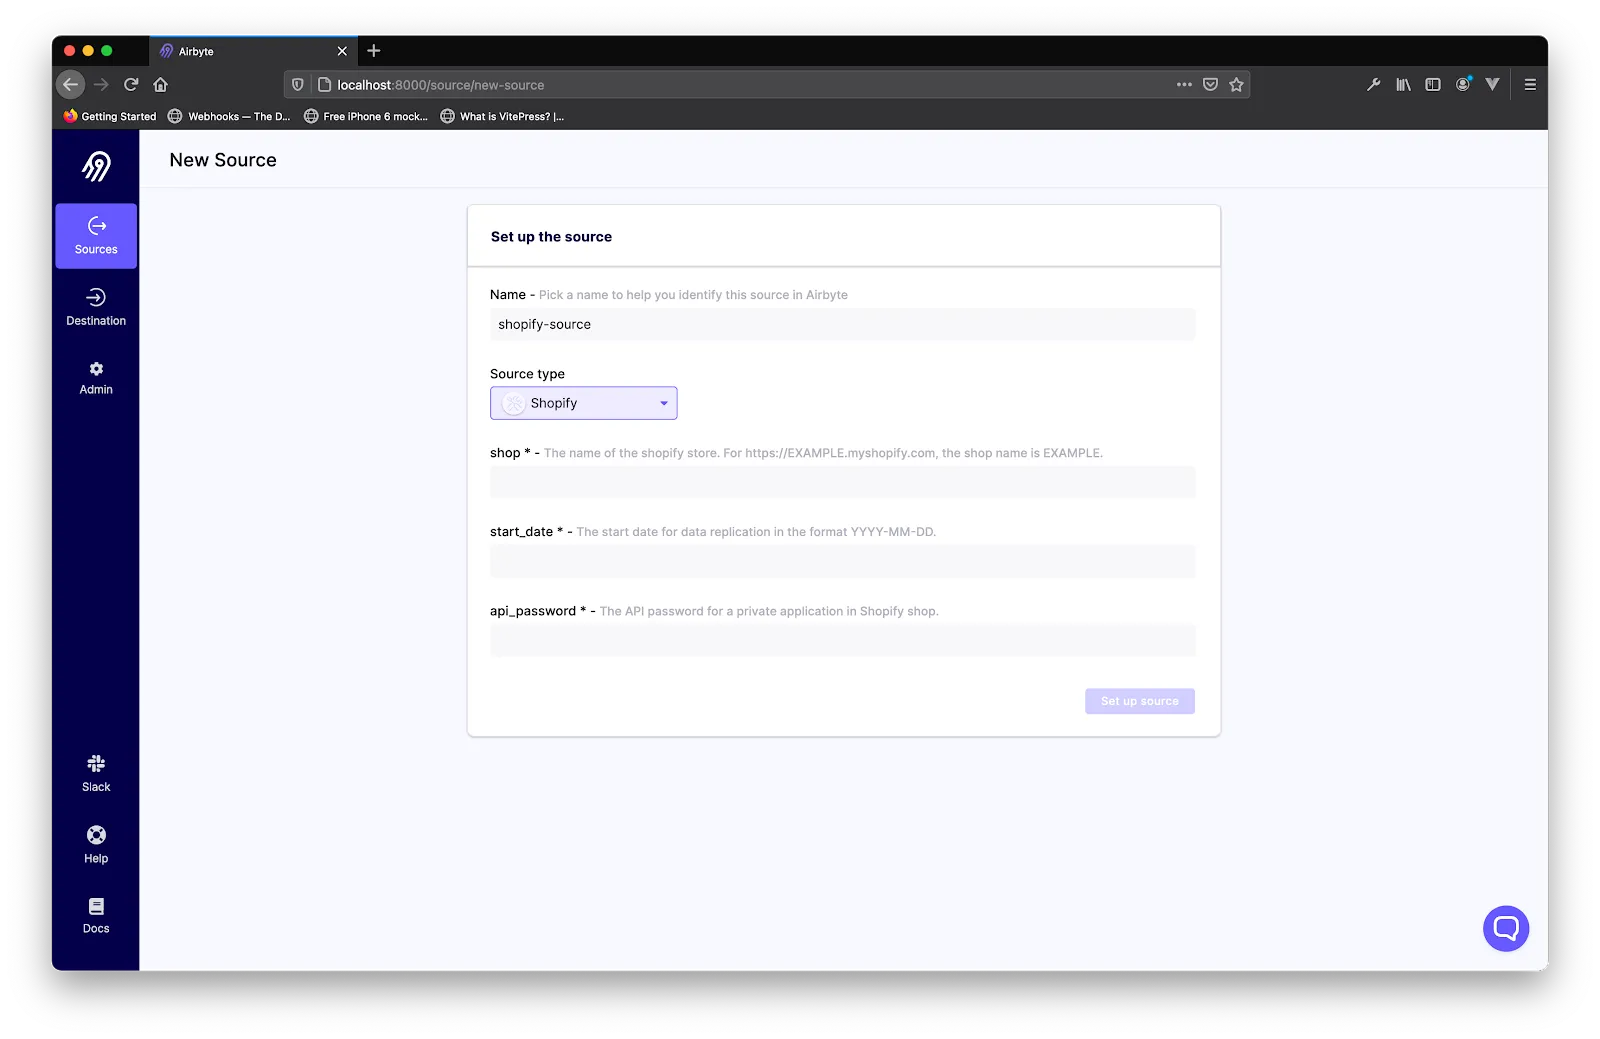
Let’s peek into the parameters the Shopify connector needs:
The shop name and start_date can be filled in readily, but the api_password requires that you create a new private app on Shopify in case you don’t already have one. Let’s walk through creating a private app on Shopify and obtaining the password that we need to set up the Airbyte Shopify connector.
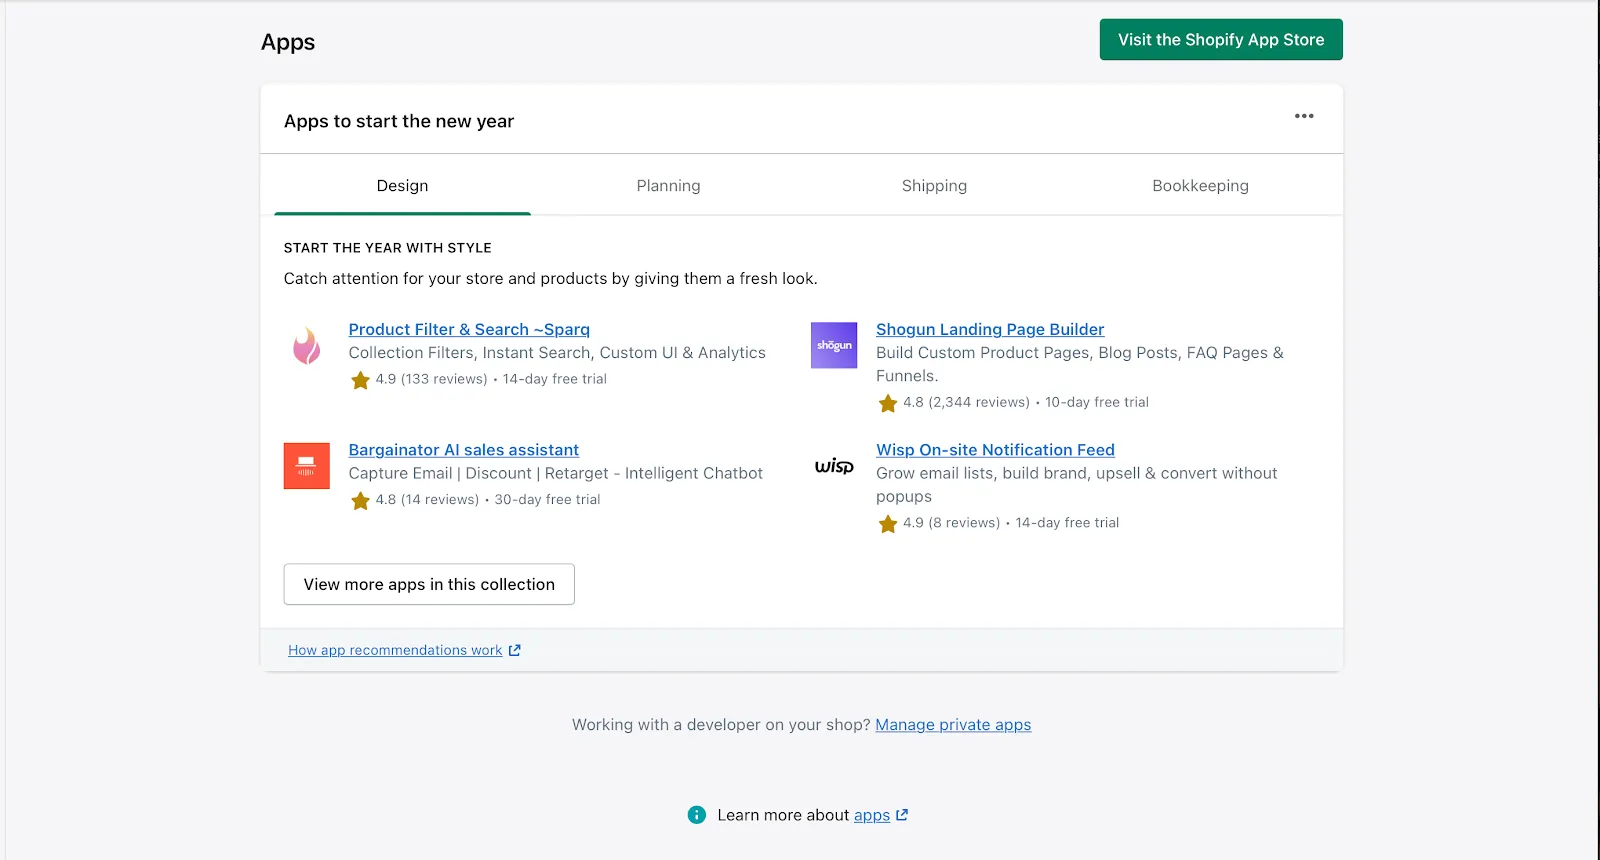
To create a Shopify private app, log into your Shopify dashboard and click on Apps in the sidebar menu.
Then, click on the Manage private apps link at the bottom of the page. If you have not enabled private apps previously, you will see a screen to enable it. Click on the Enable private app development button.
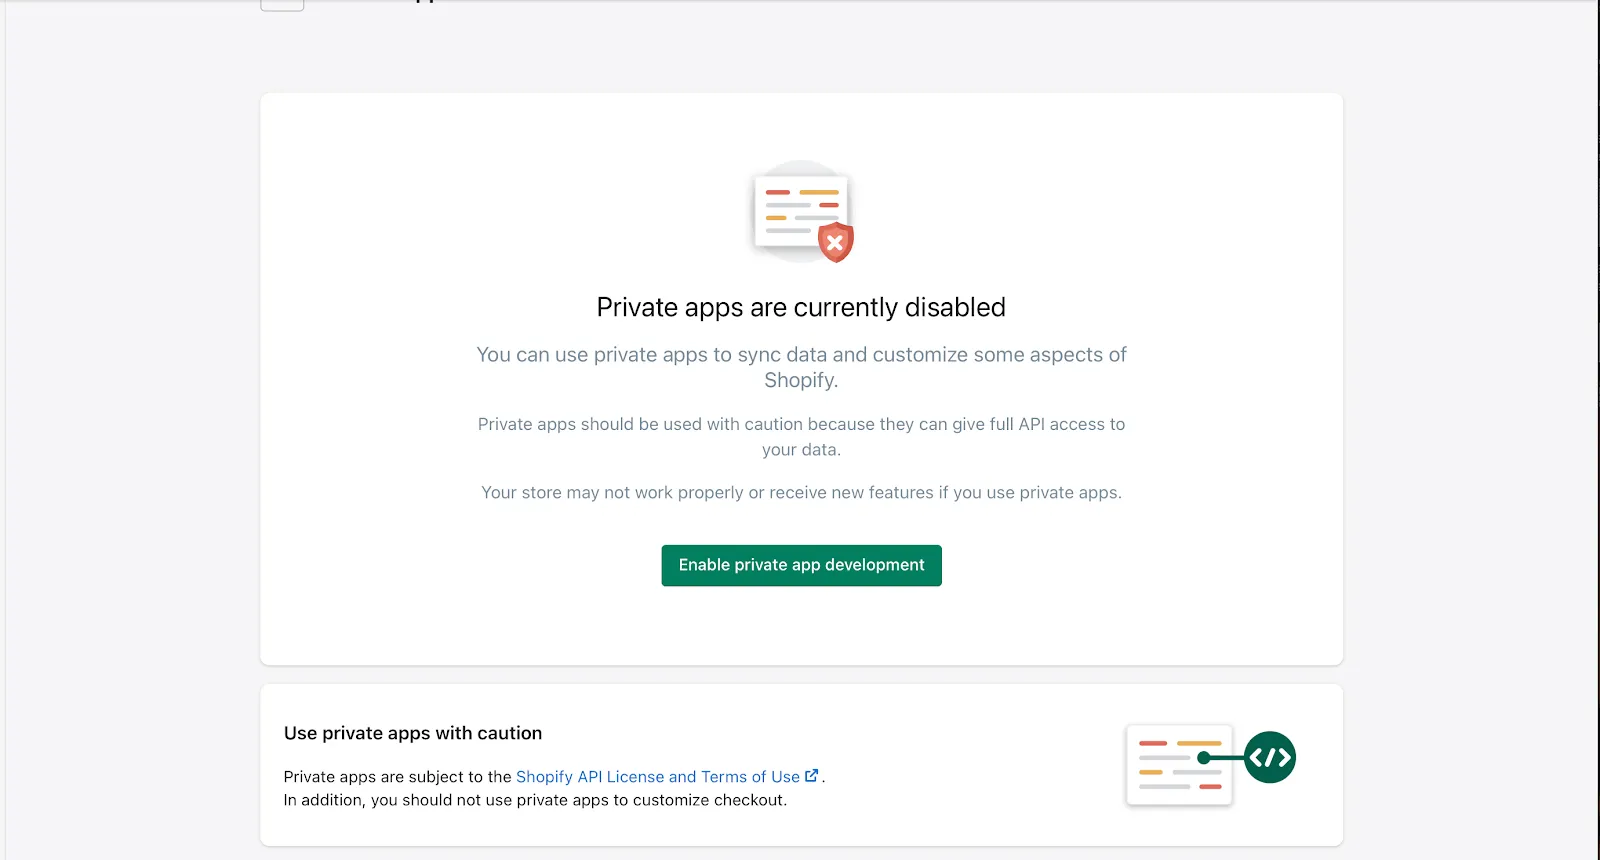
You will be taken to a screen to accept Shopify’s terms on private app development usage. Check the checkboxes if you agree, and then click on Enable private app development once again.
Once private app development has been enabled, you will be redirected to a screen where you can create a private app.
Click on the Create private app button to get started.
In the App details section, fill in the private app name and emergency developer email.

Go into to the Admin API section and perform the following:
You will be greeted with a confirmation modal—just click on the Create app button to confirm the creation of the private app. That’s it! Now we just need to get the private app API password.
On the same page, scroll down to the Admin API section and copy your private app API password.
Then, head over to the Airbyte web UI dashboard and provide the Shopify connector configuration form with the password you just copied.
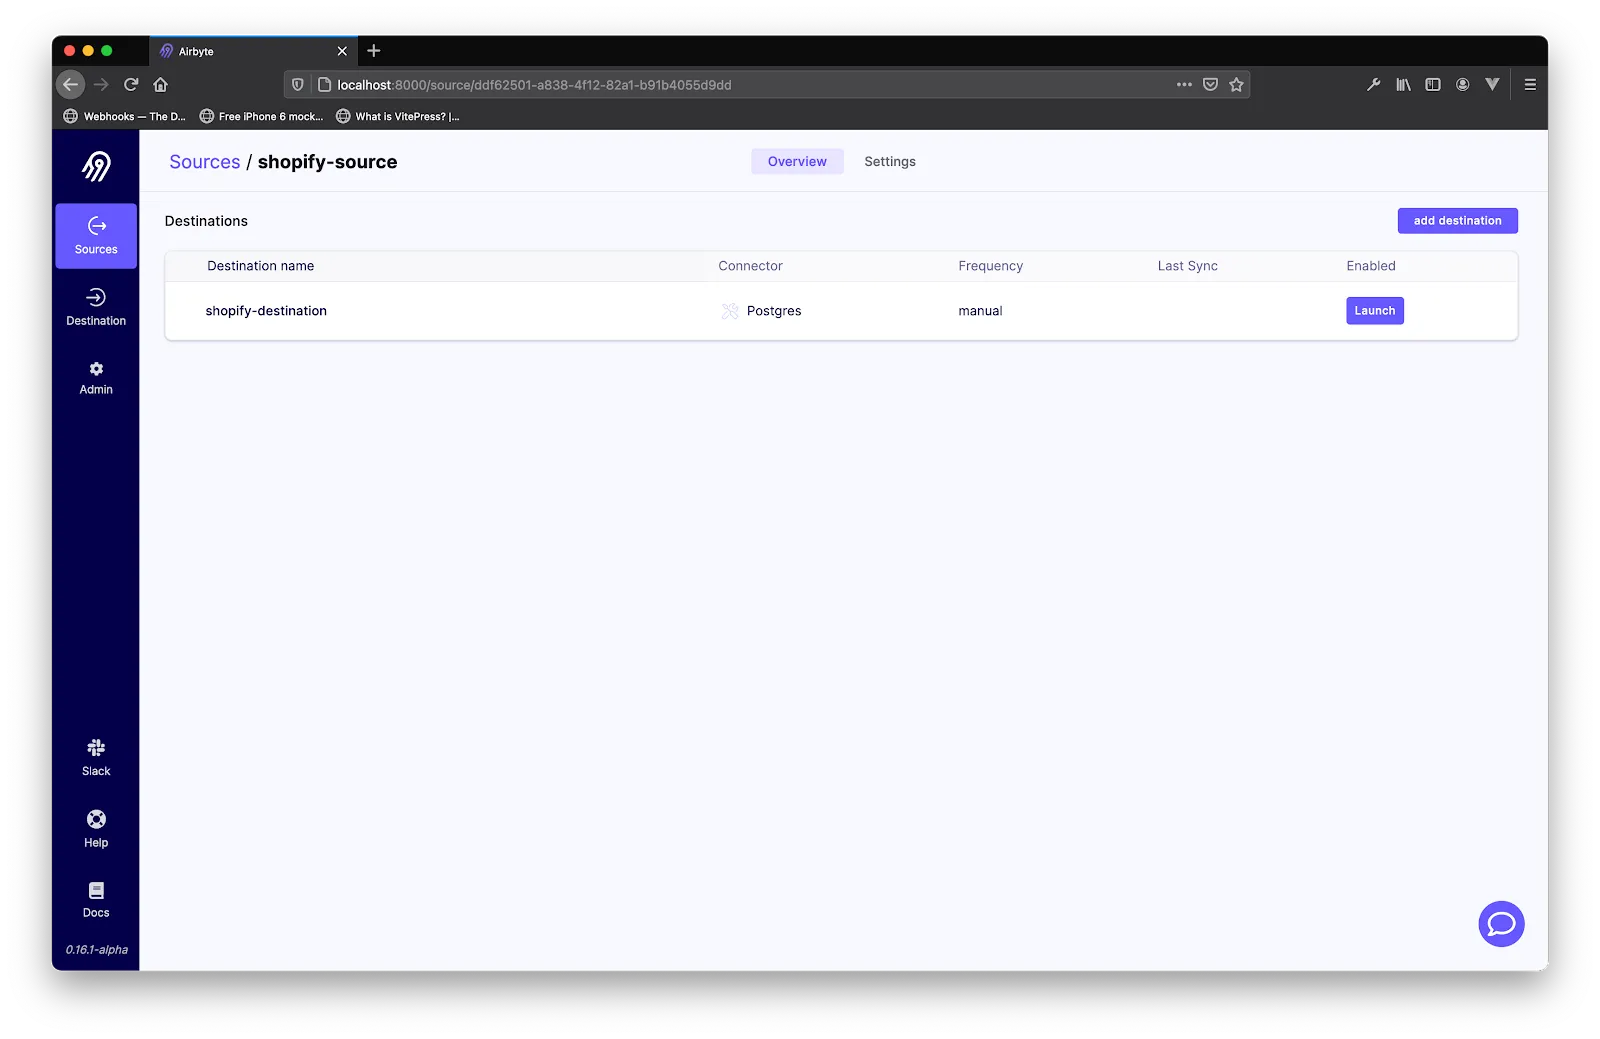
In the Airbyte UI where you left off setting up Shopify, paste in the password you copied from Shopify and then hit Set up Source.
Once you have set up the source successfully, Airbyte will navigate to the destination screen. Click on the add destination button in the top right corner. In the dropdown, click on + add a new destination.
Airbyte will validate the source and then present a form to enter the destination name and type. Enter shopify-destination as the name and choose Postgres as the destination type. To set up our Postgres destination, we will spin up a Postgres container via Docker. So run the following in your terminal:
docker run --rm --name shopify-db -e POSTGRES_PASSWORD=password -v $HOME/docker/volumes/postgres:/var/lib/postgresql/data -p 2000:5432 -d postgres
Note that the -v $HOME/docker/volumes/postgres:/var/lib/postgresql/data bit of the above snippet is important to persist the data, as by default, data in a Postgres Docker container is ephemeral and will be lost when the container is destroyed. You can create the directory on your local machine (as we are assuming it doesn’t exist). Run the following to create it before the command to spin off the Docker container:
mkdir -p $HOME/docker/volumes/postgres
Verify that the container is running. Then fill in the login credentials in the Airbyte dashboard.

After Airbyte has set up the destination successfully, you will be presented with the schema of the data to be replicated onto the destination, and a dropdown to specify the syncing frequency with the source. In this tutorial, we chose manual, as we want direct control over when our syncs take place.
Then hit the Set up connection button.
Airbyte will navigate you to the destination page where you can hit the Launch button to start the replication. To monitor the syncing, you can click on the destination name to see the syncing process and status.
Once Airbyte is done replicating the data onto the Postgres database, the status of the sync will change to Succeeded. To confirm that the syncing was successful, you can run the below command:
docker exec shopify-source psql -U postgres -c "SELECT COUNT(*) FROM public.transactions;"
The above should return the count of all the records on the transactions table.
The next step is to perform predictive analysis on top of the store data that we have imported inside the database. Before we do that, we need to first install MindsDB. There are a few ways to install it as described in the documentation. Our suggestion is to always use Docker as it encapsulates all of the dependencies for running MindsDB. To download the latest production image, run the following command:
docker pull mindsdb/mindsdb
Alternatively, if you have Python pre-installed on your machine, you can use pip to install the latest MindsDB version. To do that, create a new virtual environment and run:
pip install mindsdb
Then, to start the server run:
docker run -p 47334:47334 mindsdb/mindsdb
Or, if you have installed with pip run:
python3 -m mindsdb
Finally, MindsDB Studio should be automatically started on your default browser on http://127.0.0.1:47334/.
There are three ways that you can use MindsDB. The first is through the graphical user interface called MindsDB Studio. The second way is using the REST APIs. To make the integration simple, you can use our Python or JavaScript SDKs. The third way is to do it directly inside the database through executing SQL statements.
In this tutorial, we will explain everything via the MindsDB Studio so you can follow along visually. We will also share the SQL queries in case you want to test directly inside your database.
To connect MindsDB and PostgreSQL from the left navigation menu, head over to integrations and click on the Add Database button. Here, you will need to fill out all of the parameters for connecting to the PostgreSQL database.
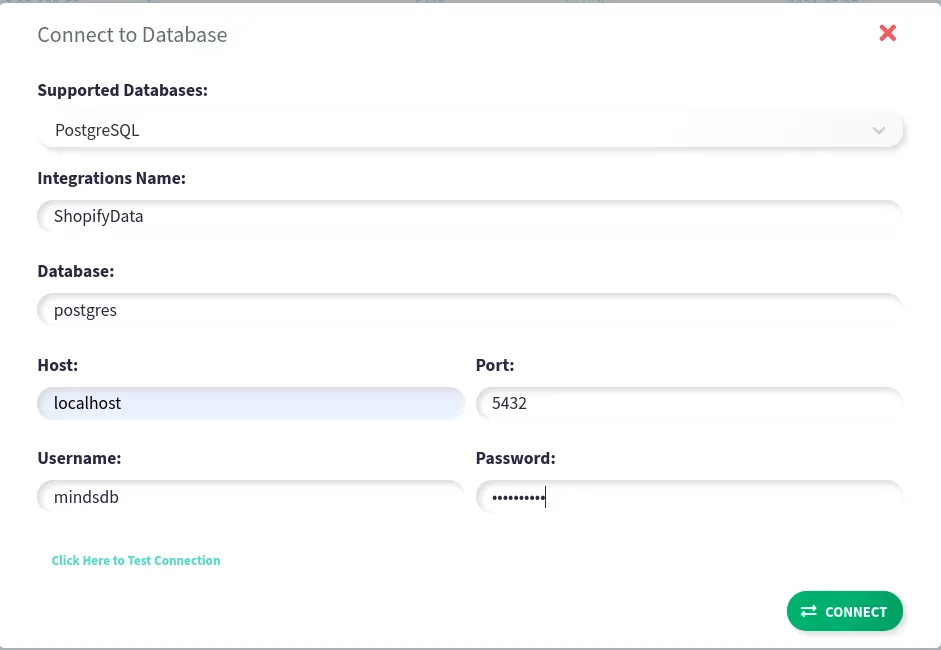
The required parameters to connect to PostgreSQL are:
After filling the form, click on CONNECT. You have now successfully connected to PostgreSQL. The next step is to create a datasource from the data which you would like to use for model training.
Let’s get an overview of the data. After we’ve imported the data inside PostgreSQL, Airbyte created different tables in the public schema. If you list the tables, you will notice that there are tables for orders, orders_refunds, products, transactions, abandoned_checkouts, and a few other tables that Airbyte has created before importing the data.

The data that is important to predict the future number of orders is inside the orders table. Let’s SELECT * FROM orders; so we can see the list of orders. There are more than 30 columns inside the table, but we will focus only on:
There are a lot of additional options that you can use to do predictive analytics on top of the Shopify data. To keep the showcase simple, we will focus on the above 3 parameters and train a model that estimates the number of orders that the store will receive over the next period.
Go to the Database Integrations dashboard and click on NEW DATASET. In the popup, you will be able to SELECT the data to train the model:.
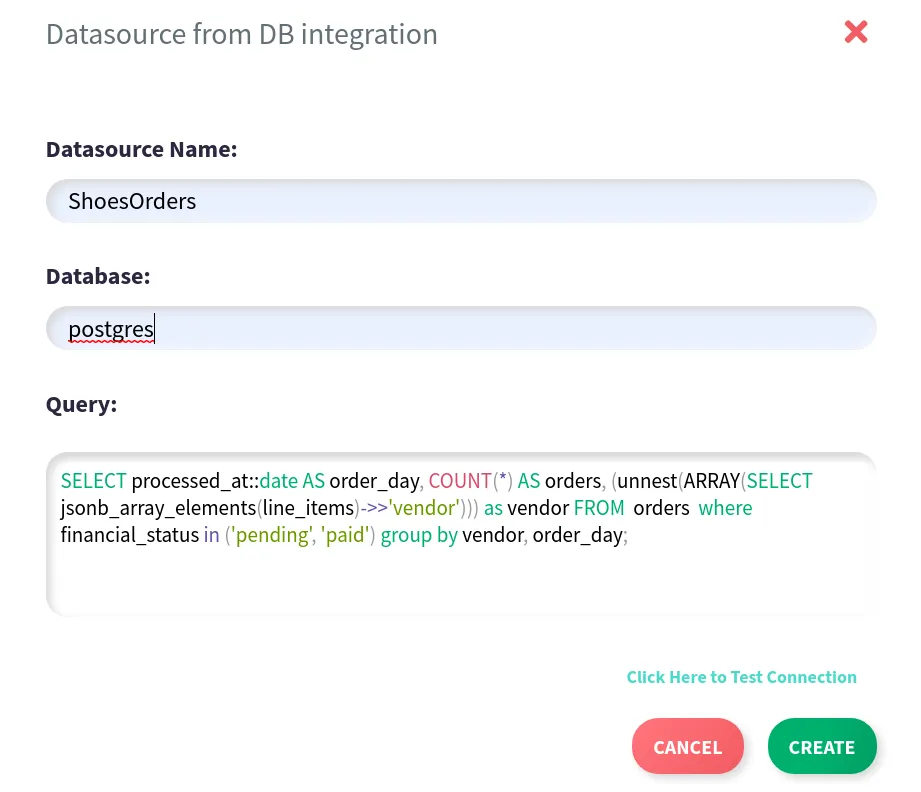
Let’s overview our SELECT query:
SELECT processed_at::date AS order_day, COUNT(*) AS orders, (unnest(ARRAY(SELECT jsonb_array_elements(line_items)->>'vendor'))) as vendor FROM orders WHERE financial_status IN ('pending', 'paid') GROUP BY vendor, order_day;
This query will select the time when the order was processed and cast it to YY:MM:DD format (without the time of the day, as we will be forecasting at a daily frequency). Then, select the vendor from the line_items column that contains the product info in JSON format.
Finally, aggregate the number of orders per day for each vendor.
Click on CREATE and MindsDB will create a new datasource called ShopifyOrders.
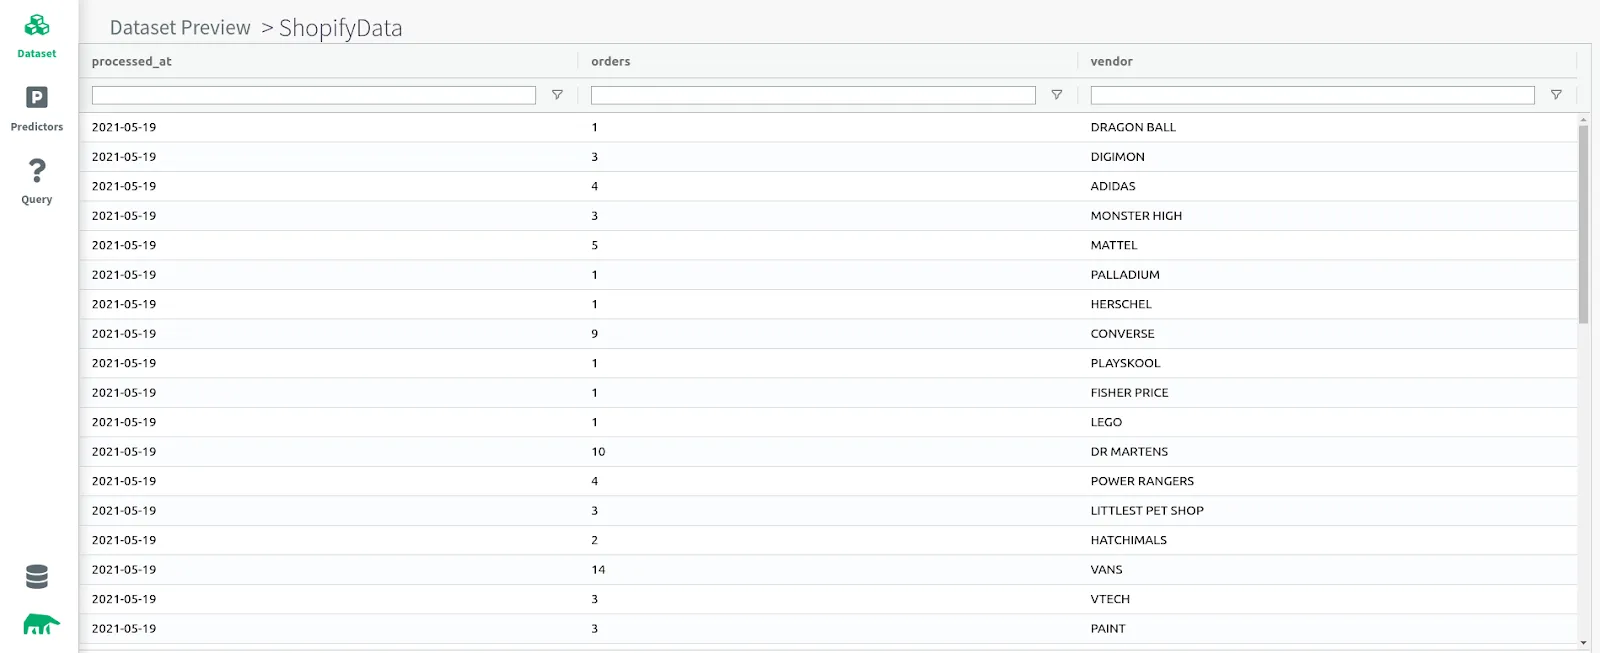
If you preview the data, you will see the number of daily orders grouped by vendor. The above example shows the orders for SHOES and TOYS stores. It groups the daily orders for the past 5 years for different vendors like NIKE, VANS, ADIDAS, LEGO, MATTEL, etc.
We now have data connected to MindsDB. The next steps are:
In the Dataset dashboard, click on the QUALITY button so that MindsDB can start with its automated data analysis procedure. In the background, it will iterate over each data record and display warnings if there are potential biases or outliers inside the data. If you click on some of the columns, it will display additional information for specific columns such as the type of the data, if there are any missing values, the number of distinct values, and if there are potential biases it will show more information.

By performing data analysis, you will get more information about your data and decide if you trust the warnings shown by MindsDB to act upon them (remember, a good dataset is crucial for good ML models), or you can ignore them and continue with the model training.
To train a new model click on the Predictors tab from the left navigation bar, and then on the TRAIN NEW button. Inside the popup form, you will need to input all of the required information so that MindsDB can start training a time series forecasting model:
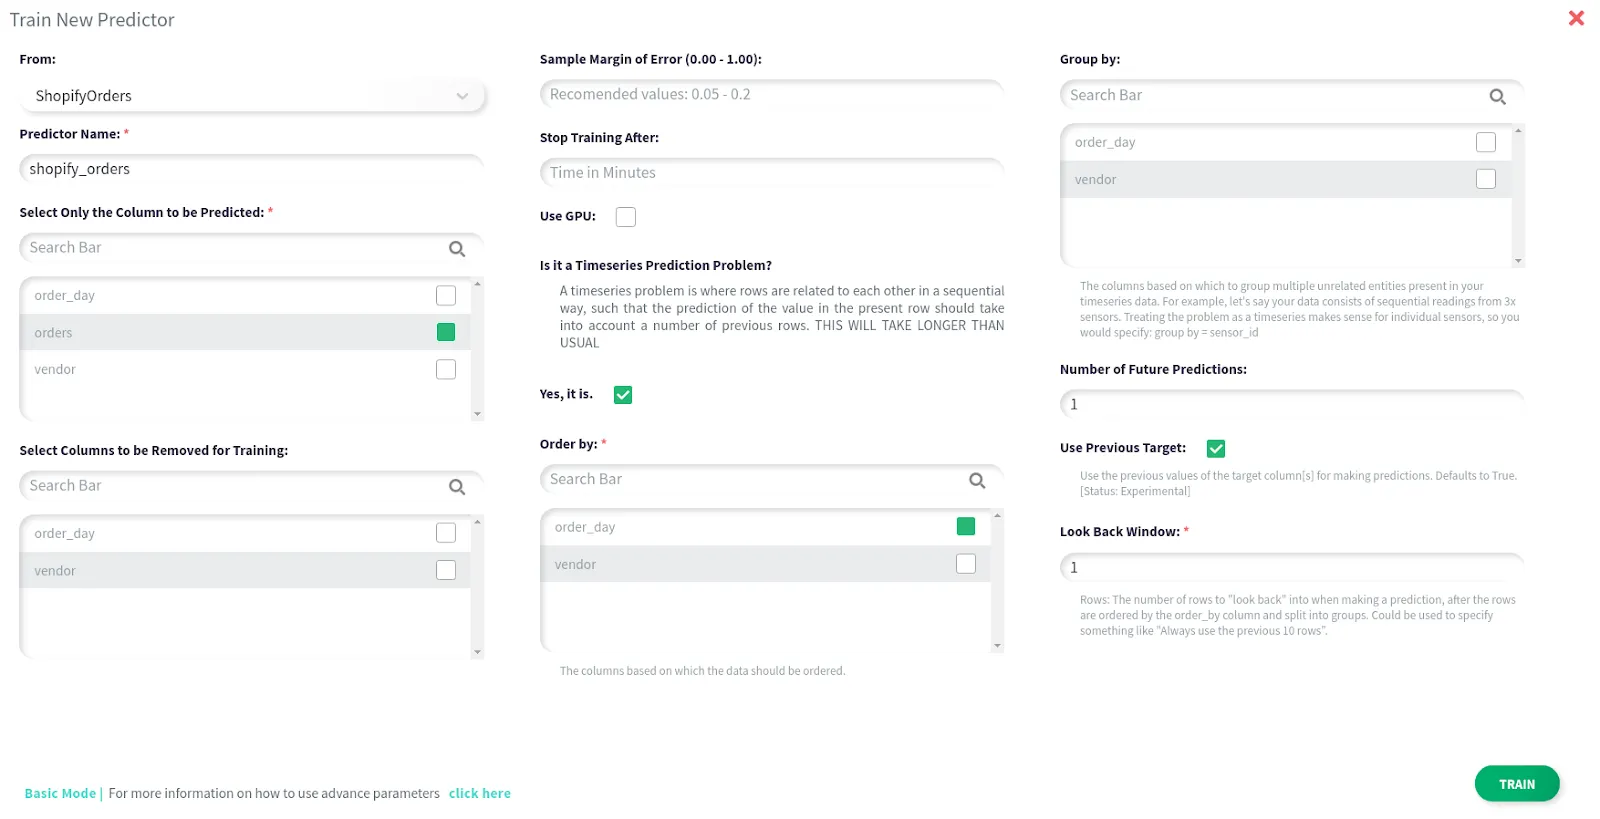
To start with the training click on TRAIN.
Alternatively, you can train the model automatically directly inside the database by just runing the following query:
INSERT INTO mindsdb.predictors(name, predict, select_data_query) VALUES('shopify_orders', 'orders', 'SELECT processed_at::date AS order_day, COUNT(*) AS orders, (unnest(ARRAY(SELECT jsonb_array_elements(line_items)->>"vendor"))) as vendor FROM orders WHERE financial_status in ("pending", "paid") group by vendor, order_day;');
To get more information about the INSERT query visit MindsDBs PostgreSQL docs.
MindsDB will promptly start the automated machine learning pipeline, deducting the data type of each column, instantiating an encoder for each one to obtain informative intermediate representations of the data, and then use this to train a forecasting model based on a mix of recurrent neural networks and gradient boosters. Finally, it will perform a model analysis to offer insights as to how good you can expect the forecasts to be.
When this procedure finishes, the status will change to COMPLETED. Next, click on the PREVIEW button. The model preview dashboard provides insights related to the trained model. The first section shows the model accuracy and how MindsDB did the dataset splitting.
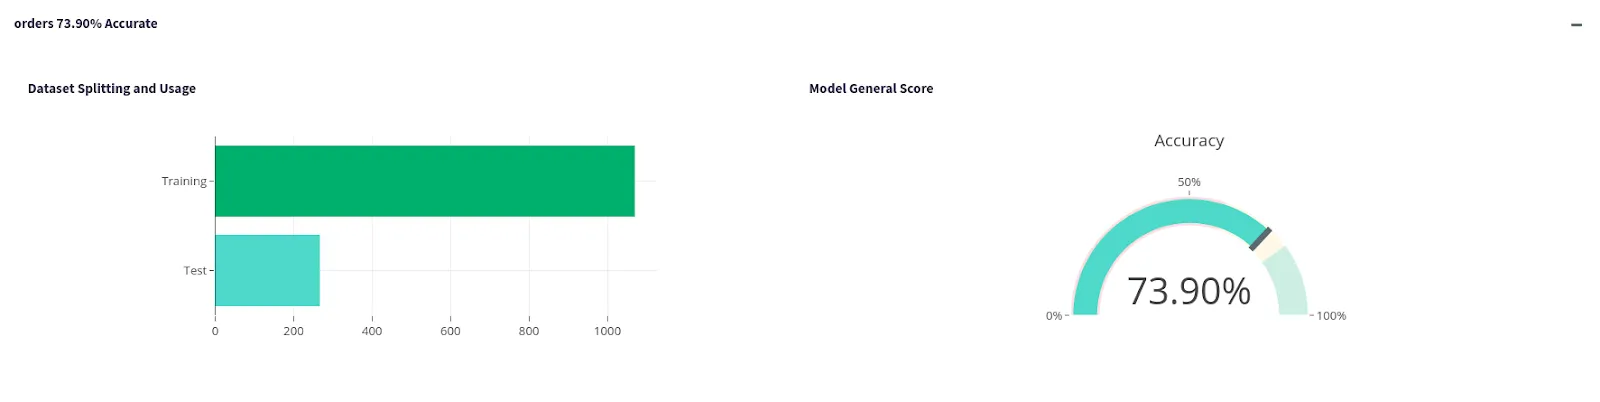
You can see that the forecasting accuracy for the shopify_orders model is around 74%, which means that 74% of the time, the true amount of orders fell within the bounds of the predicted range for the held-out validation dataset.
The next section shows the column importance where MindsDB is rating the columns from 0 as the least important to 10 as the most important column for making a good prediction. Given the settings we used, our time series forecaster needed all three columns to train, so this part of the analysis is not applicable to this predictor.
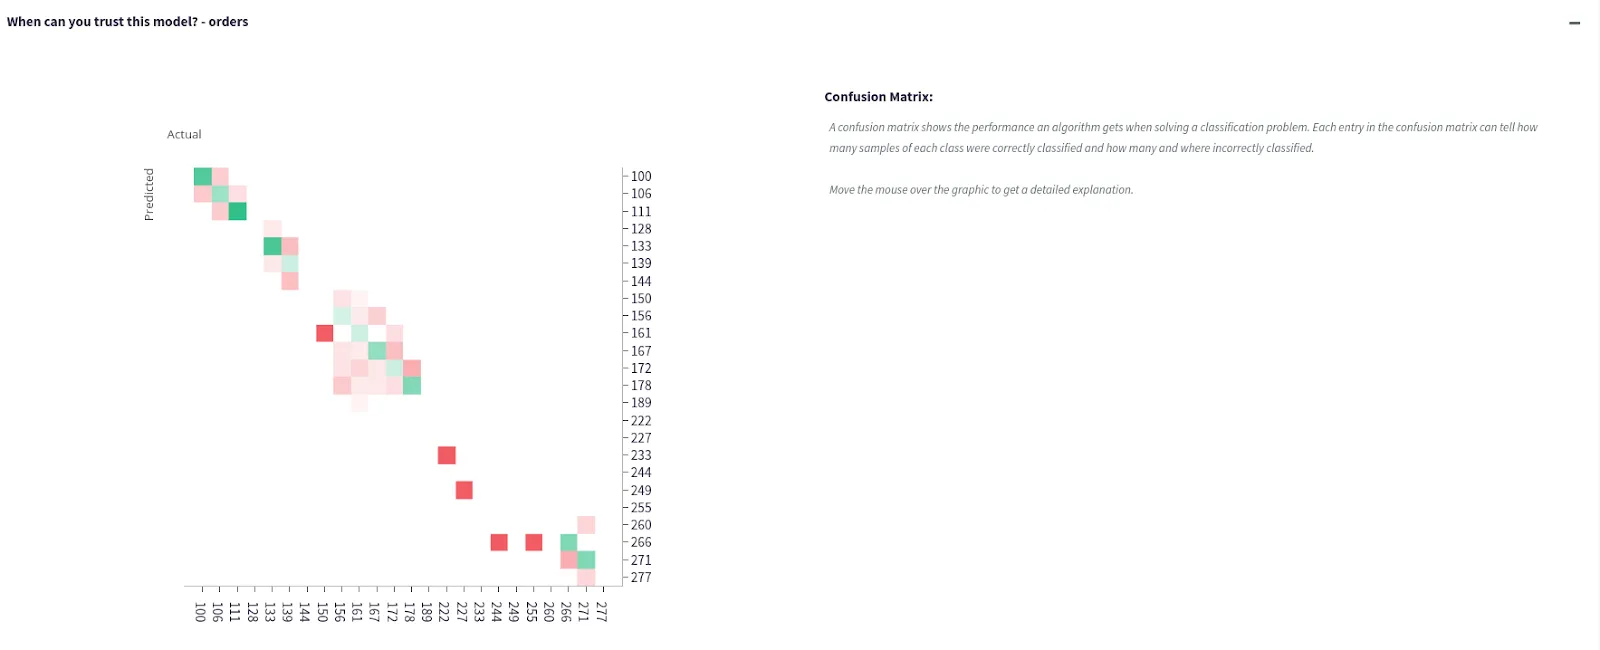
The last section presents a confusion matrix, where if you hover over the matrix you will see the percentage of time where the model predicted the number of orders correctly or the percentage of the time where the model misclassified the number of orders. A perfect forecaster would show a thin straight diagonal. In this case, the diagonal is still well-formed, which reinforces the reported accuracy of 74%.
The model was successfully trained. How can we use it to predict the number of orders? From the left navigation tab click on the Query option, and then on the New Query button.
Let’s imagine that we want to forecast “How many Converse orders will the store get next Friday?.”
In the dropdown, select the vendor e.g Converse and the date e.g 6/18/2021 for which we want to predict the number of orders.
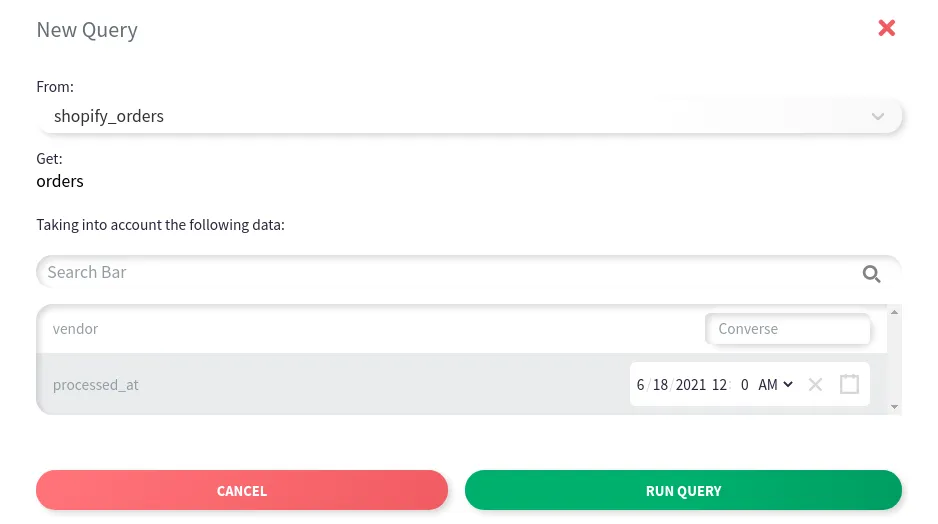
Then, click on the RUN QUERY and in less than a second MindsDB will return the predicted value.

If you want to get predictions directly from the database run:
SELECT orders AS predicted, orders_confidence AS confidence, orders_explain AS info FROM mindsdb.shopify_ordersWHERE "vendor"='Converse' AND "order_day"='2021-06-18';
In this example, for Converse products on Friday 18 June 202, MindsDB thinks that the store will get around 57 orders with a minimum order of 32 and maximum orders of 78. Also, MindsDB is 74% confident that this will be the correct number of orders. The width of the predicted region can be further tuned by the user at the expense of modified confidence: a tighter pair of bounds would imply less confidence in predictions and vice versa.
Another thing to note is that queries will be more accurate as you provide more historical context.
Download our free guide and discover the best approach for your needs, whether it's building your ELT solution in-house or opting for Airbyte Open Source or Airbyte Cloud.

We have shown how easy it is to use Airbyte to extract and load data inside the database, and then leverage MindsDB to perform predictive analytics to drive better business based decisions. For further information and examples check out the documentation on Airbyte, MindsDB and for a limited time sign up for a free MindsDB Cloud account at http://cloud.mindsdb.com.


Download our free guide and discover the best approach for your needs, whether it's building your ELT solution in-house or opting for Airbyte Open Source or Airbyte Cloud.
Use the integrated machine learning in MindsDB to forecast Shopify store metrics.
Learn how to use a data integration tool (Airbyte) and a data transformation tool (dbt) to create a single customer view on a data warehouse (BigQuery).