Set up Postgres CDC (Change Data Capture) in minutes using Airbyte, leveraging Debezium to build a near real-time EL(T).
Published on Jun 16, 2022
Summarize this article with:

The benefits of using Change Data Capture (CDC) to replicate data from PostgreSQL into any destination are many – mainly, it allows you to track all changes applied to your database in real-time, including delete operations. The ability to track and replicate delete operations is especially beneficial for ELT pipelines.
In this tutorial, you'll learn how to set up PostgreSQL Change Data Capture in minutes using Airbyte, leveraging a powerful tool like Debezium to build a near real-time EL(T).
But before we begin, let's clarify some key concepts so you better understand what's happening in every step.
Change Data Capture (CDC) is a pivotal concept in database management, enabling real-time tracking and replication of data changes. Organizations leverage CDC to stay abreast of dynamic data modifications, including inserts, updates, and crucially, deletions. By comprehending the fundamentals of CDC, businesses gain insights into the evolving state of their databases, empowering them to make informed decisions and ensure data integrity.
PostgreSQL CDC ensures that changes to the source database are accurately reflected in the target systems. This consistency is crucial for maintaining data integrity across different applications and services.
By capturing only the changes instead of processing entire datasets, CDC significantly reduces the amount of data that needs to be processed and transferred. This agility allows for rapidly developing and deploying new products and services.
By simply capturing changes, the CDC dramatically reduces the amount of data that must be processed and transferred. This reduction in data volume translates into lower storage and processing costs.
Postgre CDC supports scalable data architectures by efficiently capturing and propagating data changes. This scalability is important for growing businesses dealing with increasing amounts of data.
CDC helps maintain comprehensive audit trails for all data changes, which are important for regulatory compliance and internal auditing. This capability ensures transparency and accountability in data handling.
Modern applications require real-time data processing to provide cutting-edge insights and a seamless user experience. PostgreSQL CDC captures changes as they occur, ensuring that your data warehouses, analytics tools, and other applications are always up-to-date.
Triggers in PostgreSQL are an easy way to use CDC. By defining triggers on tables, you can capture changes and store them in a separate log table or transfer them to another system for further processing. This method is relatively easy to implement.
PostgreSQL's logical replication captures data manipulation language (DML) operations such as insert, update, and delete, and replicates these changes from one database to another. This method is suitable for real-time data synchronization and can be used to synchronize specific tables or an entire database.
PostgreSQL WAL logs can be used for CDC by extracting changes from the WAL files. Tools like Debezium or pg_recvlogical can read WAL files and interpret changes. This is a powerful approach to capturing change but requires a deep understanding of WAL features and appropriate tools.
Airbyte is a popular open-source data integration platform that supports CDC for PostgreSQL. It allows you to capture changes from a PostgreSQL source and replicate them to various destinations, such as data warehouses or other databases. Airbyte provides pre-built connectors for PostgreSQL and handles the CDC process, making it easier to set up and manage compared to building a custom CDC solution from scratch.
Debezium stands as a cornerstone in the realm of Change Data Capture (CDC), offering an open-source framework for real-time streaming of database changes. With Debezium, businesses can capture row-level committed operations, such as inserts, updates, and deletions, directly from their database systems. This robust framework empowers organizations to build dynamic data pipelines and drive actionable insights from their evolving data landscape.
Logical decoding plays a pivotal role in enabling Change Data Capture (CDC) by providing a streaming representation of the write-ahead log (WAL) in PostgreSQL. Through logical decoding, database modifications performed via SQL commands are captured and streamed in real-time. This mechanism forms the foundation for CDC implementations, allowing organizations to track and replicate changes efficiently across their database environments.
Replication slots serve as essential components in PostgreSQL's Change Data Capture (CDC) architecture, providing streams of changes for replication purposes. By creating replication slots, organizations establish continuous streams of data modifications, ensuring seamless replication and synchronization across their database systems. Replication slots play a crucial role in maintaining data consistency and enabling real-time data replication in PostgreSQL environments.
In PostgreSQL, logical decoding plugins play a crucial role in facilitating Change Data Capture (CDC) by converting the internal representation of the write-ahead log (WAL) into a format that can be interpreted without knowledge of the database's internal state. These plugins enable organizations to capture and stream database changes effectively, enhancing the interoperability and usability of CDC implementations. With a variety of logical decoding plugins available, such as pgoutput and wal2json, organizations can choose the most suitable plugin for their specific use case and requirements.
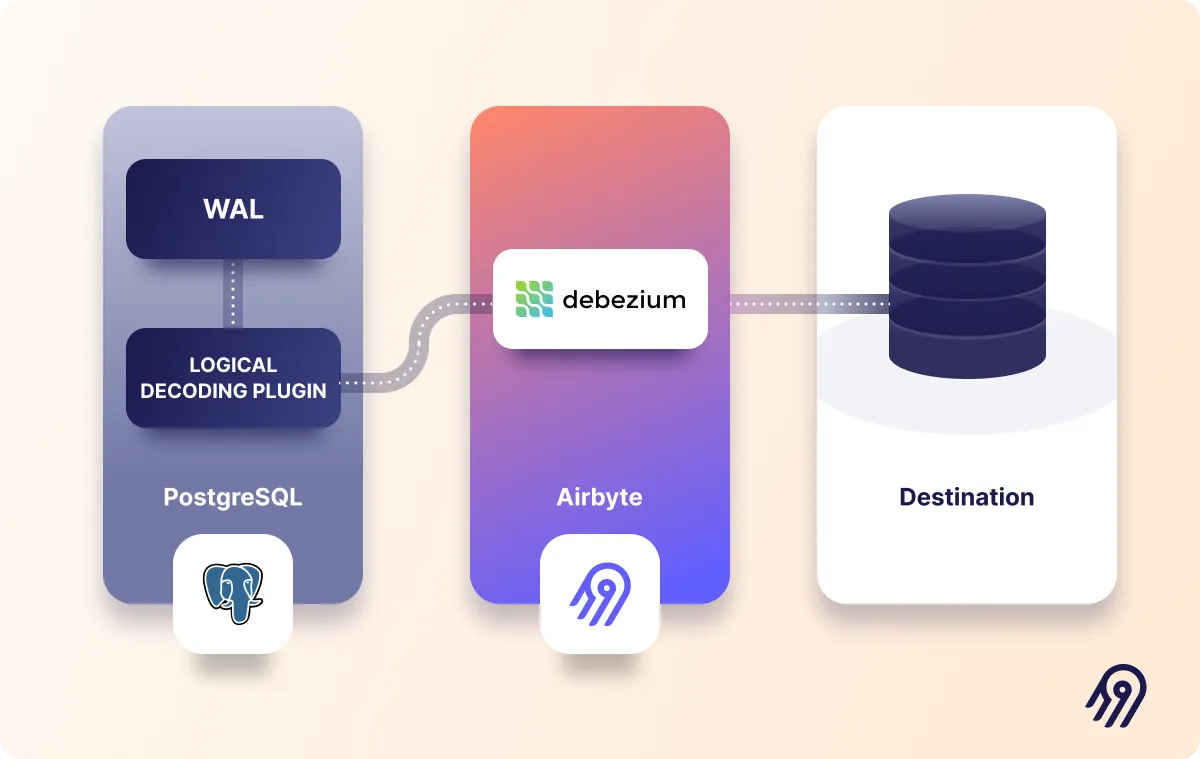
When using an Airbyte source with Change Data Capture, you don't need to have specific knowledge of the technologies mentioned above. Airbyte takes care of everything, and in general, you only need to make sure to have a compatible logical decoding plugin and a replication slot in your PostgreSQL instance.
⚠️ If you’re using a PostgreSQL instance in the cloud, such as Amazon RDS, refer to the Debezium connector documentation for the specific requirements your instance may have.
Now, you will learn how to configure Airbyte to replicate data from PostgreSQL to a local file using CDC and you will use Docker to start a PostgreSQL instance. Let's get started!
Use docker to kick start a PostgreSQL container. To do that, run the following command in your terminal.
docker run --name airbyte-postgres -e POSTGRES_PASSWORD=password -p 5432:5432 -d debezium/postgres:13
In this case, we are naming the container airbyte-postgres. You can select a different password.
The debezium/postgres image is used the same manner as the Postgres official image. Additionally, it instructs Postgres to load Debezium's logical decoding plugin, enable the logical decoding feature and configure a single replication slot used by the Debezium connector.
Now, it's time to configure a PostgresSQL schema, user, and necessary privileges. You can use psql, which will allow you to execute queries from the terminal interactively.
To start psql, you need to SSH into the Docker container you just started in the previous step.
docker exec -it airbyte-postgres /bin/bash
Once in the container, start psql.
psql -U postgres
Now, create a schema and set the search path to tell PostgreSQL which schema to look at.
CREATE SCHEMA postgres;
SET search_path TO postgres;
Although the database can be accessed with the root user, it is advisable to use a less privileged read-only user to read data. Create a user called airbyte and assign the password of your choice.
CREATE USER airbyte PASSWORD 'password';
Then, grant the user access to the relevant schema.
GRANT USAGE ON SCHEMA postgres TO airbyte;
To replicate data from multiple Postgres schemas, you can re-run the command above, but you'll need to set up numerous Airbyte sources connecting to the same database on the different schemas.
Next, grant the user read-only access to the relevant tables.
GRANT SELECT ON ALL TABLES IN SCHEMA postgres TO airbyte;

# Allow airbyte user to see tables created in the future
ALTER DEFAULT PRIVILEGES IN SCHEMA postgres GRANT SELECT ON TABLES TO airbyte;
The user you just created also needs to be granted REPLICATION and LOGIN permissions.
ALTER USER airbyte REPLICATION LOGIN;
Now, it's time to create a new table and populate it with some data. Create a cars table with an id and the car's name.
CREATE TABLE cars(id INTEGER, NAME VARCHAR(200), PRIMARY KEY (id));
INSERT INTO cars VALUES(0, 'mazda');
INSERT INTO cars VALUES(1, 'honda');
Next, let's create a logical replication slot using the pgoutput plugin. In PostgreSQL, a replication slot is used to hold the state of a replication stream.
SELECT pg_create_logical_replication_slot('airbyte_slot', 'pgoutput');
Finally, create a publication to allow subscription to the events of the cars table. We advise users to add only the tables that they want to sync in the publication and not all tables.
CREATE PUBLICATION pub1 FOR TABLE cars;
Download our free guide and discover the best approach for your needs, whether it's building your ELT solution in-house or opting for Airbyte Open Source or Airbyte Cloud.

To set up a new PostgreSQL Airbyte source, go to Airbyte's UI, click on sources and add a new source.
As the connector type, select Postgres. As demonstrated in the subsequent illustrations, fill in the following configuration fields if you used the instructions above to configure your Postgres database.

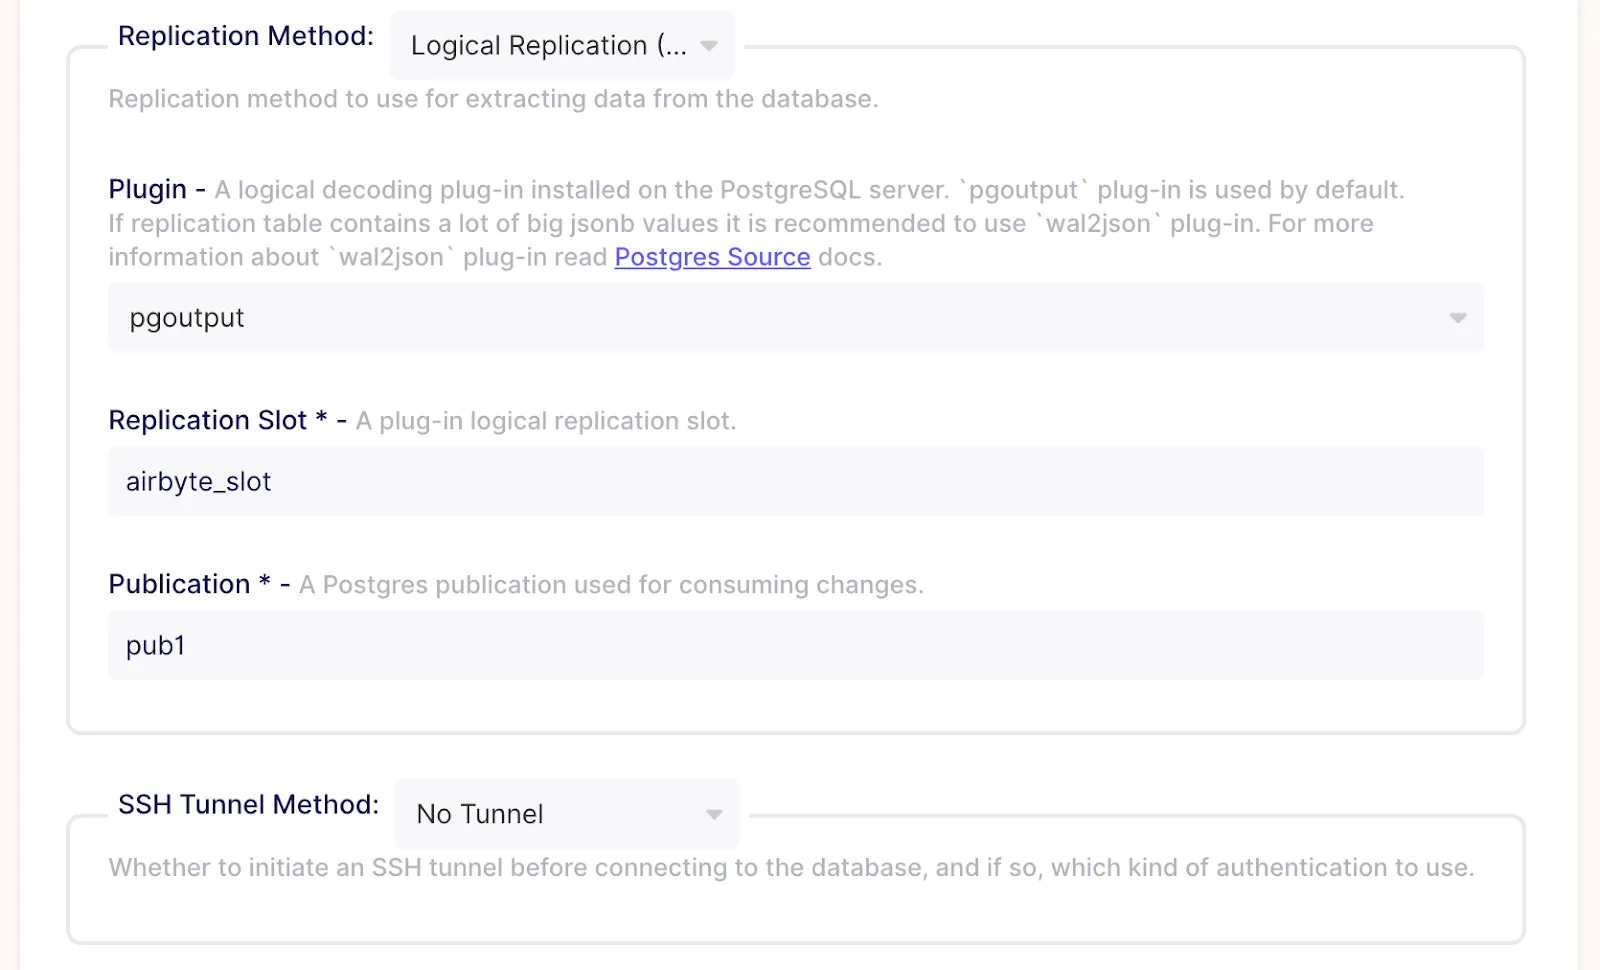
Then click on Set up source and Airbyte will test the connection. If everything goes well, you should see a successful message.
Go to destinations and add a new one. As demonstrated in the following diagram, select Local JSON as the destination type and fill in with the following details.
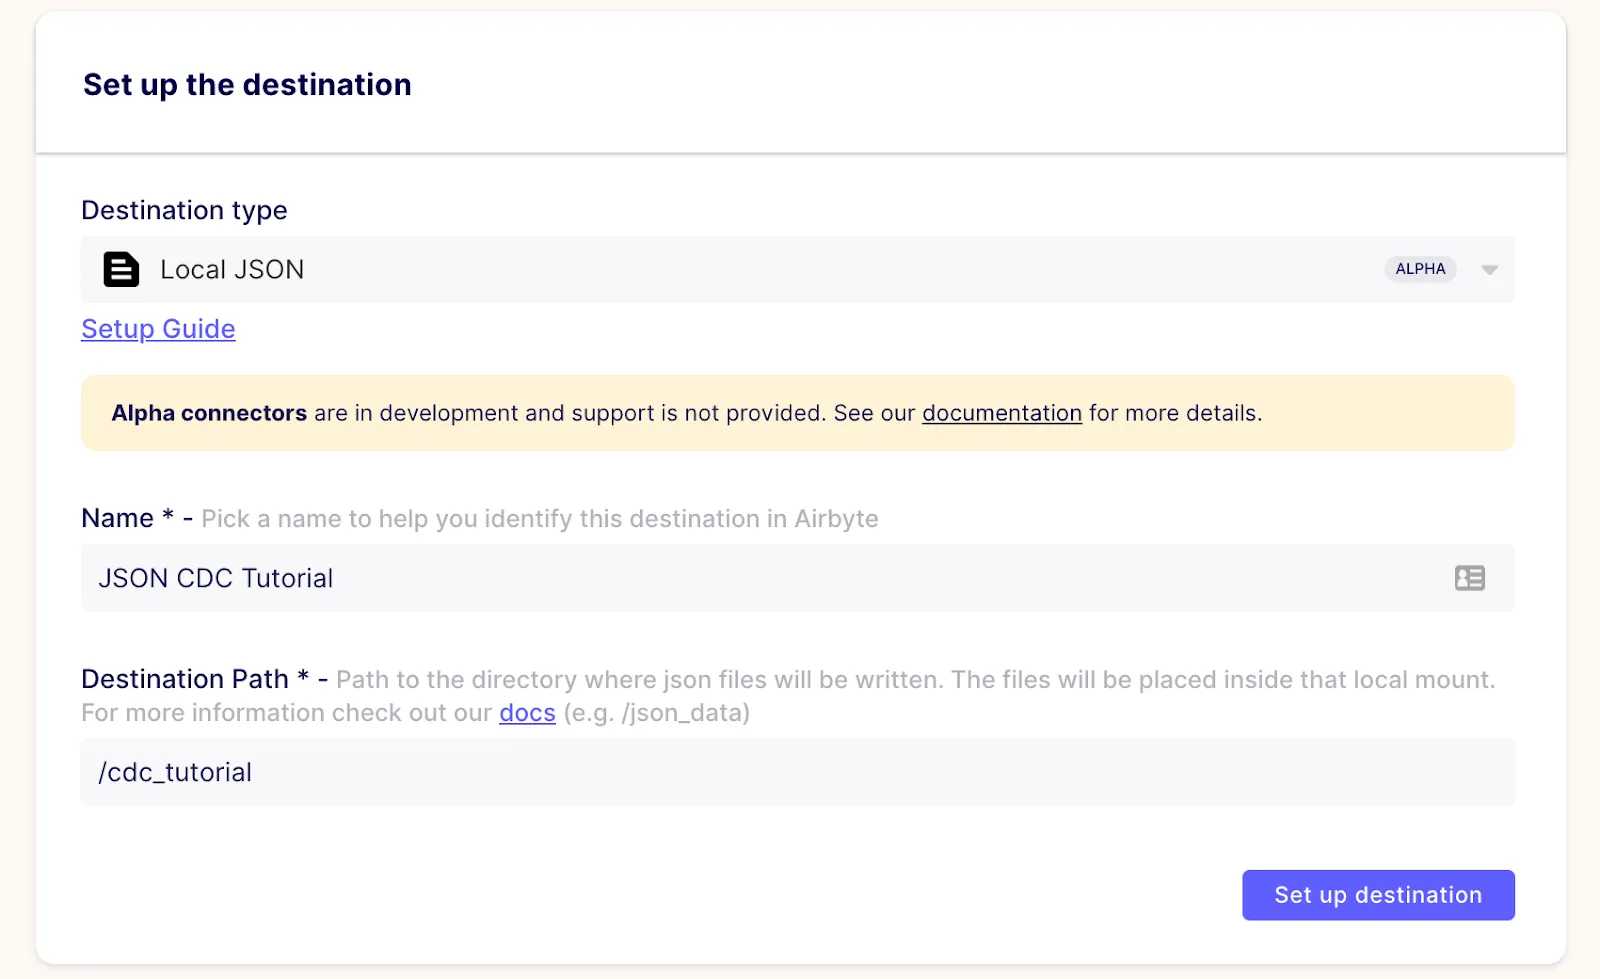
Then click on Set up source and let Airbyte test the destination.
Go to connections and create a new connection. Then, select the existing Postgres source you have just created and then do the same for the Local JSON destination. Once you're done, you can set up the connection as follows.

Then, it's time to configure the streams, which in this case are the tables in our database. For now, we only have the cars table. If you expand it, you can see the columns it has.
Now, you should select a sync mode. If you want to take full advantage of using Change Data Capture, you should use Incremental | Append mode to only look at the rows that have changed in the source and sync them to the destination. Selecting a Full Refresh mode would sync the whole source table, which is most likely not what you want when using CDC. Learn more about sync modes in our documentation.
When using an Incremental sync mode, we would generally need to provide a Cursor field, but when using CDC, that's not necessary since the changes in the source are detected via the Debezium connector stream.

Once you're ready, save the changes. Then, you can run your first sync by clicking on Sync now. You can check your run logs to verify everything is going well. Just wait for the sync to be completed, and that's it! You've replicated data using Postgres CDC.
Now, let's test the CDC setup we have configured. To do that, run the following queries to insert and delete a row from the database.
INSERT INTO cars VALUES(3, 'tesla');
DELETE FROM cars WHERE NAME = 'tesla';
Launch a sync and, once it finishes, check the local JSON file to verify that CDC has captured the change. The JSON file should now have two new lines, showing the addition and deletion of the row from the database.
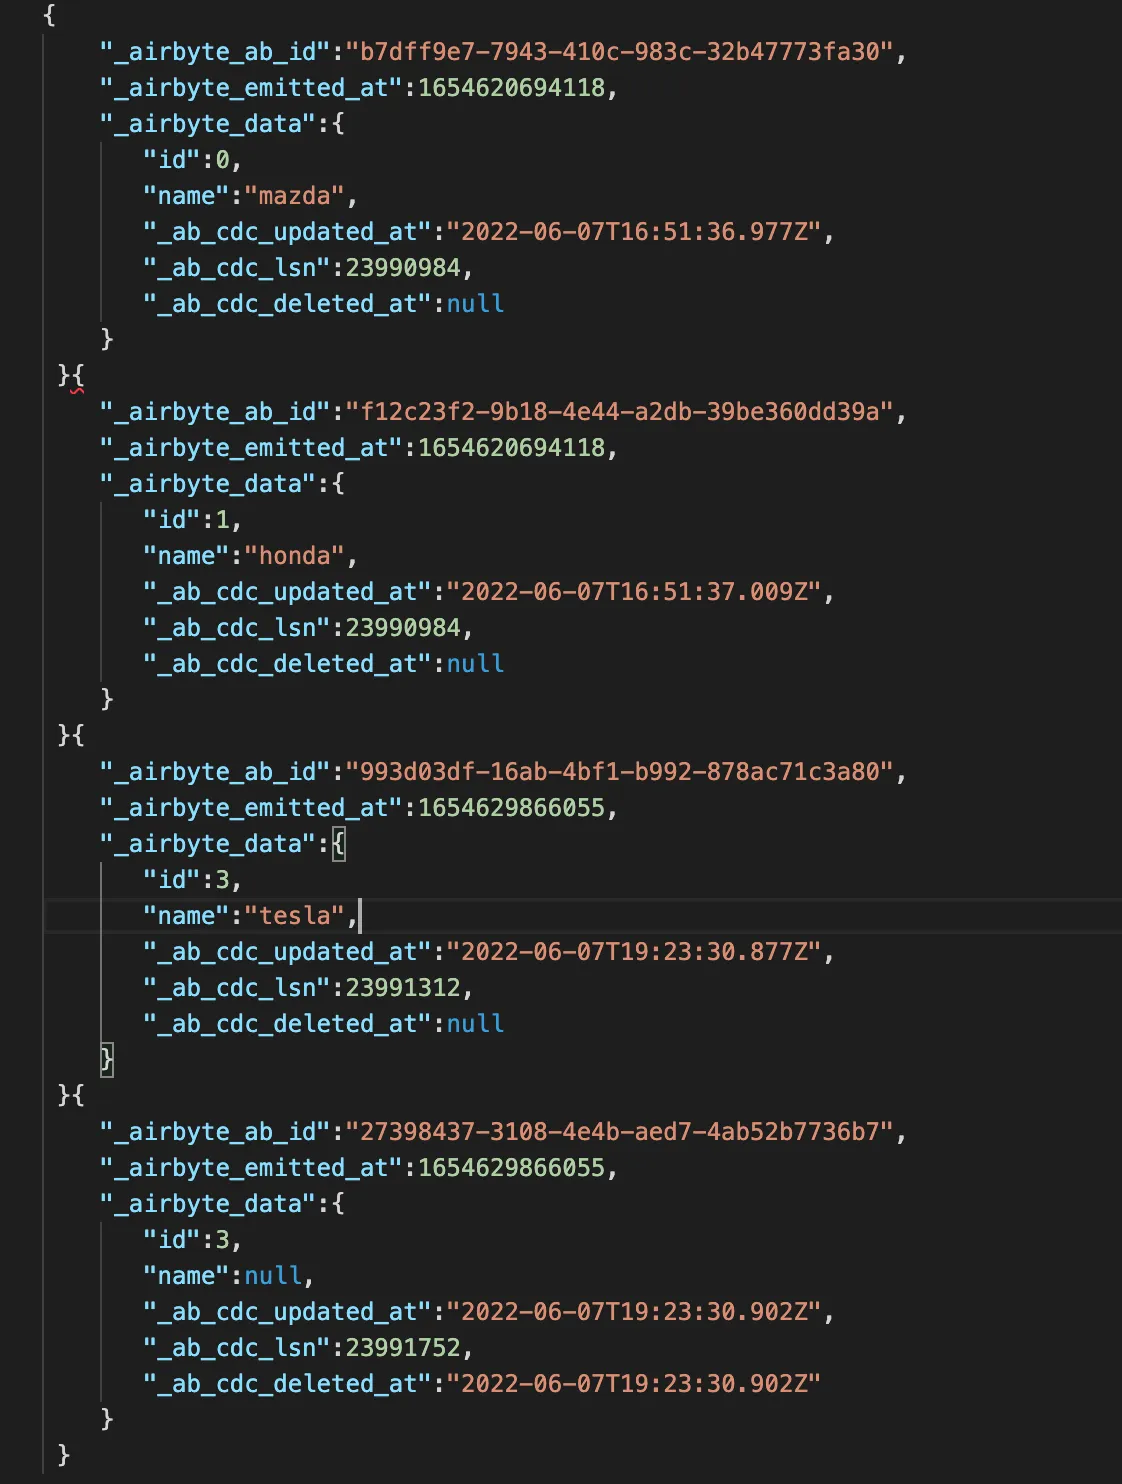
We confirm that CDC allows you to see that a row was deleted, which would be impossible to detect when using the regular Incremental sync mode. The _ab_cdc_deleted_at meta field not being null means id=3 was deleted.
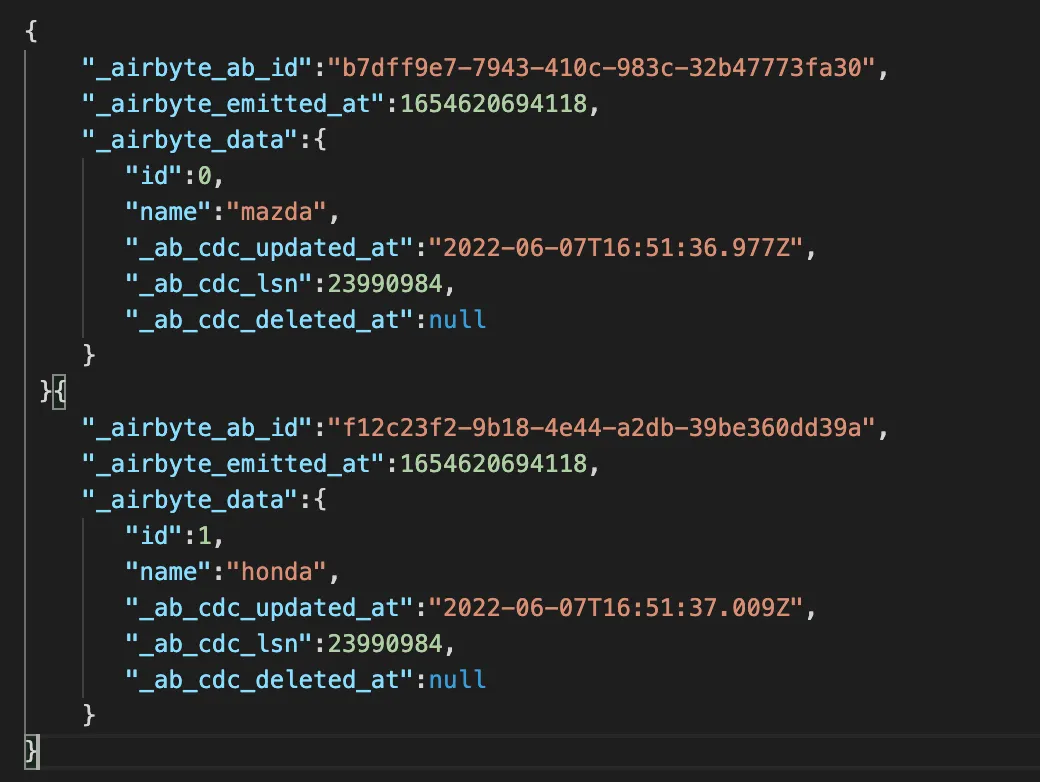
From the root directory of the Airbyte project, go to /tmp/airbyte_local/cdc_tutorial, and you will find a file named _airbyte_raw_cars.jsonl where the data from the PostgreSQL database was replicated.
You can check the file's contents in your preferred IDE or run the following command.
cat _airbyte_raw_cars.jsonl
In this tutorial you have learned how logical decoding works in PostgreSQL and how to leverage it to implement an EL(T) using Airbyte. Using CDC to capture database changes is one of the best ways to replicate data, especially when you have huge amounts of it and the need to track delete operations in the source database.
If you want to easily try out Airbyte, you might want to check our fully managed solution: Airbyte Cloud. We also invite you to join the conversation on our community Slack Channel to share your ideas with thousands of data engineers and help make everyone’s project a success!

Thalia Barrera is a data engineer and technical writer at Airbyte. She has over a decade of experience as an engineer in the IT industry. She enjoys crafting technical and training materials for fellow engineers. Drawing on her computer science expertise and client-oriented nature, she loves turning complex topics into easy-to-understand content.

Thalia Barrera is a data engineer and technical writer at Airbyte. She has over a decade of experience as an engineer in the IT industry. She enjoys crafting technical and training materials for fellow engineers. Drawing on her computer science expertise and client-oriented nature, she loves turning complex topics into easy-to-understand content.
Download our free guide and discover the best approach for your needs, whether it's building your ELT solution in-house or opting for Airbyte Open Source or Airbyte Cloud.

Experience swift Postgres replication, effortlessly transferring data between databases in just 10 minutes.
Learn how to easily automate your LinkedIn Scraping with Airflow and Beautiful Soup.
Learn how to ingest and transform Github and Slack data with SQL and Python-based transformations.