No items found.

Creating a GitHub Documentation Chatbot Using PyAirbyte and pgvector

Learn how to build a GitHub documentation chatbot with PyAirbyte and PG Vector for seamless data retrieval and enhanced user experience.

Should you build or buy your data pipelines?

Download our free guide and discover the best approach for your needs, whether it's building your ELT solution in-house or opting for Airbyte Open Source or Airbyte Cloud.

Download now

Developing a custom GitHub chatbot is crucial to streamline business operations. By creating an internal chatbot, you can foster effective management of pull requests and identification of newly added issues. This assists in reducing the delays in addressing critical tasks and maintaining project transparency.

Although there are multiple ways that can aid you in creating a custom chatbot, we are going to discuss the best one using PyAirbyte and pgvector. Following this tutorial, you will build a robust GitHub chatbot that uses the issues created in your repository to respond to your questions.

An Overview of pgvector

pgvector is an extension of PostgreSQL that allows you to store, query, and index vector embeddings. Designed as a relational database, Postgres lacks the ability to perform vector similarity searches.

Bridging this gap, pgvector enables Postgres to support specialized vector operations alongside regular Online Transaction Processing (OLTP) tasks. This feature is especially advantageous if your application’s backend utilizes PostgreSQL as the primary database. By querying the vector embeddings stored in the database, you can incorporate robust similarity search techniques.
An Overview of Airbyte

Airbyte

Airbyte is a no-code data integration solution that enables you to migrate data from various sources to the destination of your choice. With over 550 pre-built data connectors, it lets you move structured, semi-structured, and unstructured data to the destination of your choice.

If the connector you seek is unavailable, you can use the Airbyte Connector Development Kits (CDKs) or the Connector Builder to create custom connections.

Here are the key features offered by Airbyte:

  • AI-Powered Connector Builder: The Connector Builder comes with an AI assistant that reads the source API doc and automatically fills most configuration fields. This simplifies your connector development journey, saving time and effort.
  • Options to Build Data Pipelines: Airbyte offers four different ways, including UI, API, Terraform, and PyAirbyte, to build data pipelines. These methods provide you the flexibility to develop powerful data pipelines based on your requirements.
  • Change Data Capture (CDC): CDC allows you to identify and replicate data changes made to the source data and replicate them in the target system. This feature helps you track the updates and maintain data consistency.
  • RAG Techniques: Airbyte supports RAG techniques, including automatic chunking, embedding, and indexing. By applying these transformations to raw data, you can effectively convert it into vector embeddings and store it inside prominent vector stores like Pinecone.
  • Enterprise Edition: The Airbyte Enterprise Edition permits you to handle large-scale data in your preferred virtual private cloud (VPC). With features like multitenancy, role-based access control, personally identifiable information (PII) masking, and enterprise support with SLAs, this Airbyte version provides more control and security.

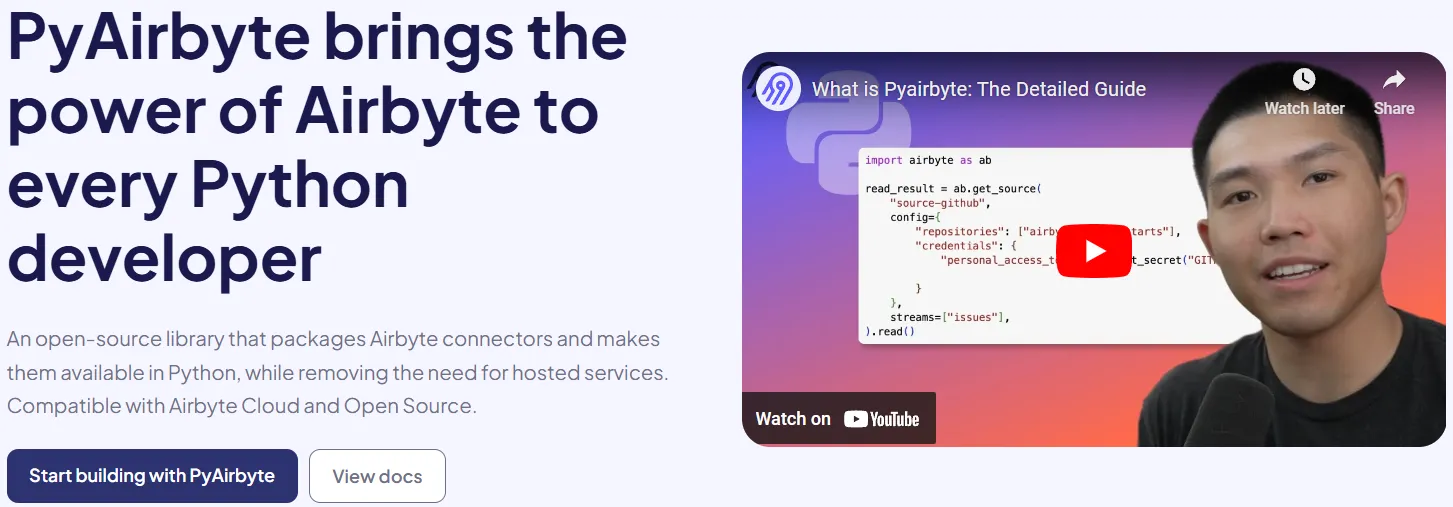
Among the outlined data pipeline development methods is using PyAirbyte, a Python library. PyAirbyte empowers you to leverage Airbyte connectors in the Python development environment. Utilizing this library, you can extract data from dispersed sources and load it into prominent SQL caches like DuckDB, Postgres, or Snowflake. These caches are compatible with AI frameworks like LangChain and LlamaIndex.

Let’s see how you can use PyAirbyte to build a custom chatbot by migrating data from a GitHub repository to pgvector.
PyAirbyte

Using PyAirbyte and pgvector to Build a GitHub Documentation Chatbot

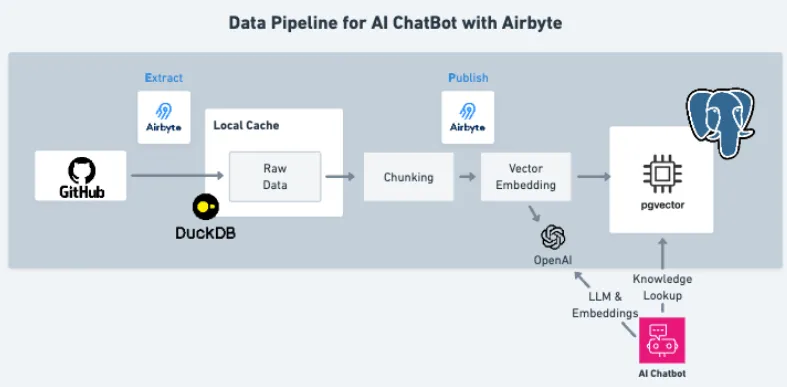
Data Pipeline for AI ChatBot with Airbyte

Now that you have an overview of the tools required for this tutorial, let’s start with the steps to build a GitHub chatbot. But before initiating, you must ensure that the necessary prerequisites are satisfied.

Prerequisites

  • You must have access to the OpenAI API key. If not, sign up for an OpenAI account and generate a new API key.
  • Access to GitHub Personal Account Token (PAT). Log in to GitHub and generate a unique PAT.

Step 1: Install PyAirbyte and Other Dependencies

For the first step, create a virtual environment in a code editor like Google Colab Notebook to isolate dependencies. To perform this step, execute this code:

!apt-get update && apt-get install -qq python3.10-venv

Now, you can get started with installing the necessary libraries. In this tutorial, we will use the uv library to speed up the installation process.

%pip install uv

Install PyAirbyte and OpenAI:

!uv pip install --system --quiet airbyte
!uv pip install --system --quiet openai

Install JupySQL to work with SQL in Colab Notebook:

!uv %pip install --quiet jupysql

Step 2: Importing Necessary Libraries

After installing the dependencies, it is essential to import the libraries that will be used throughout the project.

Import PyAirbyte and specify the Google Drive cache that will store the connection data by replacing the drive_name and sub_dir with a path:

import airbyte as ab
colab_cache = ab.get_colab_cache(
    drive_name="Company",
    sub_dir="20_Demos/PyAirbyte Demo/Cache",
)

To allow standard inputs, run:

from pathlib import Path
from textwrap import dedent

For accessing Google Drive:

from google.colab import drive

Configure rich library for styling and formatting terminal output:

from rich.markdown import Markdown
from rich import print

Import OpenAI and set up the connection. Replace the OPENAI_API_KEY with your credential in the code below:

import openai
openai_client = openai.OpenAI(
    api_key=ab.get_secret("OPENAI_API_KEY"),
)

For working with SQL, import specific sqlalchemy methods:

from sqlalchemy import create_engine, text, URL

Step 3: Connect to Postgres and Configure pgvector

Before connecting to Postgres, it’s beneficial to set up the JupySQL library to perform SQL in the same Colab Notebook. Load the JupySQL extension in Colab and configure the max row limit:

%load_ext sql
%config SqlMagic.displaylimit = 200

To connect to the Postgres instance with pgvector installed, get the SQLAlchemy 'engine' object for the cache:

engine = create_engine(
    URL.create(
        "postgresql",
        host=ab.get_secret("POSTGRES_HOST"),
        username=ab.get_secret("POSTGRES_USERNAME"),
        password=ab.get_secret("POSTGRES_PASSWORD"),
        database="ai_db",
    )
)

Pass the engine to JupySQL:

%sql engine

Use JupySQL to execute SQL statements. You can verify PostgreSQL query execution in Google Colab using the following:

%%sql

SELECT schema_name
FROM information_schema.schemata;

This code will output the available schema names. Install pgvector extension:

%%sql

CREATE EXTENSION IF NOT EXISTS vector;

Step 4: Establishing a Connection with GitHub via PyAirbyte

To configure GitHub as a source connector, you must have the necessary parameters, including the repository name and access credentials (PAT). After accessing the required credentials, provide the repositories and credentials in the config parameter and execute the code below:

source = ab.get_source(
    "source-github",
    config={
        "repositories": ["airbytehq/quickstarts"],
        "credentials": {
            "personal_access_token": ab.get_secret("GITHUB_PERSONAL_ACCESS_TOKEN")
        },
    },
)

The above code will configure Airbyte’s GitHub repository as the source. To check whether the connection to the API was successful, run the following code:

source.check()

The above code must output a success message.

Step 5: Extracting the GitHub Data

After configuring the data source, check the available data streams that you can use to train your chatbot.

source.get_available_streams()

This code will output a list of available data streams for your selected repository. If you wish to select a subset of all the available streams to train your chatbot, execute the code below:

source.set_streams(["issues"])

You can either add or remove stream names from this list, depending on your requirements. The above code selects the issues stream. Read the results of this connection in the colab_cache:

read_result = source.read(cache=colab_cache)

Step 6: Configuring pgvector Destination with PyAirbyte

When configuring pgvector as a destination, PyAirbyte enables you to perform automatic RAG techniques. Outline the configuration mode by mentioning indexing, embedding, and processing parameters. To set up the destination connector, specify account credentials and execute this code:

destination = ab.get_destination(
    "destination-pgvector",
    # Configure the destination:
    config={
        "indexing": {
            # Connection info for Postgres:
            "host": ab.get_secret("POSTGRES_HOST"),
            "database": "ai_db",
            "default_schema": "public",
            "port": 5432,
            # Postgres credentials:
            "username": ab.get_secret("POSTGRES_USERNAME"),
            "credentials": {"password": ab.get_secret("POSTGRES_PASSWORD")},
        },
        "embedding": {
            # Configure how to perform embeddings:
            "mode": "openai",
            "model": "text-embedding-ada-002",
            "openai_key": ab.get_secret("OPENAI_API_KEY"),
        },
        "processing": {
            # Which fields to use when mapping from
            # records to documents:
            "text_fields": [
                "title",
                "body",
            ],

            # Default to keeping all fields as metadata:
            # "metadata_fields": [],

            # Text splitting logic, aka "chunking":
            "chunk_size": 600,
            "chunk_overlap": 60,
        },
    },
)

Splitting the text into smaller manageable components is a beneficial processing step that enhances the search performance. For better search results, adjust the chunk_size and chunk_overlap parameters. The chunk_size parameter represents the number of tokens in a single chunk. The chunk_overlap highlights the total number of tokens that can overlap in different chunks.

Write data to pgvector:

write_result = destination.write(read_result)

Step 7: Using pgvector Data to Build a Custom Chatbot

The data is available in pgvector and can be leveraged to build your GitHub chatbot. To create the chatbot, you must define three functions.

  • A get_vector function to calculate the vector representation, or numeric representation, of the question.
  • A get_related_context  function to return tokens related to the question vector embeddings.
  • An ask_question function to retrieve the answer from the AI chatbot.

In the following sections, you will learn how to generate vector embeddings for the input questions, perform relevant searches based on the knowledge base, and retrieve the data to answer the questions.

Function 1: Calculating the Question Vector

To create a function that calculates a vector representing the original question, run the code below:

def get_vector(question) -> list[float]:
    return openai_client.embeddings.create(
        input=question,
        model="text-embedding-ada-002",
    ).data[0].embedding

Test this function by providing a sample question to the function.

question = "How are you?"
question_vector = get_vector(question)
print(question_vector)

This code will print the vector equivalence of the question provided.

Function 2: Searching Relevant Document Chunks in the Knowledge Base

Defining an SQL statement is a crucial step. The given RAG_SQL_QUERY variable contains an SQL statement that will aid in querying the required data.

RAG_SQL_QUERY = """
SELECT document_content, metadata->'number' as number
FROM issues
ORDER BY embedding <-> '{question_vector}'
LIMIT 15
"""

To get an easily understandable output format, create a horizontal line with a newline character (\n).

HORIZONTAL_DIV = "\n\n-------\n\n"

Generate a search relevance function that returns the GitHub issue number with the specific issue posted for the question using the code below:

def get_related_context(question) -> str:
    sql_query = RAG_SQL_QUERY.format(
        question_vector=get_vector(question)
    )
    with engine.begin() as connection:
        return (HORIZONTAL_DIV).join(
            [
                f"Issue {row.number}: {row.document_content}"
                for row in connection.execute(text(sql_query))
            ]
        )

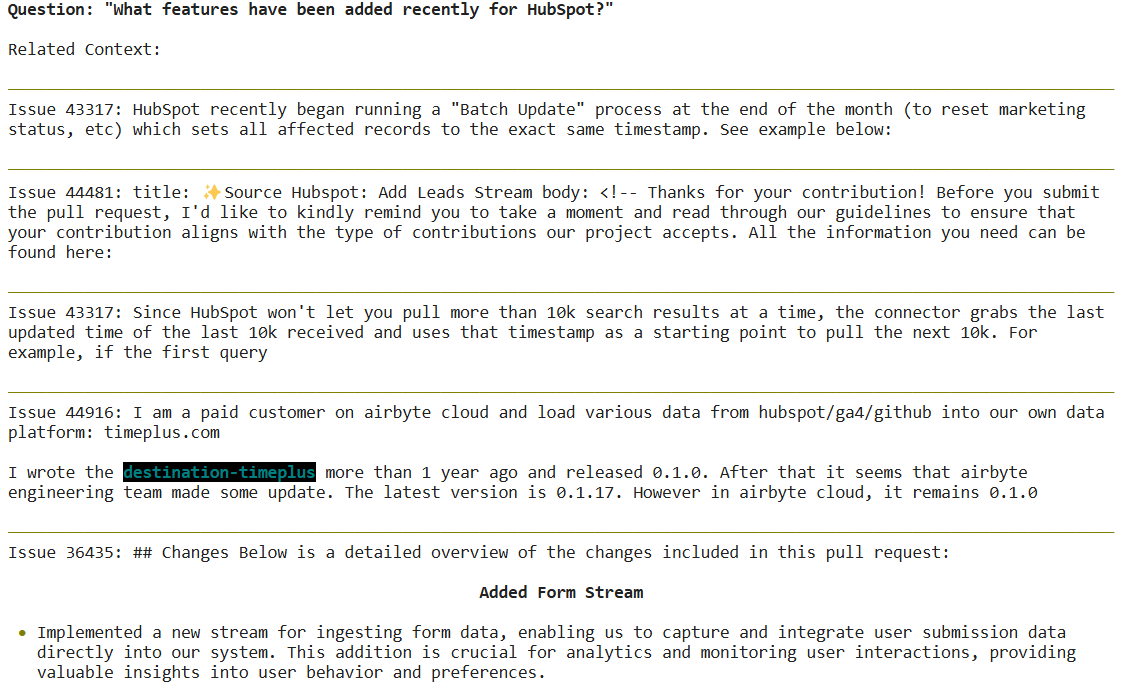
To test the get_related_context function, provide a question and store the results of this function in a variable. For example, asking a question about the recently added features for HubSpot can be done by running:

question = "What features have been added recently for HubSpot?"
context = get_related_context(question)

print(Markdown(f"""
**Question: "{question}"**

Related Context:

{HORIZONTAL_DIV}

{context}
"""))

Output:

Output of get_related_context function

Function 3: Utilizing a Large Language Model to Answer Queries

By defining a prompt template, you can highlight the behavior of the large language model. This will enable the model to produce a response in a certain way.

PROMPT_TEMPLATE = """
You are an AI assistant. You are able to find answers to the questions
from the contextual passage snippets provided.

Use the following pieces of information enclosed in <context> tags to provide an
answer to the question enclosed in <question> tags.

Please provide your answer using markdown, and bullets when appropriate. The
context will be a set of excerpts from GitHub issues and pull requests. In your
answer, you should list the issue number that was helpful in answering the
question.

<context>
{context}
</context>

<question>
{question}
</question>
"""

You can get the answers based on the defined prompt by populating it with the questions and the context generated by the get_related_context function.

def get_answer(question) -> None:
    answer_text = openai_client.chat.completions.create(
        model="gpt-3.5-turbo",
        messages=[
            {
                "role": "user",
                "content": PROMPT_TEMPLATE.format(
                    question=question,
                    context=get_related_context(question),
                )
            },
        ],
    ).choices[0].message.content

    print(Markdown(
        f'Question: "{question}" {HORIZONTAL_DIV}' +
        answer_text
    ))

To verify the response generated by the chatbot, provide a sample question to the get_answer function.

question = "What features have been added recently for HubSpot?"

get_answer(question)

Output:

Output of get_answer function

The output signifies that the chatbot is correctly responding to the questions you provide. By implementing the steps mentioned in this process, you can generate an efficient chatbot to answer your GitHub issues queries. To learn more about this process, follow this GitHub tutorial. You can also leverage PyAirbyte to build chatbots or other AI applications with diversified sources. For example, build a chatbot with LangChain and Pinecone.

Conclusion

This article demonstrates how to use PyAirbyte with pgvector to develop a custom GitHub chatbot. PyAirbyte simplifies the ETL process for you by providing pre-built connectors to migrate data to vector stores without requiring custom transformations. Automated chunking, embedding, and indexing allow you to modify raw GitHub data and arrange it in the specified vector database.

Should you build or buy your data pipelines?

Download our free guide and discover the best approach for your needs, whether it's building your ELT solution in-house or opting for Airbyte Open Source or Airbyte Cloud.

Download now

Similar use cases

Creating a GitHub Documentation Chatbot Using PyAirbyte and pgvector

Learn how to build a GitHub documentation chatbot with PyAirbyte and PG Vector for seamless data retrieval and enhanced user experience.

Build a GitHub Analytics Dashboard Using Metabase & Airbyte

Using the Airbyte GitHub connector and Metabase, we can create insightful dashboards for GitHub projects.

Chat with your data using OpenAI, Pinecone, Airbyte and Langchain

Learn how to build a connector development support bot for Slack that knows all your APIs, open feature requests and previous Slack conversations by heart