Learn how to load data to a Databricks Lakehouse and run simple analytics.
Published on Jun 19, 2022
Summarize this article with:

Databricks Lakehouse destination is a strong Airbyte connector to bring your data into a Databricks Lakehouse. The Lakehouse combines the best elements of Data Lakes and Data Warehouses to deliver the reliability, strong governance, and performance of data warehouses with the openness, flexibility, and machine learning support of data lakes. The Databricks Lakehouse platform is powered by open-source technologies like Apache Spark, MLflow, and Delta Lake.
Delta Lake on Databricks provides database-like features such as ACID Transactions, Time-Travel, Schema Evolution & Enforcement, and many more. With their Data Lakehouse Ecosystem, you can use the modern data stack with one single tool.
This tutorial will set up a Databricks Lakehouse destination using Airbyte. You will learn how to configure Airbyte to work with an existing Databricks Cluster, inspect the output created, and create simple queries and analytics within the Databricks Lakehouse Platform.
ℹ️ For demonstration purposes, this tutorial uses Postgres as a source connector, but you can send data to a Databricks Lakehouse from any Airbyte source.
Before starting the tutorial, let's understand the file format used by Delta Lake. Firstly, Databricks stores files in distributed object storage such as AWS S3, Google Cloud Storage, or Azure Blob Storage in an open-source table format: Apache Parquet. Parquet is the de facto standard for storing column-oriented, compressed data. The encoded db-schema and the availability for multiple languages make it a great choice to store data for big data use cases.
The difference between the Delta Lake table format and a native Parquet file is the addition of the Transaction Log. Furthermore, Delta Lake unifies different Parquet-Files with the same db-schema into a single folder, essentially the path to a Delta Table. Included in that folder is an automatically generated separate folder for the transaction log represented by `_delta_log`, which logs the ACID transactions happening on a table and allows neat features such as rolling back the data to a previous point in time.
Let's explore some Delta Lake on Databricks examples in this tutorial. Three typical use cases you would solve with a Data Lakehouse are:
ℹ️ To govern all your data in a unified way, Airbyte integrates with Databricks Unity Catalog. You can add row-level security, share data securely with Delta Sharing, access a data catalog with built-in data search, and more.
The Databricks Lakehouse connector works for both Open-Source (OSS) and Airbyte Cloud. For OSS, you must have Docker and Docker Compose installed, and Airbyte Deployed locally. For Airbyte Cloud, you require to Sign up.
Access to the Databricks Platform on any of the major cloud platforms:
Airbyte is an open-source data integration platform that helps you move and sync data from different sources to destinations like data warehouses or lakes. It provides 300+ pre-built connectors and offers cloud and self-hosted options, making it easy to build automated data pipelines without extensive coding.
If you don’t have a readily available Postgres database to sync, here are some quick instructions. Run the following commands in a new terminal window to start backgrounded source and destination databases:
docker run --rm --name airbyte-source -e POSTGRES_PASSWORD=password -p 2000:5432 -d postgres
Add two tables with a few rows to the source database:
docker exec -it airbyte-source psql -U postgres -c "CREATE TABLE users(id SERIAL PRIMARY KEY, col1 VARCHAR(200));"
docker exec -it airbyte-source psql -U postgres -c "INSERT INTO public.users(col1) VALUES('record1');"
docker exec -it airbyte-source psql -U postgres -c "INSERT INTO public.users(col1) VALUES('record2');"
docker exec -it airbyte-source psql -U postgres -c "INSERT INTO public.users(col1) VALUES('record3');"

docker exec -it airbyte-source psql -U postgres -c "CREATE TABLE cities(city_code VARCHAR(8), city VARCHAR(200));"
docker exec -it airbyte-source psql -U postgres -c "INSERT INTO public.cities(city_code, city) VALUES('BCN', 'Barcelona');"
docker exec -it airbyte-source psql -U postgres -c "INSERT INTO public.cities(city_code, city) VALUES('MAD', 'Madrid');"
docker exec -it airbyte-source psql -U postgres -c "INSERT INTO public.cities(city_code, city) VALUES('VAL', 'Valencia');"
You now have a Postgres database ready to be replicated.
Alternatively, use a local Postgres database on your computer: use `host.docker.internal` (if you are on a Mac) as the host instead of `localhost` when setting up the source and destination.
If you didn’t do it before when deploying Airbyte, go to localhost:8000 or in Cloud cloud.airbyte.io, to launch the UI.
Then, click on sources and add a new source. As the connector type, select Postgres. If you used the instructions above to create a Postgres database, fill in the following configuration fields.
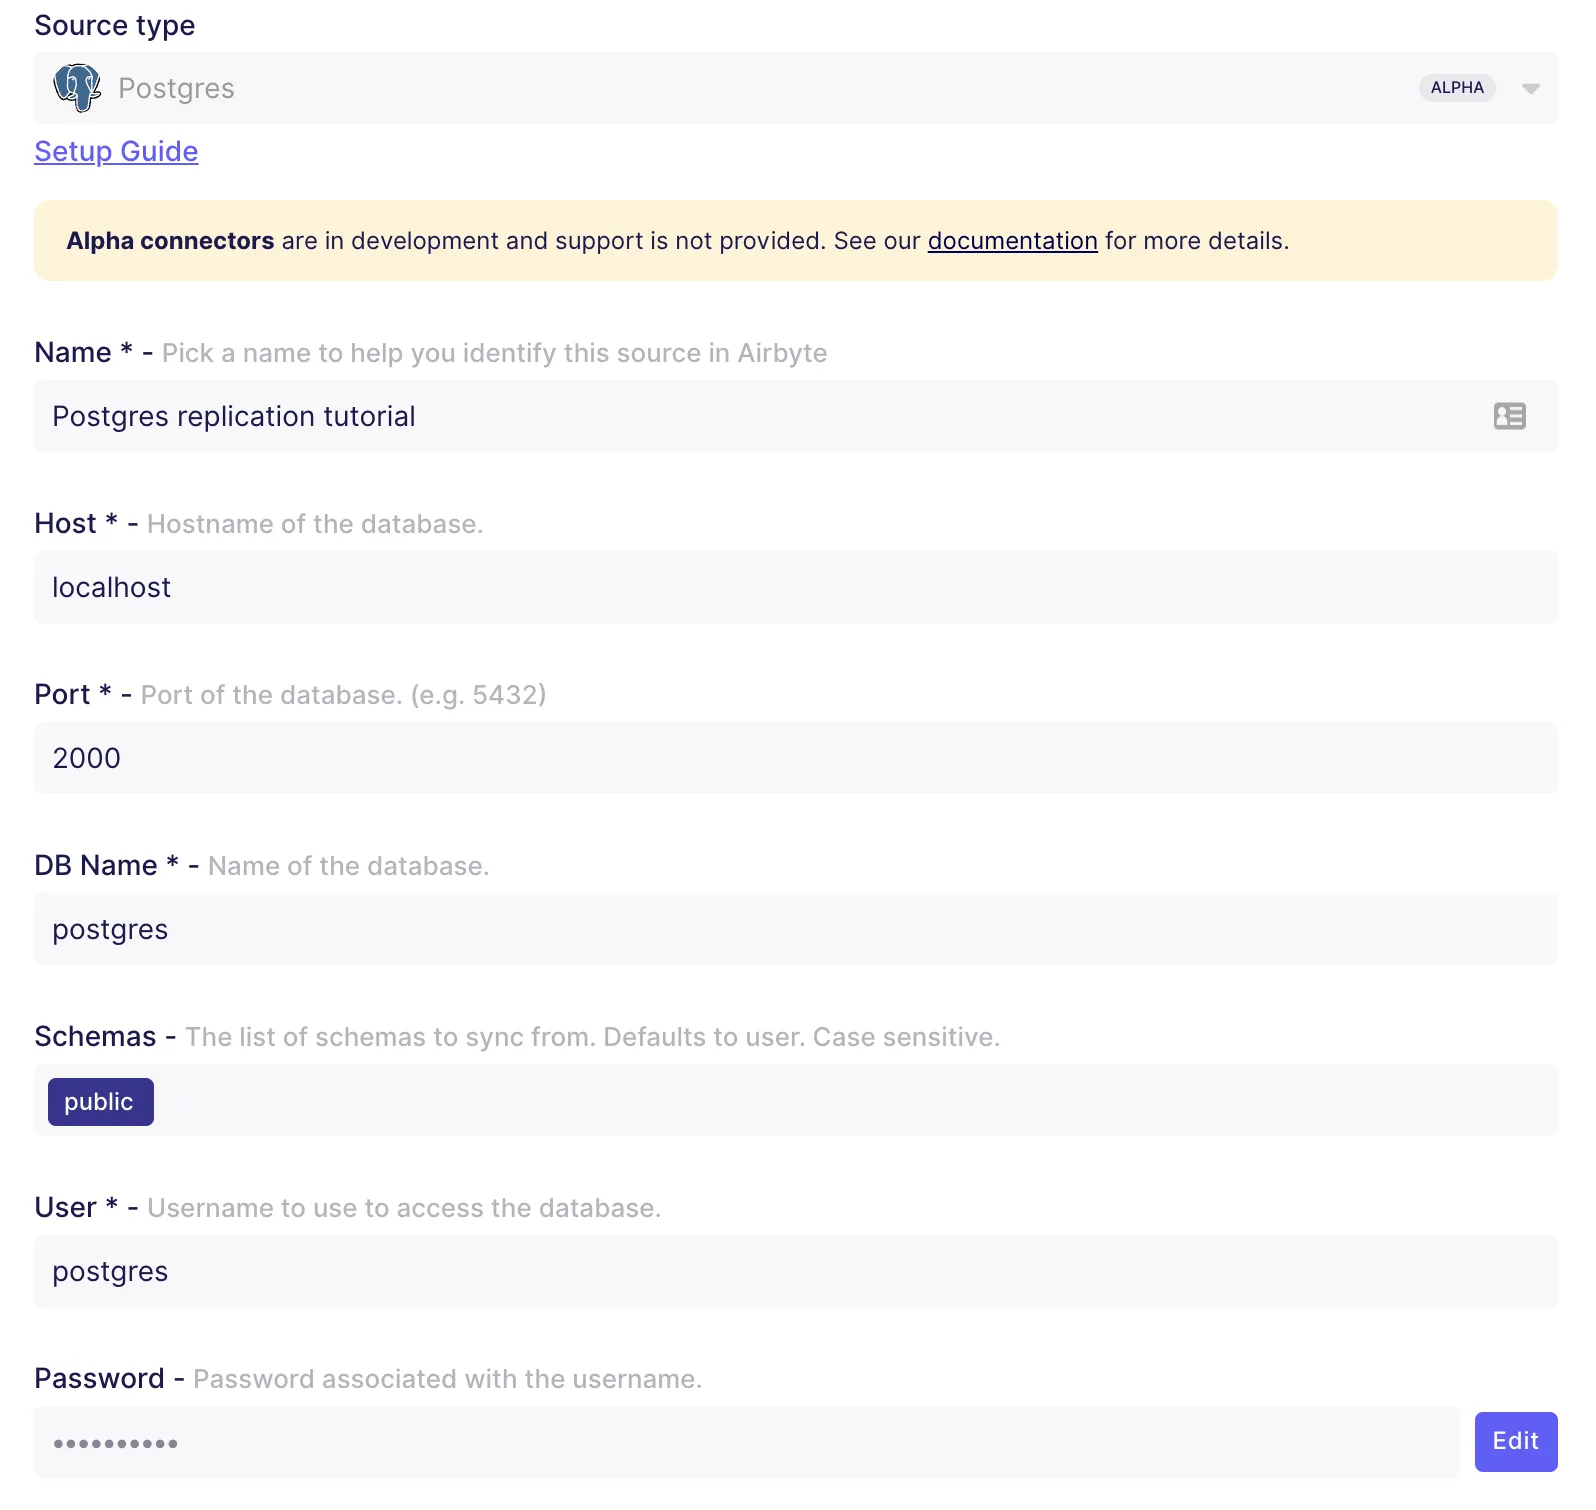
To keep things simple, select the "Standard" replication method. If you need a more advanced replication method like Change Data Capture (CDC), you can follow this other tutorial to configure Postgres CDC replication.
To get started, select the "No Tunnel" SSH option. If you want to connect with SSH, check the documentation on how to connect via an SSH tunnel.
Click on "Set up source", and now you’re ready to configure a destination.
Download our free guide and discover the best approach for your needs, whether it's building your ELT solution in-house or opting for Airbyte Open Source or Airbyte Cloud.

Go to "Destinations", select "Databricks Lakehouse" as the destination type, and fill in the following details.
Databricks Cluster Set up - Compute of this connector:
AWS S3 Storage - Storage of this connector:
General:
The following image shows how the settings look once filled in:
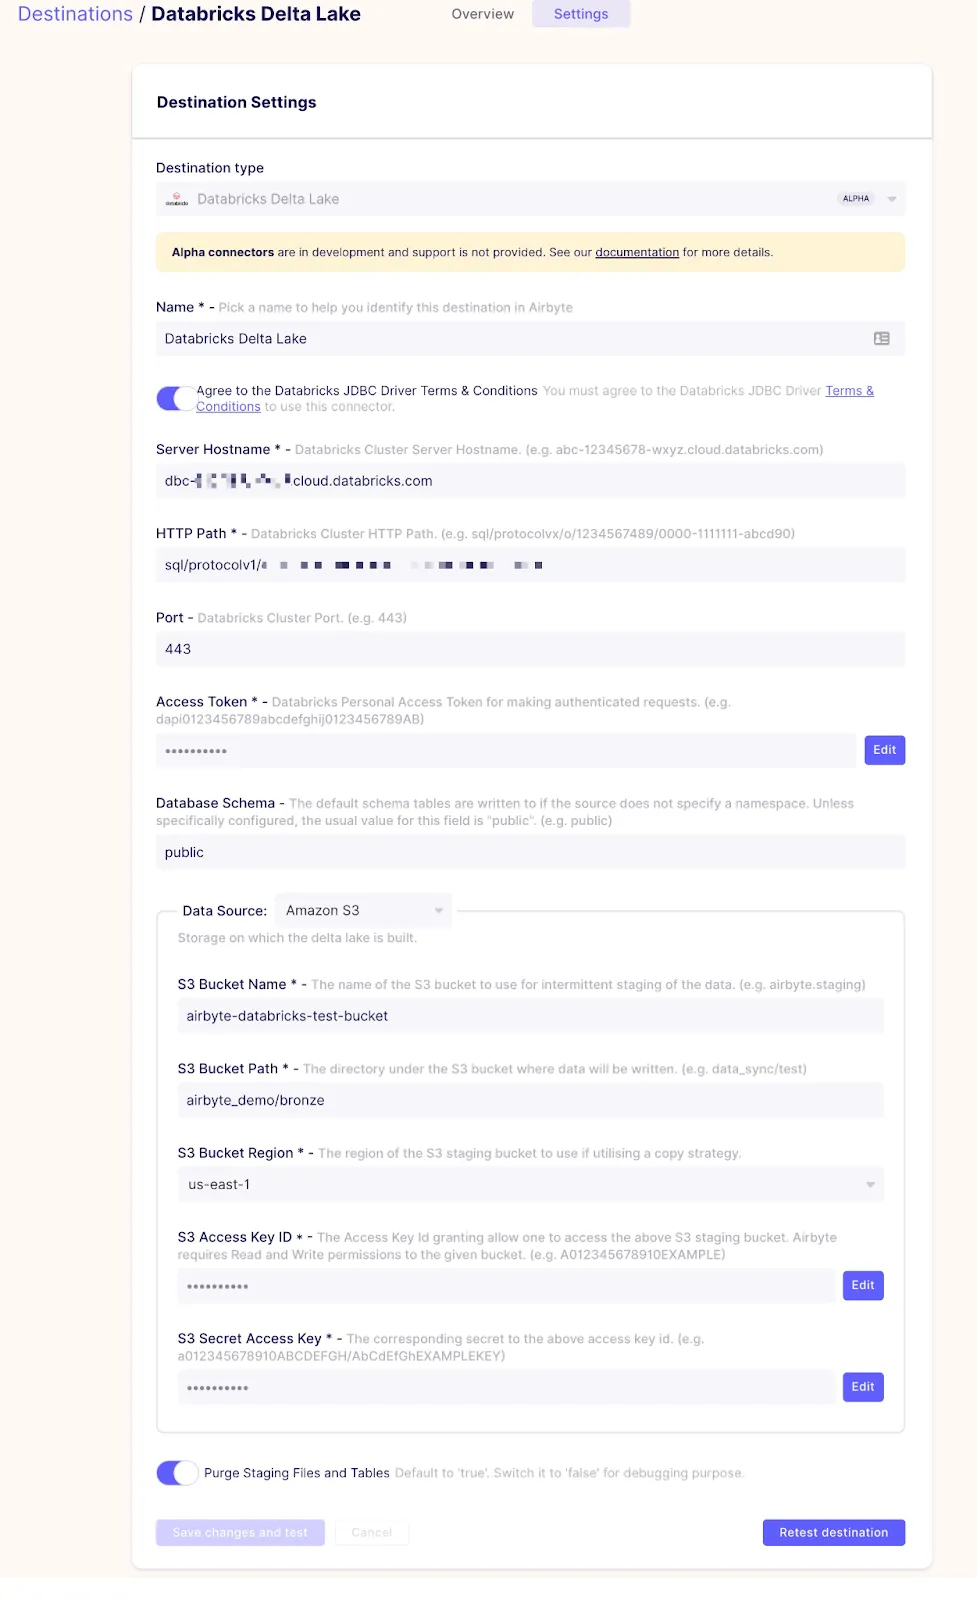
That’s it. You have configured the source and destination. Save the settings to check if they have been filled in correctly.
Go to "Connections" and select the existing Postgres source you have just created and then select the "Databricks Destination" you just created. Once done, you can set the connection parameters as follows.
It’s time to configure the streams and the tables in the database. If you expand the tables, you should see them in the public namespace or schema. The destination schema should also be public.
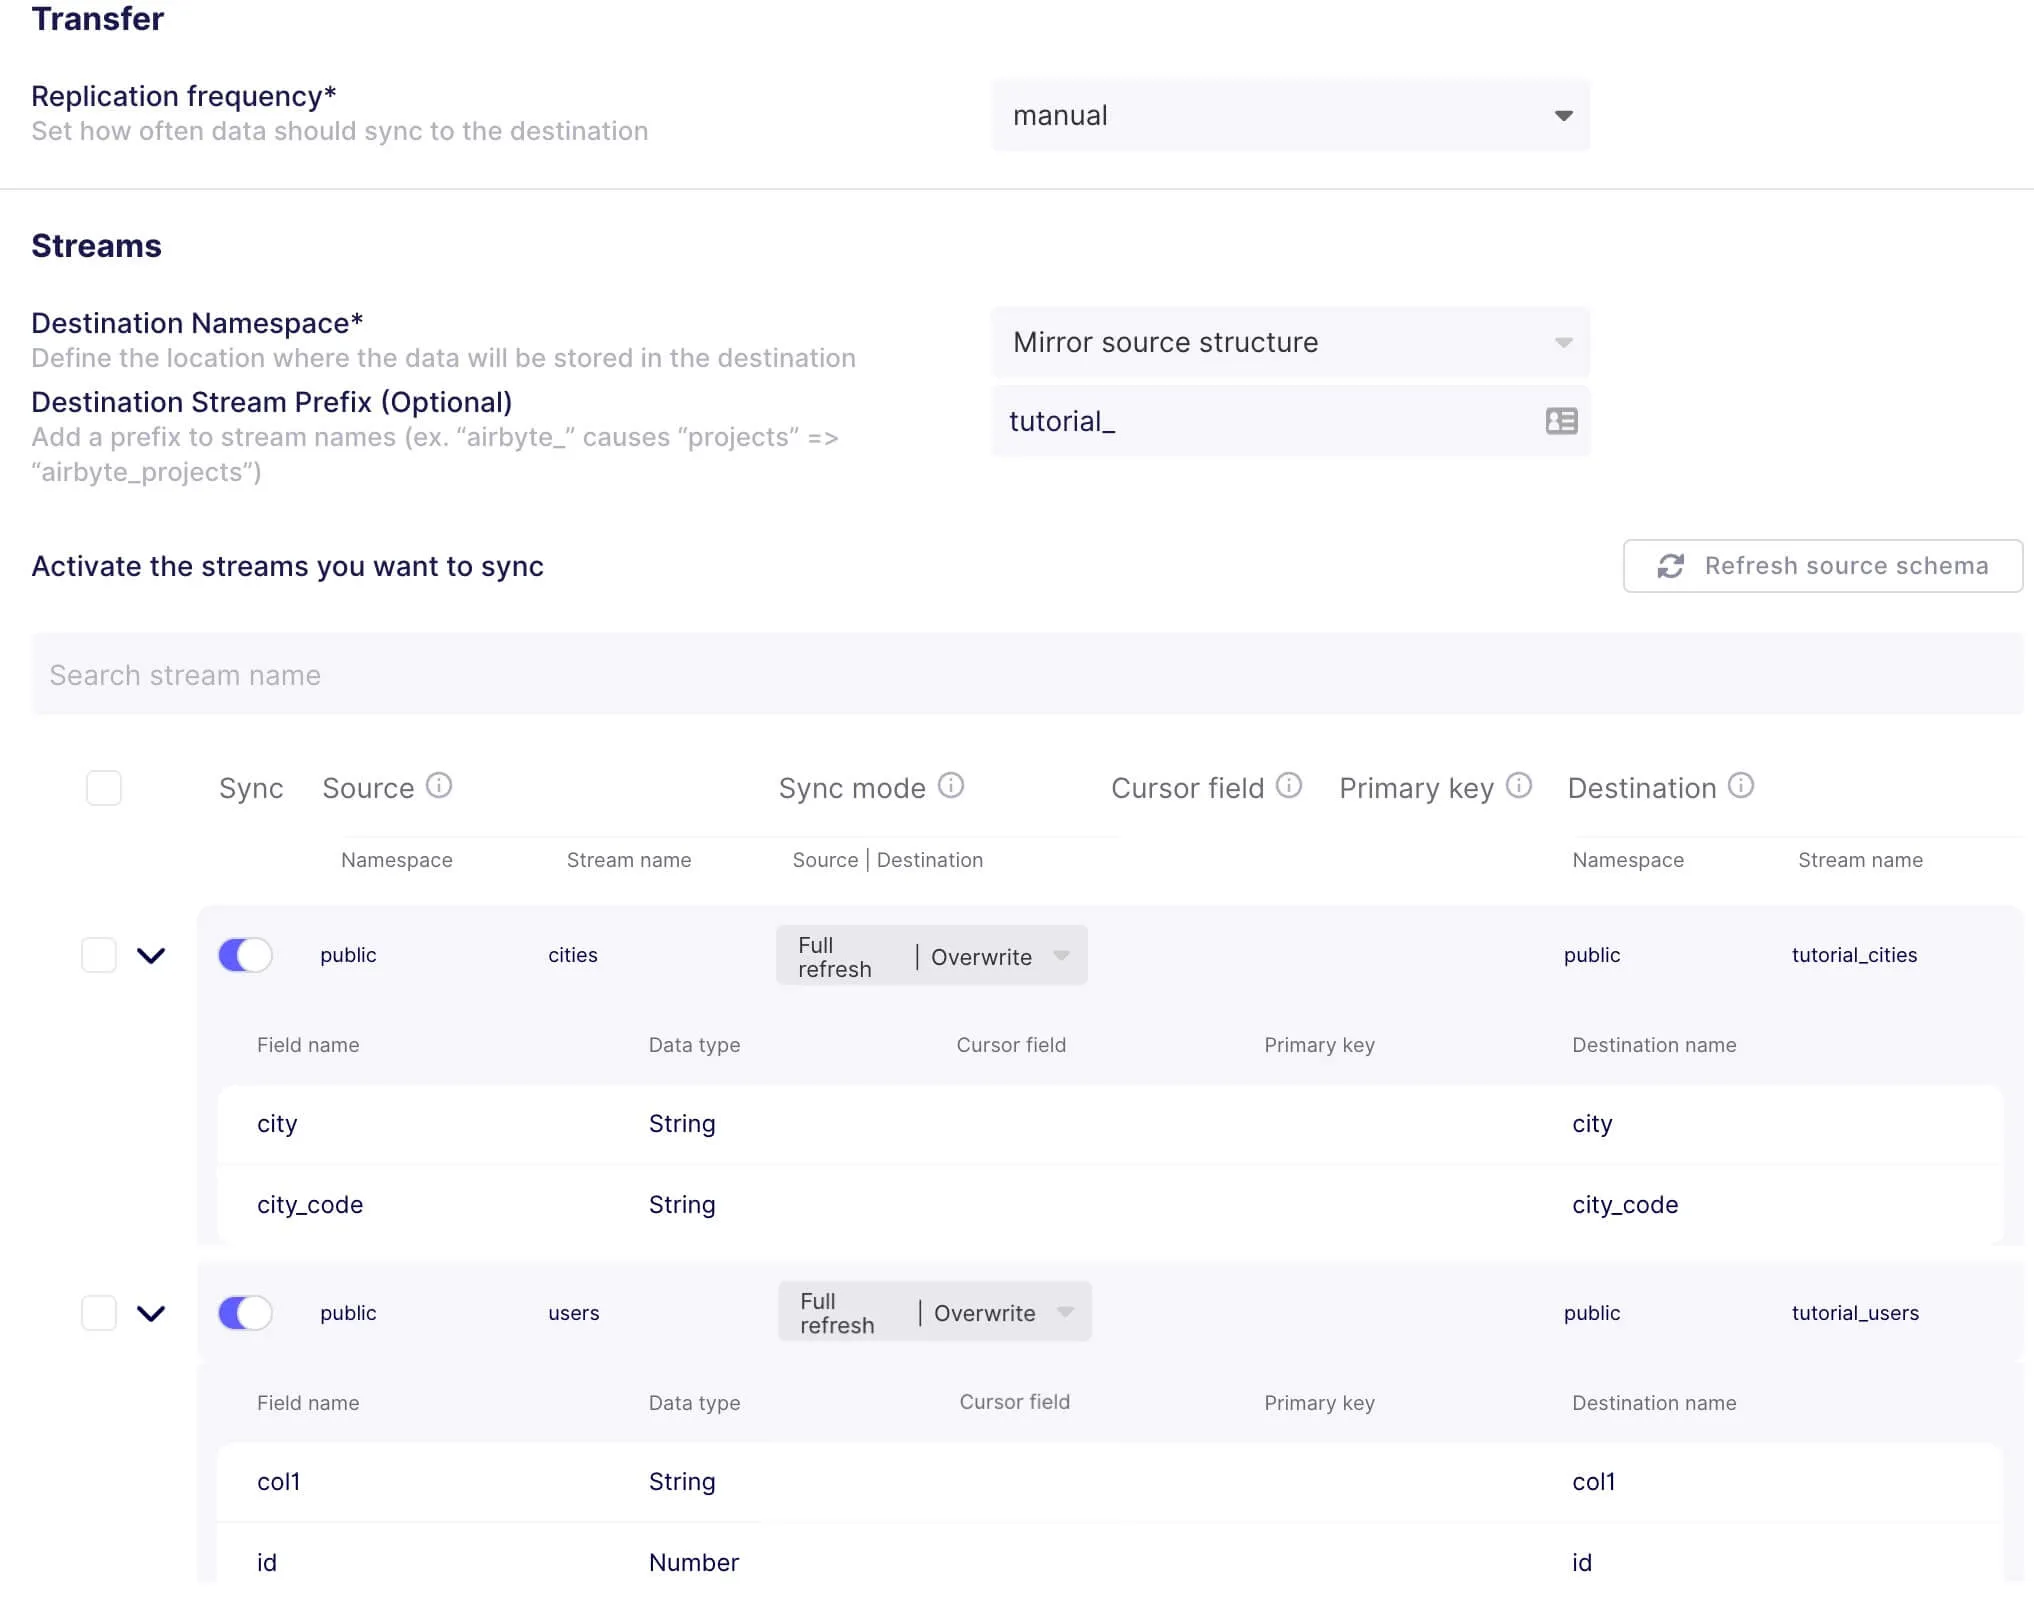
Now, select a sync mode. I chose Full refresh | Overwrite to sync the `cities` and the `users` table since there is no suitable cursor field. The most important thing to note is that you can have different sync modes for each table!
Once you’re ready, save the changes. After that, you can run your first sync by clicking on "Sync now". You can check your run logs to verify everything is going well. Just wait for the sync to be completed, and that’s it! You’ve synchronized data from a Postgres database to a Databricks Lakehouse destination.

Let's look at what files Airbyte created behind the scenes on the S3 data storage.
I used CyberDuck to connect to S3, but you can connect via cmd-line or the web console. Below is an image that illustrates how that looks:

Airbyte created several files. Most notably, the `*.snappy.parquet` and the `_delta_log` contain the above-mentioned delta lake transaction log. The content of your source data resides in the parquet files consolidated in a delta table represented as a single folder in the `tutorial_cities` and `tutorial_users` tables. Each table folder contains the delta-log with detailed information about each transaction.
There are other internal folders that Databricks created, such as `copy_into_log` and SSTs produced by the COPY INTO command.
The Airbyte Databricks Lakehouse connector does at its core two following steps:
These two transactions are also represented in the transaction log with `00000000000000000000.json/crs` and `00000000000000000001.json/crc`. If you open the transaction log represented by the two JSON and CRC files, you should see a protocol for each transaction that happened and some metadata.
00000000000000000000.json:
{
    "commitInfo": {
        "timestamp": 1654879959245,
        "operation": "CREATE TABLE AS SELECT",
        "operationParameters": {
            "isManaged": "false",
            "description": "Created from stream tutorial_cities",
            "partitionBy": "[]",
            "properties": "{"delta.autoOptimize.autoCompact":"true","delta.autoOptimize.optimizeWrite":"true","airbyte.destinationSyncMode":"append"}"
        },
        "isolationLevel": "WriteSerializable",
        "isBlindAppend": true,
        "operationMetrics": {
            "numFiles": "1",
            "numOutputBytes": "927",
            "numOutputRows": "0"
        }
    }
}
00000000000000000000.crc:
{"tableSizeBytes":927,"numFiles":1,"numMetadata":1,"numProtocol":1,"numTransactions":0}
And the second transaction 00000000000000000001.json with `COPY INTO`:
{
    "commitInfo": {
        "timestamp": 1654879970063,
        "operation": "COPY INTO",
        "operationParameters": {},
        "readVersion": 0,
        "isolationLevel": "WriteSerializable",
        "isBlindAppend": true,
        "operationMetrics": {
            "numFiles": "1",
            "numOutputBytes": "2085",
            "numOutputRows": "3"
        }
    }
}
00000000000000000001.crc:
{"tableSizeBytes":3012,"numFiles":2,"numMetadata":1,"numProtocol":1,"numTransactions":1}
This tutorial taught you about the Databricks Lakehouse Platform and how to use Airbyte’s Databricks Lakehouse destination connector to synchronize data from PostgreSQL. Apart from the Postgre source, Airbyte can be used to connect to any of the supported data sources.
Now that you experienced how easy it is to move data with Airbyte, you might want to check our fully managed solution: Airbyte Cloud. The cloud solution allows you to unify your data integration pipelines under one fully managed platform.
We also invite you to join the conversation on our community Slack Channel to share your ideas with thousands of data engineers and help make everyone’s project a success. With Airbyte, the integration possibilities are endless, and we can't wait to see what you will build.
The above-detailed analysis helps you to understand what happened under the hood. But the real power becomes apparent when querying the data. To query the data, you can use a Collaborative Notebook in the Databricks Workspace you created earlier.
Below the `dbutils.fs.ls` files are listed as Delta Tables with a name and a schema, like in any relational database. Then you can use `df.printSchema() ` for printing the Schema. Based on that, you can now create extensive analytics with simple BI dashboarding or sophisticated Python or machine learning logic.
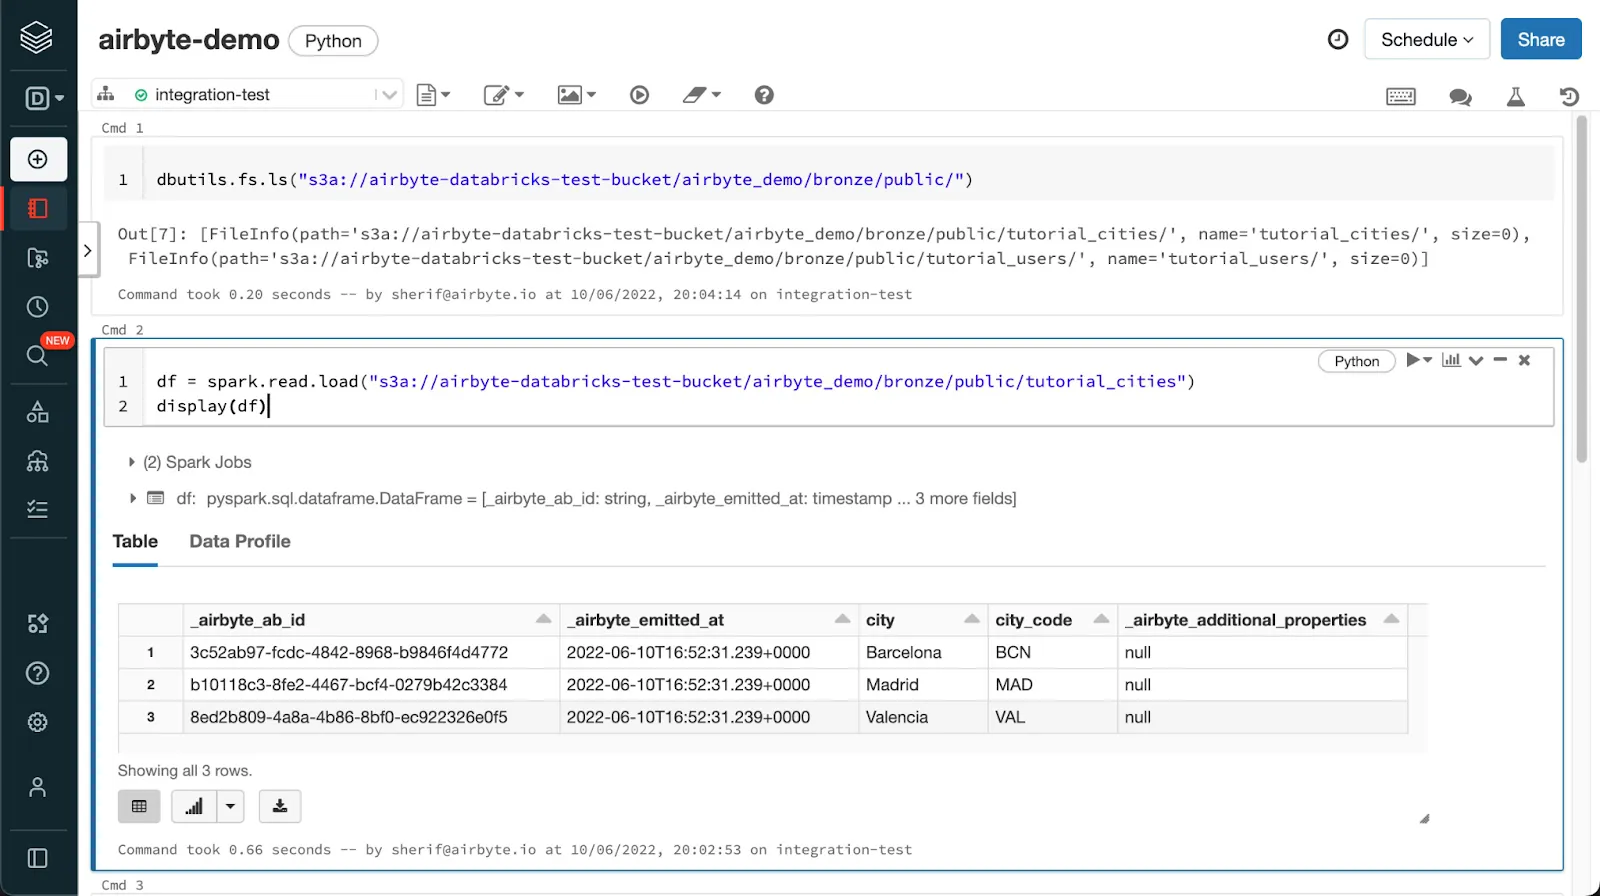
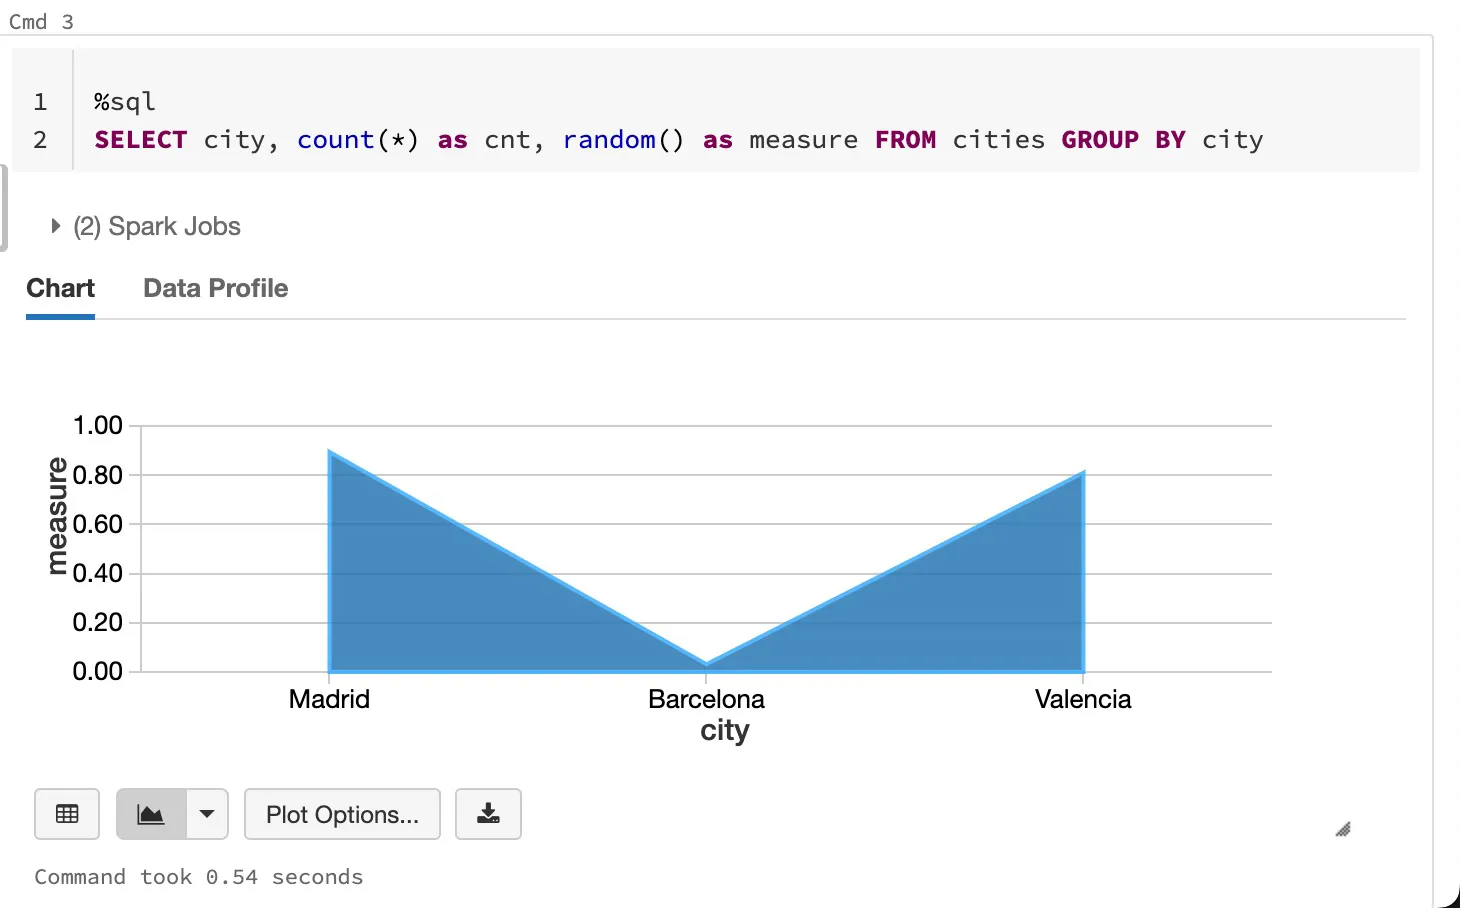
In the image above, I used Python to read a delta lake table into a dataframe and displaying it with python. Another way is with SQL. You can run any SQL against the table if you create a temporary view called cities with `df.createOrReplaceTempView("cities")`. With the magic command `%sql`, you can write arbitrary SQL and visualize the response with an extensive choice of charts.
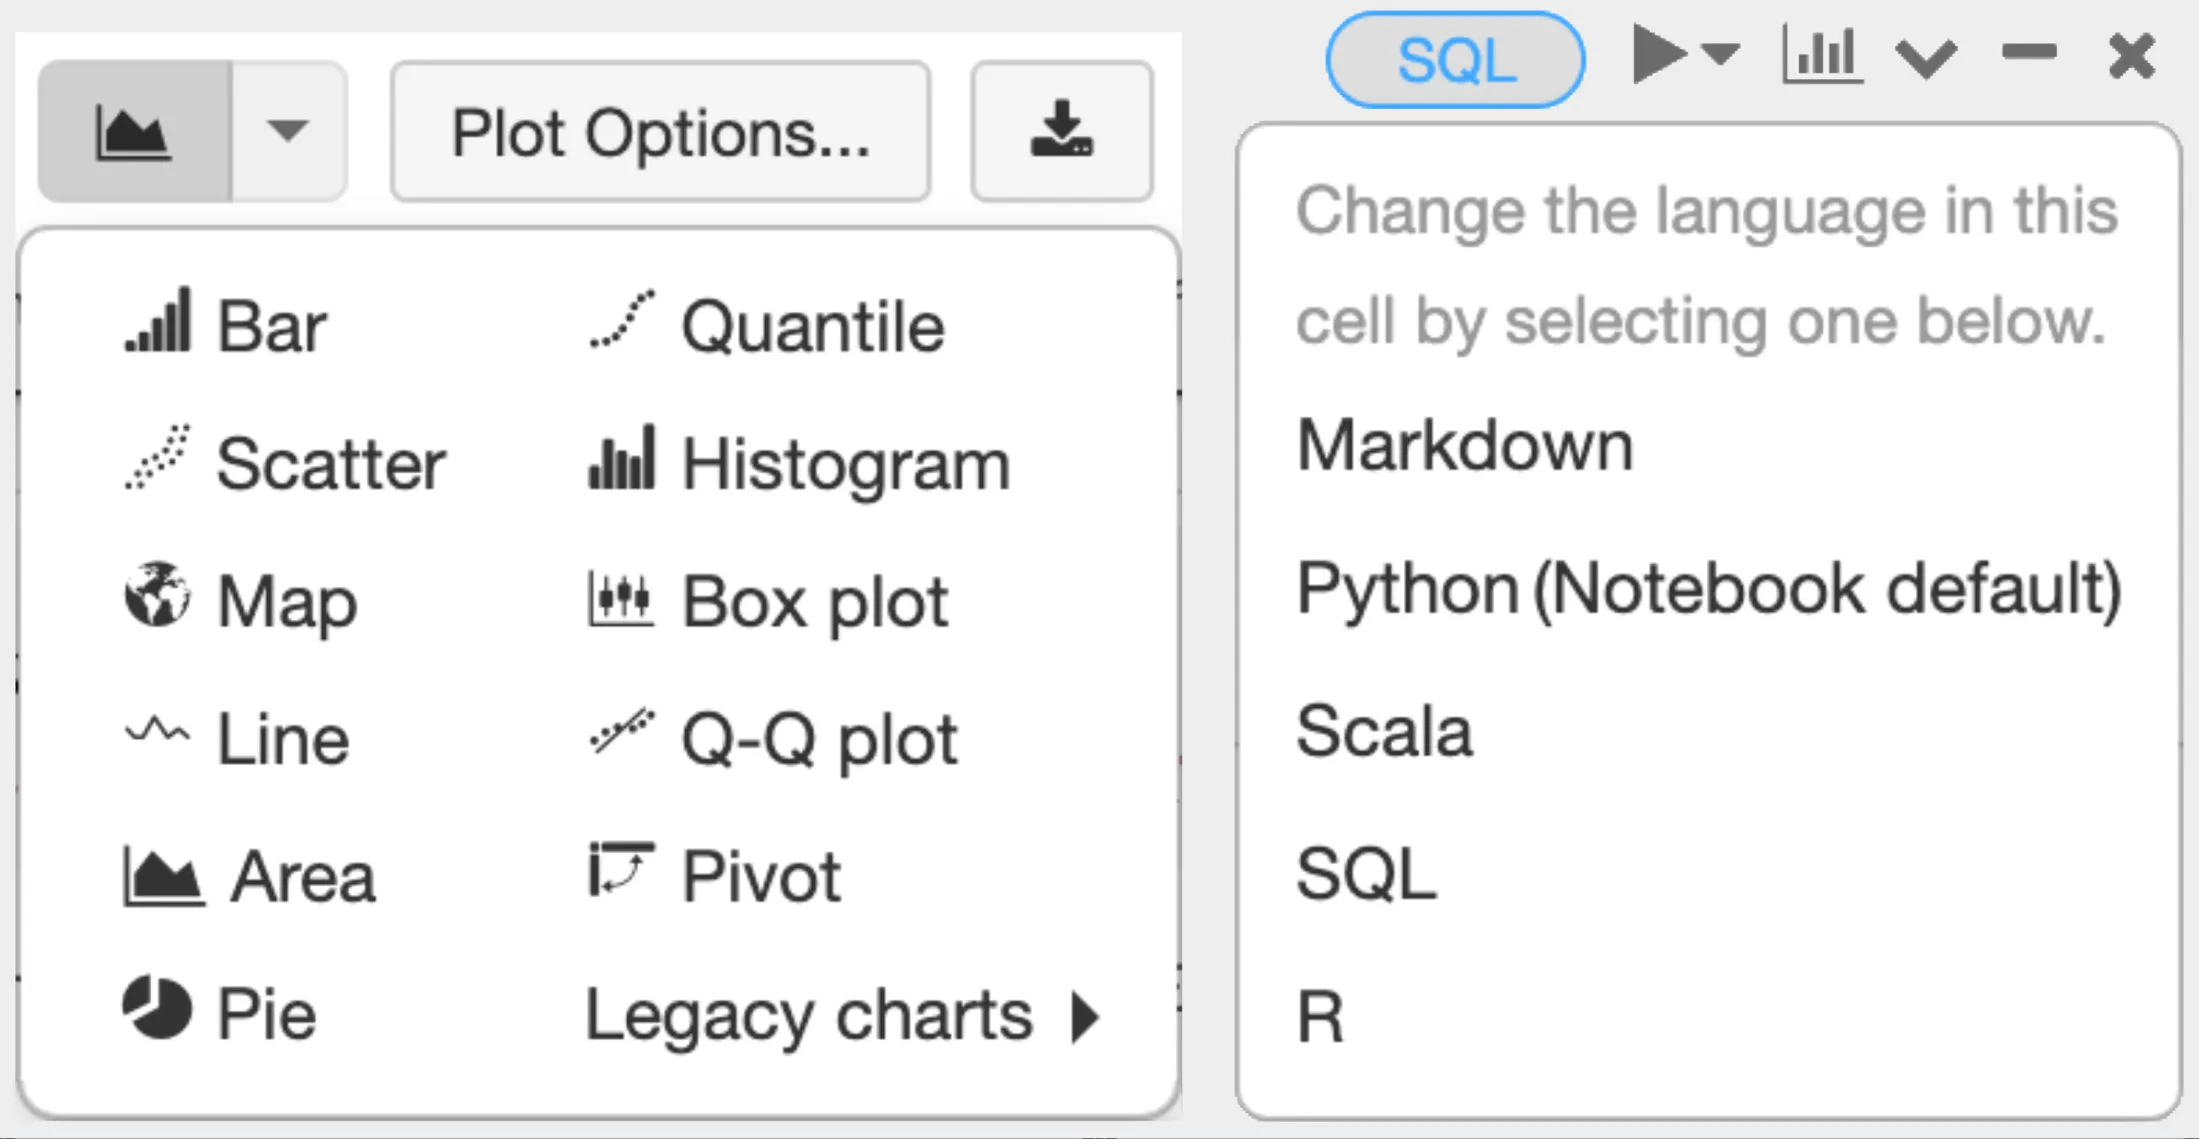
Other charts and languages that are supported as of now in a Databricks notebook are:
The demo notebook used above you can download from airbyte-demo.ipynb or airbyte-demo.dbc.
Simon is a Data Engineer and Technical Author at Airbyte. He is dedicated, empathetic, and entrepreneurial with 15+ years of experience in the data ecosystem. He enjoys maintaining awareness of new innovative and emerging open-source technologies.
Simon is a Data Engineer and Technical Author at Airbyte. He is dedicated, empathetic, and entrepreneurial with 15+ years of experience in the data ecosystem. He enjoys maintaining awareness of new innovative and emerging open-source technologies.
Download our free guide and discover the best approach for your needs, whether it's building your ELT solution in-house or opting for Airbyte Open Source or Airbyte Cloud.

Experience swift Postgres replication, effortlessly transferring data between databases in just 10 minutes.
Learn how to easily automate your LinkedIn Scraping with Airflow and Beautiful Soup.
Learn how to ingest and transform Github and Slack data with SQL and Python-based transformations.