Agent Engine Public Beta is now live!
Learn how Airbyte’s incremental synchronization replication modes work.
Published on Sep 08, 2022
Summarize this article with:
.webp)

In order to get the maximum value from your data integration strategy, you require a synchronized view of your data across multiple systems. Data synchronization involves replicating data from a source system into a destination system, where data consistency is maintained by continually synchronizing modifications on the source system to the destination system. Data synchronization can be done in several ways including: full replication, incremental replication, or change data capture (CDC) replication.
This is the second tutorial in a three part series that explores Airbyte synchronization modes. The purpose of this series is to provide you with step-by-step instructions so that you can see for yourself how Airbyte-replicated data looks for different synchronization modes, and to help you understand how each synchronization mode functions behind the scenes. If you have not already done so, I recommend that you read Exploring Airbyte's full refresh data synchronization (the previous article in this series), before proceeding with this tutorial.
This second tutorial in this series focuses on Airbyte’s incremental synchronization modes. In this tutorial you will:
ℹ️ If you are not sure which replication mode is the most appropriate for your use case, you may be interested in reading An overview of Airbyte's replication modes before continuing with this tutorial.
This tutorial was written in September 2022 and due to the fast-changing nature of Airbyte may become less relevant in the future. The following tools/versions were used for the examples in this tutorial:
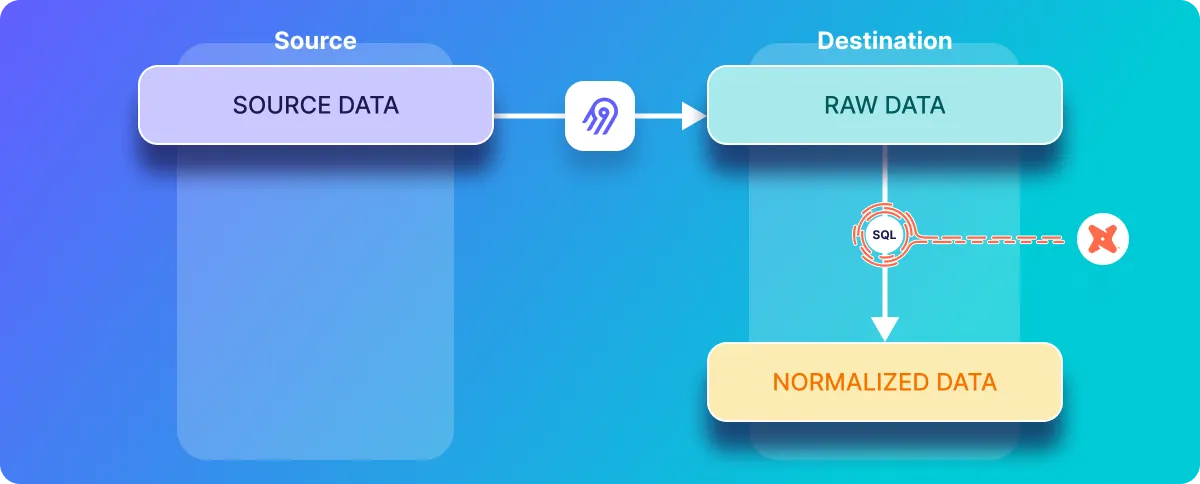
When Airbyte replicates data from a source to a destination, it first replicates the data into a “raw” table. Then, if normalization is enabled, this data will be transformed by SQL commands that are triggered by Airbyte in the destination. Airbyte leverages dbt to create the SQL for normalizing data, and makes use of common table expressions (or CTEs) to break the SQL into more modular and understandable pieces. Later in this tutorial you will explore the low-level SQL that is used for normalization, and will look at both the raw and the normalized tables in the destination database.
The following diagram represents Airbyte’s approach to ELT at a high level:
Incremental synchronization is a replication method that efficiently keeps a source and a destination in sync. As with full refresh data synchronization, sync operations are periodically executed from the source to the destination, with the frequency of synchronization operations defined by a sync schedule. However, as opposed to the full refresh sync, only changes that have occurred since the previous sync will be copied from the source to the destination – in other words any data that is already in the destination is not re-copied.
Airbyte’s incremental synchronization can be conceptually thought of as a loop which periodically executes synchronization operations. Each iteration of this loop only replicates records that have been inserted or updated in the source system since the previous execution of this synchronization loop. This is much more efficient than copying an entire dataset on each iteration, which is the behavior of full refresh synchronization.
At a high level, the Incremental Sync - Append sync mode results in a final normalized table which contains a historical copy of every record that has been inserted or updated on the source and synced to the destination. If a record has been updated and synchronized multiple times, then it will result in multiple entries in the final normalized table.
On the other hand the Incremental Sync - Deduped History sync mode generates two normalized destination tables. One of the tables is a history table (also known as the scd table, which refers to slowly changing dimension) which includes historical versions of each record that includes the start date and end date for each record. The other table is the deduped table which contains a single copy of each record.
Sending only updated or newly inserted records in a given synchronization iteration requires keeping track of which records have been sent in previous iterations. A cursor serves this purpose, and can be thought of as a pointer to the most recent record that has been replicated. When selecting records to be replicated during a new synchronization iteration, Airbyte includes the cursor value as part of the query on the source system so that only records that are newer than the cursor (i.e. new or updated since the previous synchronization) will be selected from the source and sent to the destination.
In this tutorial, the source database contains records which include a field called updated_at, which stores the most recent time that each record is inserted or updated. This is used as the cursor field. In other words, Airbyte will store the largest updated_at value seen in a given synchronization, and then in the subsequent synchronization iteration, new records that have been inserted or records that have been updated on the source will be retrieved by including the cursor value as part of the query. The inclusion of the cursor in the query limits the response to only records where the updated_at value is greater than or equal to the largest updated_at value from the previous synchronization.
ℹ️ See this discussion on Airbyte’s cursors for SQL sources for more details on design decisions and trade-offs that are considered in the implementation of a query that uses a cursor to select data from a source database.
The Airbyte Protocol specifies that an Airbyte source should emit an AirbyteStateMessage. This message includes the value of the most recently emitted cursor as well as other state information. Ultimately, Airbyte persists this state (StatePersistence.java) to an internal Postgres database. If you wish to view this database for yourself, you can login to it as follows:
docker exec -ti airbyte-db psql -U docker -d airbyteThe contents of the state database can be viewed with the following command:
SELECT * FROM state;Which should respond with a table similar to the one given below (note that the response is abbreviated in this article for conciseness):
                  id                  |            connection_id             |                                                                                                  state                                                                   |          created_at           |          updated_at           | stream_name | namespace |  type
--------------------------------------+--------------------------------------+--------------------------------------------------------------------------------------------------------------------------------------------------------------------------+-------------------------------+-------------------------------+-------------+-----------+--------
 884a10a7-1c58-4456-af44-c617eec0c1fb | 78cb42b9-e857-4f93-b159-e590ec31d287 | {"state": {"cdc": false, "streams": [{"cursor": "2022-09-02T07:55:58.324989", "stream_name": "table_one", "cursor_field": ["updated_at"], "stream_namespace": "public"}]}} | 2022-09-01 16:52:44.619871+00 | 2022-09-02 07:59:27.304753+00 |             |           | LEGACY
Records that are inserted or updated on a source system are replicated by Airbyte to the destination during a sync operation, and initially stored in a raw data table. If a given document is updated and synchronized multiple times, the raw data table will have multiple entries for that record (as will be seen in the hands-on deep-dive later in this article).
If an Airbyte user has selected the Incremental Sync - Deduped History sync mode, then the data must be deduplicated so that a single entry in the source table only results in a single corresponding entry in the final normalized deduplicated destination table, even though multiple versions corresponding to that record may appear in the raw and historic data tables. A primary key field is used by Airbyte to select only the most recent version of a given record from the history table for inclusion in the final deduplicated table, and all other historical versions of that record are not included.
On the other hand, because Incremental Sync - Append sync mode does not do any deduplication, it does not require a primary key to be defined.
Download our free guide and discover the best approach for your needs, whether it's building your ELT solution in-house or opting for Airbyte Open Source or Airbyte Cloud.

Assuming that your data has a suitable cursor field, and that (for the deduped mode) you have a suitable primary key, then Airbyte’s incremental sync modes may be appropriate for your data replication needs. However, there are a few limitations to be aware of:
These limitations are described in more detail in the incremental append limitations and incremental dedupe history limitations documentation.
The above discussion has given a brief overview of how incremental sync modes work. The remainder of this article is focussed on a hands-on exploration of what happens behind the scenes during incremental database replication.
If you have completed the previous tutorial in this series, then you may already have containers running for the Postgres source and Postgres destination. If this is your case then you can re-use these containers and may skip to the next section.
ℹ️ The examples in this tutorial are presented with new/empty Postgres containers, but it is not a requirement that your source and destination databases are empty.
Start a source Postgres container running at port 2000 on localhost as follows:
docker run --rm --name airbyte-source -e POSTGRES_PASSWORD=password -p 2000:5432 -d debezium/postgres:13
Start a destination Postgres container running at port 3000 on localhost as follows:
docker run --rm --name airbyte-destination -e POSTGRES_PASSWORD=password -p 3000:5432 -d debezium/postgres:13
Create a new data source by clicking + New source as follows.

Then select Postgres as the source as follows:

And define a source connector called Incremental-source as follows:

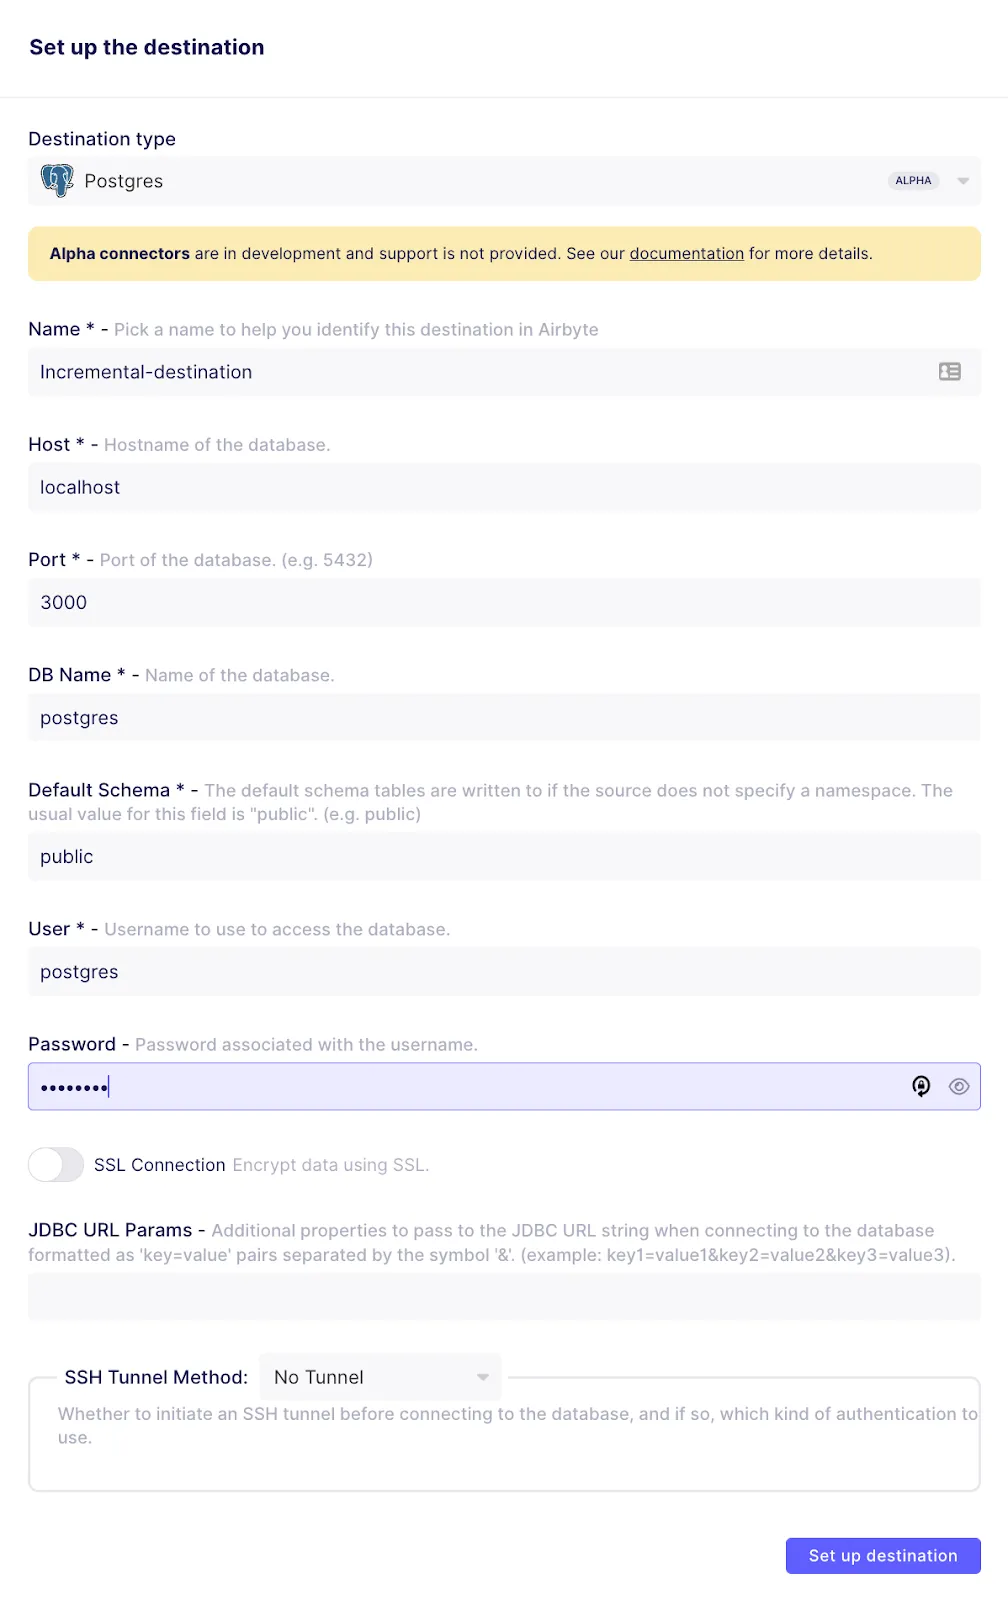
Define a new Postgres destination called Incremental-destination as follows:
In this section, you will explore incremental data replication with the Incremental Sync | Deduped sync mode, and will examine the SQL that is used for normalizing the raw data in the destination Postgres database.
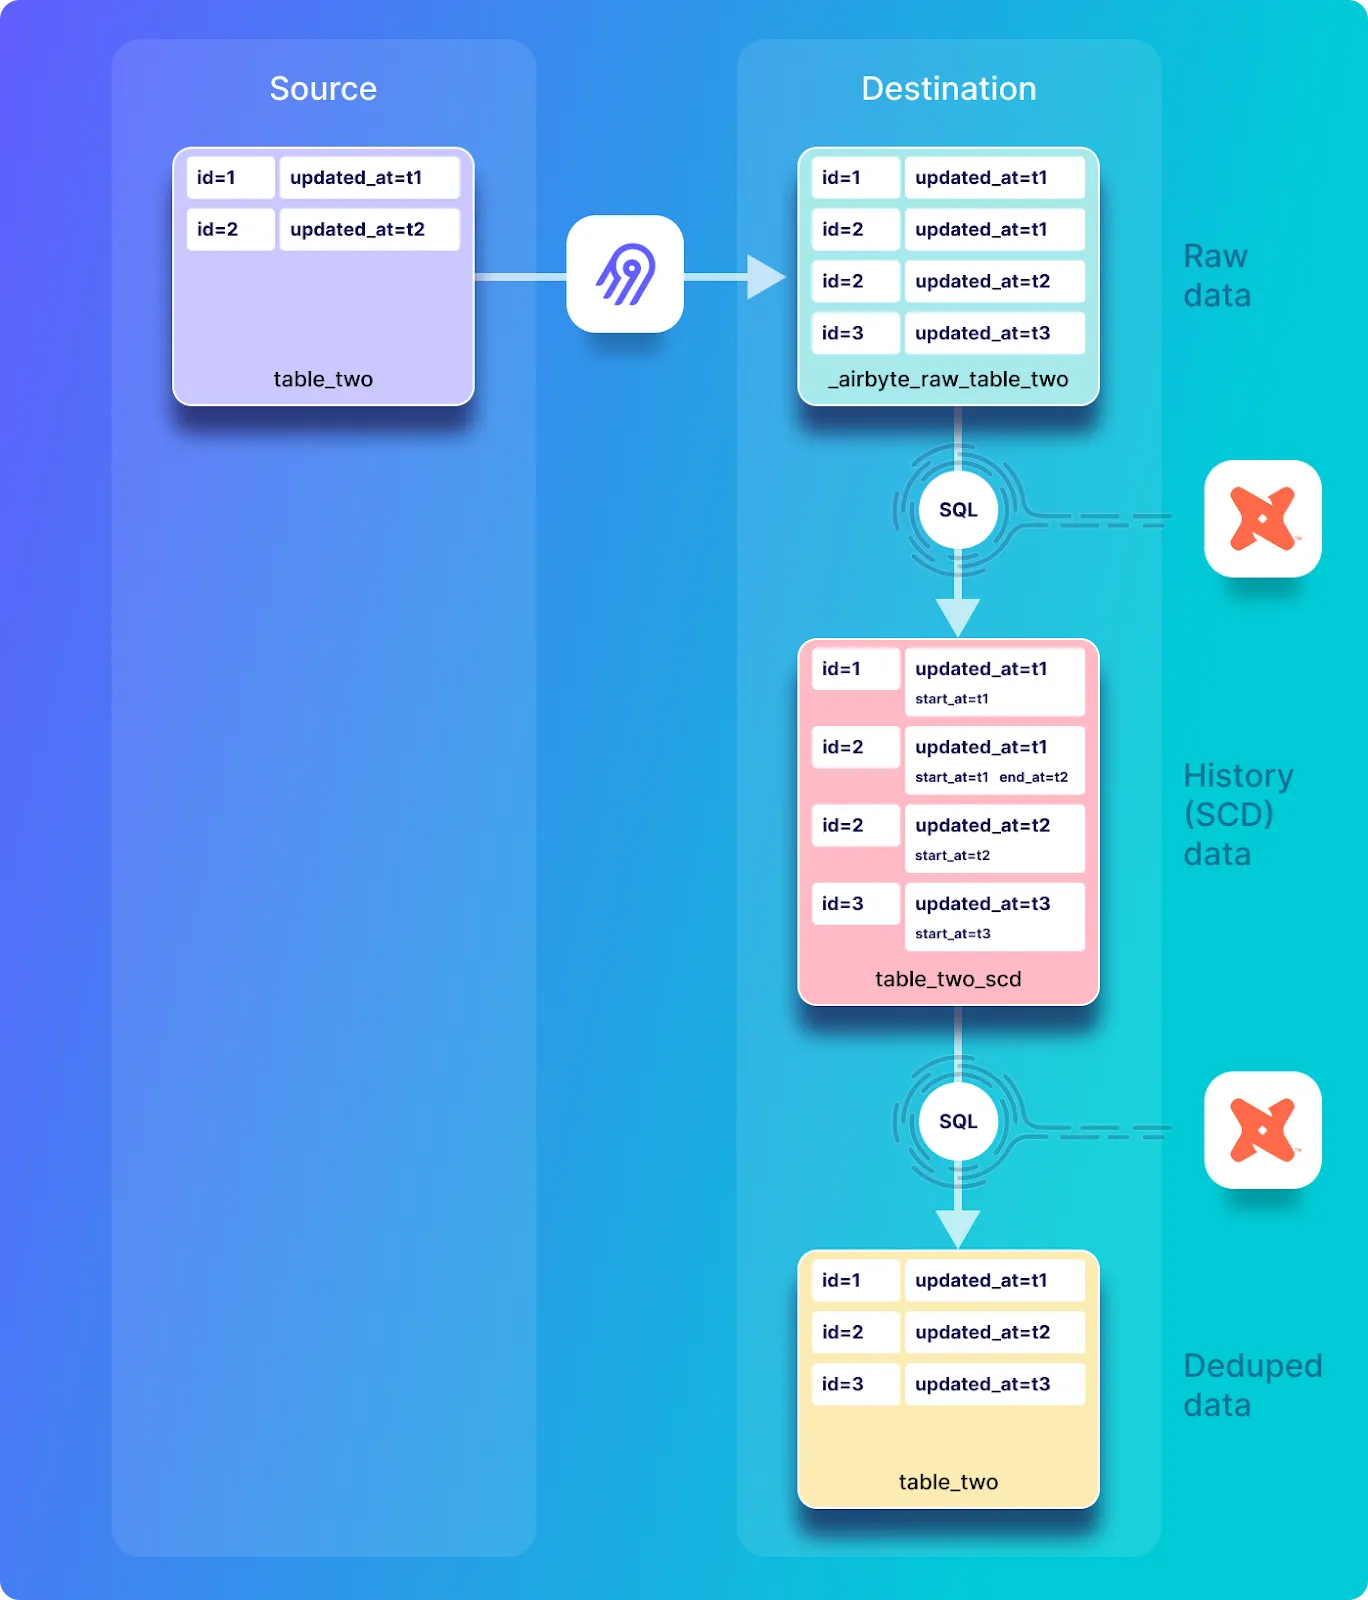
In this synchronization mode, Airbyte first copies the source data into a raw data table in the destination, and then two normalized tables are created by executing SQL statements in the destination, as demonstrated in the diagram below:

In this section of the tutorial, you will login to the source Postgres database and create and populate a new table that will be used as a source for demonstrating incremental replication. Go back to the Postgres shell in the airbyte-source that you previously opened, and create a new table in the source database called table_two as follows:
CREATE TABLE table_two(
  id integer PRIMARY KEY,
  name VARCHAR(200),
  updated_at timestamp DEFAULT NOW() NOT NULL
);
Next, define a trigger that should be executed on each update to the table_two table, which is accomplished by executing the following code. Not that this refers to the procedure called trigger_set_timestamp that was defined earlier in this tutorial:
CREATE TRIGGER set_timestamp_on_table_two
  BEFORE UPDATE ON table_two
  FOR EACH ROW
  EXECUTE PROCEDURE trigger_set_timestamp();
Populate the second table with some data and view it as follows:
INSERT INTO table_two(id, name) VALUES(1, 'Eg1 DD+Hst');
INSERT INTO table_two(id, name) VALUES(2, 'Eg2 DD+Hst');
SELECT * FROM table_two;
The source table_two table looks as follows
 id |    name    |         updated_at
----+------------+----------------------------
  1 | Eg1 DD+Hst | 2022-09-01 16:18:07.569818
  2 | Eg2 DD+Hst | 2022-09-01 16:18:07.581552
(2 rows)
Verify that the trigger that sets the updated_at field is executing correctly by updating one of the rows in the table and viewing the table with the following commands:
UPDATE table_two SET name='Eg2a DD+Hs' WHERE id=2;
SELECT * FROM table_two;
The source table_two table looks as follows
 id |    name    |         updated_at
----+------------+----------------------------
  1 | Eg1 DD+Hst | 2022-09-01 16:18:07.569818
  2 | Eg2a DD+Hs | 2022-09-01 16:30:13.939030
(2 rows)
If your trigger has executed correctly then you should see that the updated_at field for the record with id=2 in table_two has been modified.
You will now configure Airbyte to detect the new table that you have just created. Do this by clicking on the Replication under the previously defined incremental-sync-demo connection, and then clicking on the Refresh source schema button as shown in the image below.
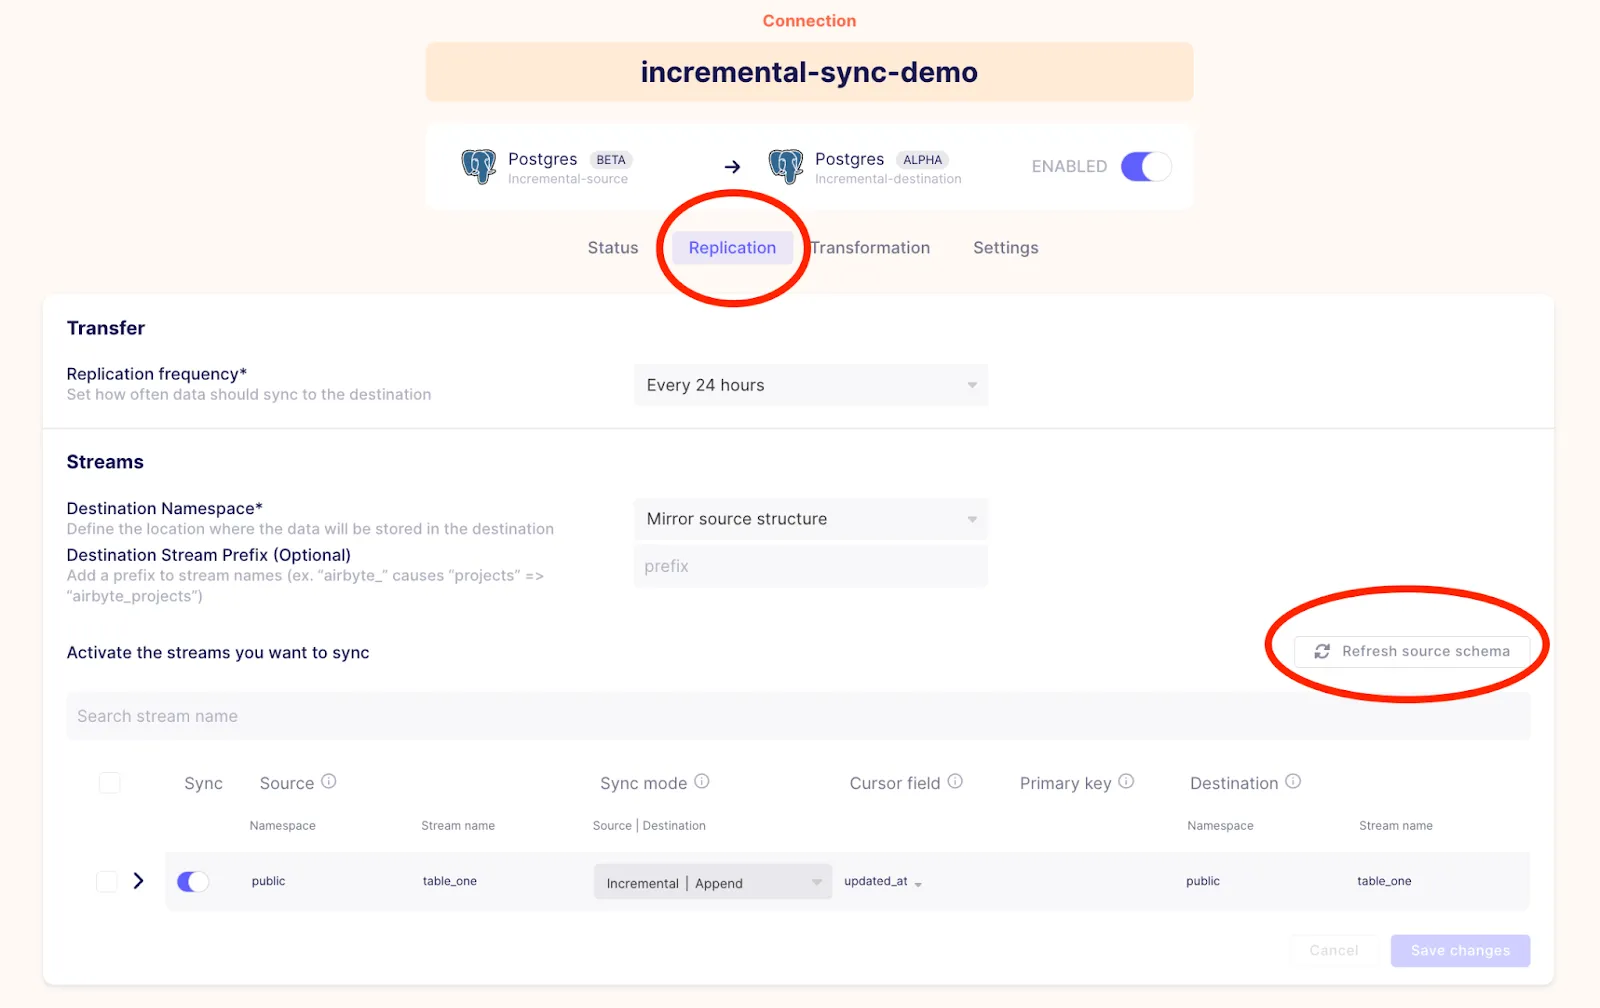
After refreshing the schema, you will be able to select table_two for replication.

Configure the stream as annotated in the image above with the following settings:
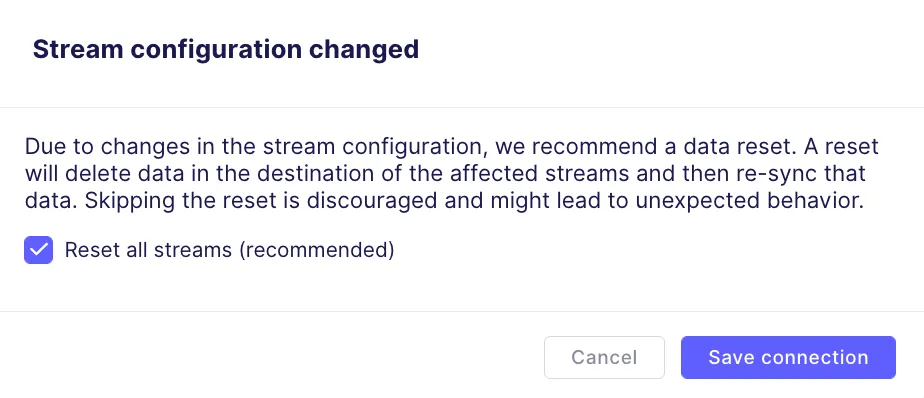
And then click on the Save changes button in the bottom right corner. At this point you may see the following pop-up, and can click on Save connection.
In the bottom right corner you will see the following spinning icon instead of the Save connection button.

It should eventually go back to the following, at which point your connection should be ready.

Go back to the connections page where you should see that a sync has succeeded as follows:

Notice that 2 records were emitted corresponding to the two records that you have written into table_two.
In the first synchronization, Airbyte replicates all of the records from the source table into a raw table in the destination database. Then, dbt-generated SQL commands are executed to normalize the raw data into a history table. Additional SQL commands are executed on this history table to create the final deduped table as shown below:

Go back to the destination Postgres shell which you previously opened, where you can then view the names of the tables in the destination with the following command:
\dt;
Which in my configuration responds with the following list of tables.
                 List of relations
 Schema |          Name          | Type  |  Owner
--------+------------------------+-------+----------
 public | _airbyte_raw_table_one | table | postgres
 public | _airbyte_raw_table_two | table | postgres
 public | table_one              | table | postgres
 public | table_two              | table | postgres
 public | table_two_scd          | table | postgres
(5 rows)
Notice that in addition to the new raw table called _airbyte_raw_table_two there are also two new normalized tables. table_two_scd is the historical table (where scd refers to slowly changing dimension), and table_two is the deduped table.
During the creation of the connection between the source and the destination, an initial sync was performed on table_two using the incremental dedupe + history synchronization mode. The data was written into a raw table called _airbyte_raw_table_two, which can be viewed by executing the following:
SELECT * FROM _airbyte_raw_table_two;
This should respond with a table that look as follows:
            _airbyte_ab_id            |                                _airbyte_data                                |    _airbyte_emitted_at
--------------------------------------+-----------------------------------------------------------------------------+----------------------------
 3bd474b8-0329-4bce-bde7-aee7c5d30cc8 | {"id": 1, "name": "Eg1 DD+Hst", "updated_at": "2022-09-01T16:18:07.569818"} | 2022-09-01 16:52:44.103+00
 4282344a-62c3-4634-a91a-e6dafb9b253a | {"id": 2, "name": "Eg2a DD+Hs", "updated_at": "2022-09-01T16:30:13.939030"} | 2022-09-01 16:52:44.103+00
(2 rows)
In addition to the field containing the source data there are two additional fields in the raw table, _airbyte_emitted_at and _airbyte_ab_id which were described earlier in this tutorial.
The normalization SQL creates two tables from the raw data, a history table (table_two_scd) and a deduplicated table (table_two). View the history table called table_two_scd by executing the following:
SELECT * FROM table_two_scd;
This looks as follows.
       _airbyte_unique_key        |     _airbyte_unique_key_scd      | id |    name    |         updated_at         |     _airbyte_start_at      | _airbyte_end_at | _airbyte_active_row |            _airbyte_ab_id            |    _airbyte_emitted_at     |    _airbyte_normalized_at     |    _airbyte_table_two_hashid
----------------------------------+----------------------------------+----+------------+----------------------------+----------------------------+-----------------+---------------------+--------------------------------------+----------------------------+-------------------------------+----------------------------------
 c4ca4238a0b923820dcc509a6f75849b | 96a17eccedd409b3b3de3b411d431ab8 |  1 | Eg1 DD+Hst | 2022-09-01 16:18:07.569818 | 2022-09-01 16:18:07.569818 |                 |                   1 | 3bd474b8-0329-4bce-bde7-aee7c5d30cc8 | 2022-09-01 16:52:44.103+00 | 2022-09-01 16:53:41.035633+00 | 78812b56ae516cb4bb4278c595c3b20e
 c81e728d9d4c2f636f067f89cc14862c | 064c6bc6ac9c9956a7188495284d8c07 |  2 | Eg2a DD+Hs | 2022-09-01 16:30:13.93903  | 2022-09-01 16:30:13.93903  |                 |                   1 | 4282344a-62c3-4634-a91a-e6dafb9b253a | 2022-09-01 16:52:44.103+00 | 2022-09-01 16:53:41.035633+00 | d89c24a3d20ae9663d6f9a40f023149c
(2 rows)
This table is quite different from the other tables. In addition to columns that appear in the previously discussed normalized tables, it includes the following new columns:
View the deduplicated table called table_two in the destination by executing the following:
SELECT * FROM table_two;
Which looks as follows:
       _airbyte_unique_key        | id |    name    |         updated_at         |            _airbyte_ab_id            |    _airbyte_emitted_at     |    _airbyte_normalized_at     |    _airbyte_table_two_hashid
----------------------------------+----+------------+----------------------------+--------------------------------------+----------------------------+-------------------------------+----------------------------------
 c4ca4238a0b923820dcc509a6f75849b |  1 | Eg1 DD+Hst | 2022-09-01 16:18:07.569818 | 3bd474b8-0329-4bce-bde7-aee7c5d30cc8 | 2022-09-01 16:52:44.103+00 | 2022-09-01 16:53:41.627757+00 | 78812b56ae516cb4bb4278c595c3b20e
 c81e728d9d4c2f636f067f89cc14862c |  2 | Eg2a DD+Hs | 2022-09-01 16:30:13.93903  | 4282344a-62c3-4634-a91a-e6dafb9b253a | 2022-09-01 16:52:44.103+00 | 2022-09-01 16:53:41.627757+00 | d89c24a3d20ae9663d6f9a40f023149c
(2 rows)
While it may not yet be apparent based on the small number of entries that have been synchronized so far, this table contains a single record corresponding to each record in the source database. In other words, the data that appears in the historical table has been deduplicated and only the most recent version of a given record appears in this table. This is achieved by SQL which selects only records where _airbyte_active_row is true, and is discussed in more detail in the discussion on the SQL.
In this section you will look at the SQL code that was used in the first synchronization for normalizing raw data into the destination tables when incremental deduped history is used. As you have just seen, this mode creates two normalized tables:
This section will guide you through the SQL that is used for creating the above tables. This is a multi-stage process which involves the creation of a staging table (table_two_stg), which is the basis for the history table (table_two_scd), which in-turn forms the basis of the deduped table (table_two).
ℹ️ Note that the cat commands that are presented below are based on the job ID of 170 and attempt ID of 0, which I have extracted from the Airbyte UI after the most recent successful synchronization. If you are following along, be sure to replace these with values based on your own sync run.
The SQL that is used for creating the final (deduped) as well as the history (SCD) table has several intermediate steps that make use of common table expressions (or CTEs) and a staging table, as demonstrated in the following diagram:
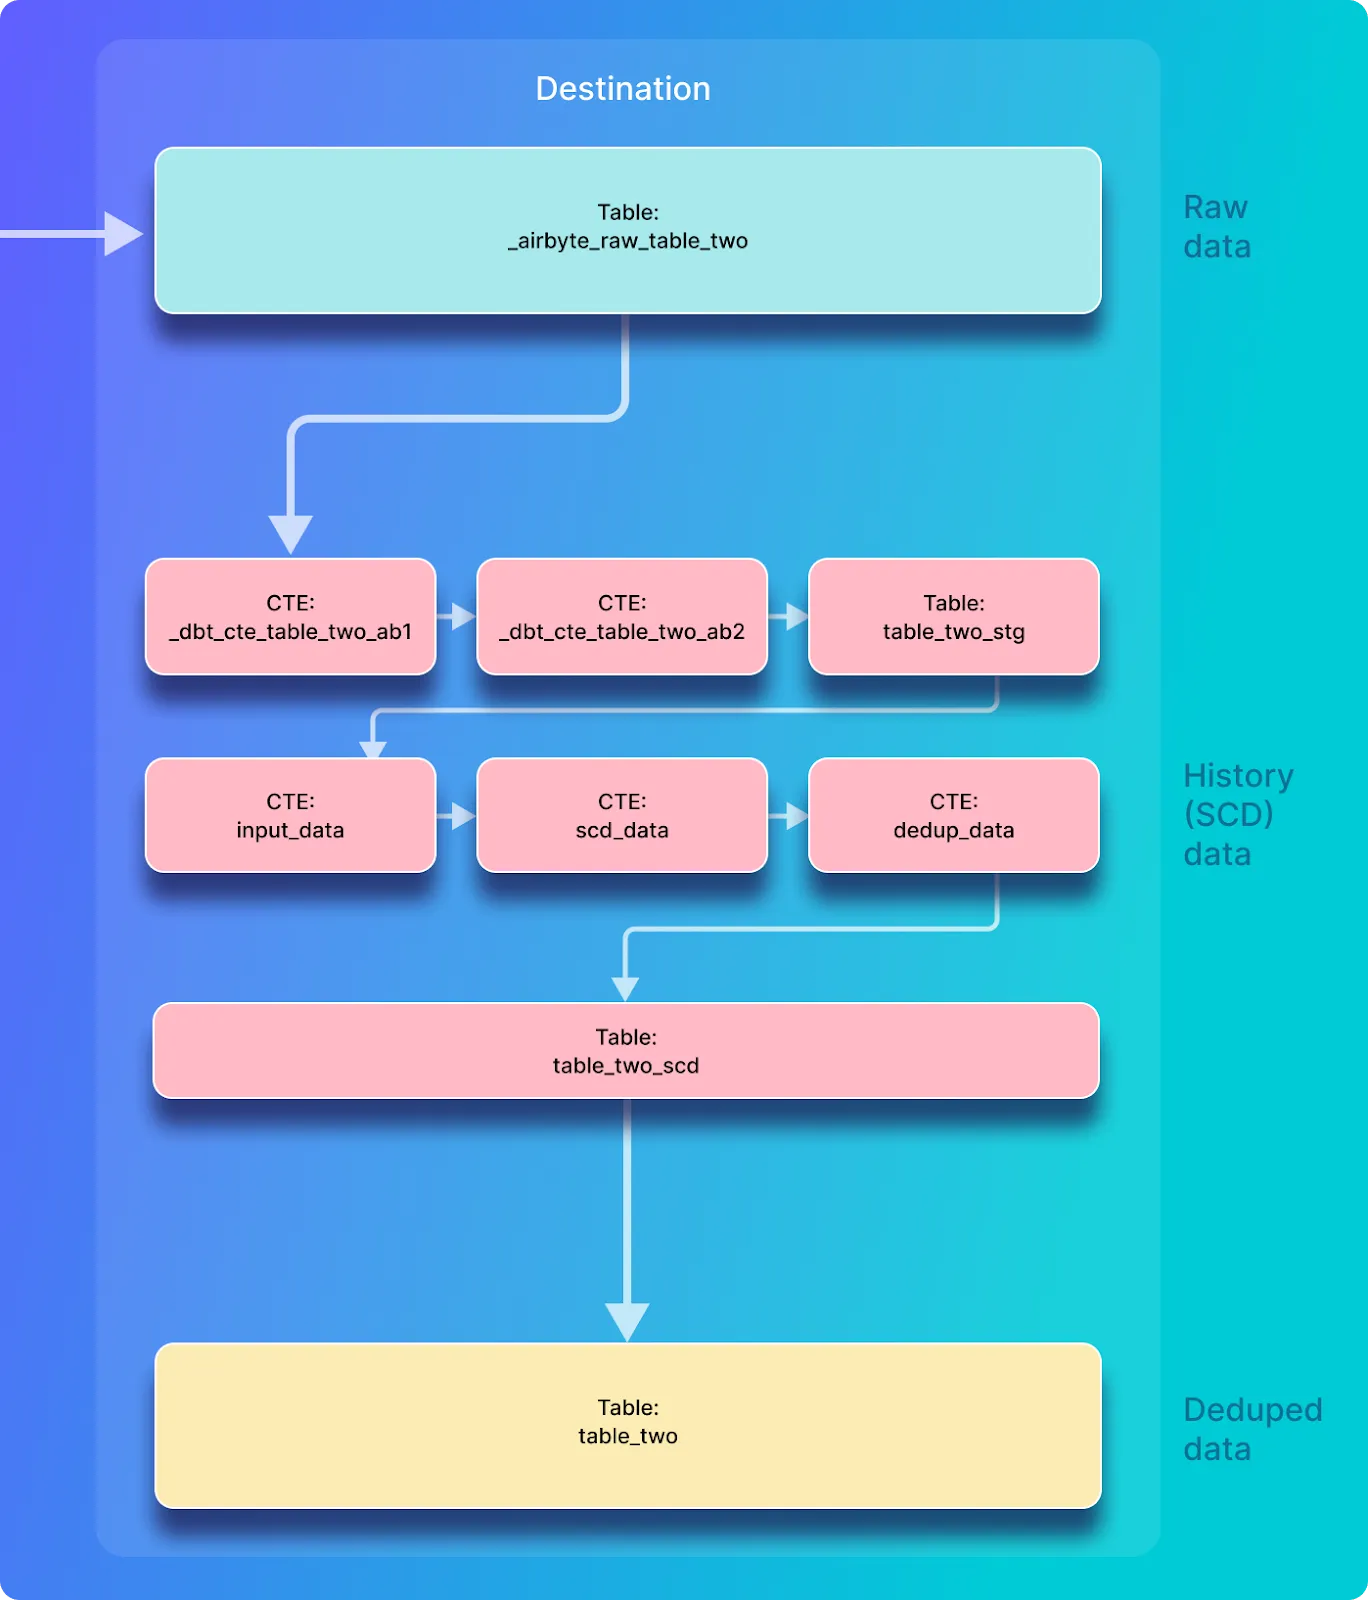
A staging table called table_two_stg is used as a basis for creating the history table called table_two_scd. The staging table is created by reading records from the raw table which is called _airbyte_raw_table_two in this example.
View the SQL that creates the staging table by executing the following command in the airbyte-server container:
cat /tmp/workspace/170/0/build/run/airbyte_utils/models/generated/airbyte_incremental/public/table_two_stg.sql
The first section of the SQL creates the destination table and extracts the fields from the embedded JSON blob in the raw table (_airbyte_raw_table_two) as well as selecting the new Airbyte-created columns, as shown below:
  create  table "postgres"._airbyte_public."table_two_stg"
  as (

with __dbt__cte__table_two_ab1 as (

-- SQL model to parse JSON blob stored in a single column and extract into separated field columns as described by the JSON Schema
-- depends_on: "postgres".public._airbyte_raw_table_two
select
    jsonb_extract_path_text(_airbyte_data, 'id') as "id",
    jsonb_extract_path_text(_airbyte_data, 'name') as "name",
    jsonb_extract_path_text(_airbyte_data, 'updated_at') as updated_at,
    _airbyte_ab_id,
    _airbyte_emitted_at,
    now() as _airbyte_normalized_at
from "postgres".public._airbyte_raw_table_two as table_alias
-- table_two
where 1 = 1

),
The next portion of the SQL is responsible for casting each of the fields that have been extracted from the embedded JSON blob to the correct type.
__dbt__cte__table_two_ab2 as (

-- SQL model to cast each column to its adequate SQL type converted from the JSON schema type
-- depends_on: __dbt__cte__table_two_ab1
select
    cast("id" as
    bigint
) as "id",
    cast("name" as text) as "name",
    cast(nullif(updated_at, '') as
    timestamp
) as updated_at,
    _airbyte_ab_id,
    _airbyte_emitted_at,
    now() as _airbyte_normalized_at
from __dbt__cte__table_two_ab1
-- table_two
where 1 = 1

)
The next section of SQL creates the md5 hash stored in _airbyte_table_two_hashid, and outputs all of the fields which were created in the previous section of SQL.
-- SQL model to build a hash column based on the values of this record
-- depends_on: __dbt__cte__table_two_ab2
select
    md5(cast(coalesce(cast("id" as text), '') || '-' || coalesce(cast("name" as text), '') || '-' || coalesce(cast(updated_at as text), '') as text)) as _airbyte_table_two_hashid,
    tmp.*
from __dbt__cte__table_two_ab2 tmp
-- table_two
where 1 = 1

  );
This section discusses the SQL that is used for the creation of the history destination table called table_two_scd. The SQL that creates this table uses the staging table that was just discussed as its input. View the SQL used for creating this new table by executing the following command:
cat /tmp/workspace/170/0/build/run/airbyte_utils/models/generated/airbyte_incremental/scd/public/table_two_scd.sql
The first part of the SQL returned by this command defines that the destination that is created is called table_two_scd, and that table_two_stg is the input.
  create  table "postgres".public."table_two_scd"
  as (

-- depends_on: ref('table_two_stg')
with

input_data as (
    select *
    from "postgres"._airbyte_public."table_two_stg"
    -- table_two from "postgres".public._airbyte_raw_table_two
),
The next section of the SQL shows the calculation of the following values which were previously discussed: _airbyte_unique_key, _airbyte_start_at, _airbyte_end_at, and _airbyte_active_row.
scd_data as (
    -- SQL model to build a Type 2 Slowly Changing Dimension (SCD) table for each record identified by their primary key
    select
      md5(cast(coalesce(cast("id" as text), '') as text)) as _airbyte_unique_key,
      "id",
      "name",
      updated_at,
      updated_at as _airbyte_start_at,
      lag(updated_at) over (
        partition by cast("id" as text)
        order by
            updated_at is null asc,
            updated_at desc,
            _airbyte_emitted_at desc
      ) as _airbyte_end_at,
      case when row_number() over (
        partition by cast("id" as text)
        order by
            updated_at is null asc,
            updated_at desc,
            _airbyte_emitted_at desc
      ) = 1 then 1 else 0 end as _airbyte_active_row,
      _airbyte_ab_id,
      _airbyte_emitted_at,
      _airbyte_table_two_hashid
    from input_data
),
The next section shows the calculation of the following _airbyte_unique_key_scd and _airbyte_row_num.
dedup_data as (
    select
        -- we need to ensure de-duplicated rows for merge/update queries
        -- additionally, we generate a unique key for the scd table
        row_number() over (
            partition by
                _airbyte_unique_key,
                _airbyte_start_at,
                _airbyte_emitted_at
            order by _airbyte_active_row desc, _airbyte_ab_id
        ) as _airbyte_row_num,
        md5(cast(coalesce(cast(_airbyte_unique_key as text), '') || '-' || coalesce(cast(_airbyte_start_at as text), '') || '-' || coalesce(cast(_airbyte_emitted_at as text), '') as text)) as _airbyte_unique_key_scd,
        scd_data.*
    from scd_data
)
Finally, the following section of the SQL code ensures that duplicate historical records (i.e. records that have the same values for _airbyte_unique_key, _airbyte_start_at, _airbyte_emitted_at) are inserted only once into table_two_scd, by selecting only a single row from the dedup_data CTE that was calculated in the above code block.
select
    _airbyte_unique_key,
    _airbyte_unique_key_scd,
    "id",
    "name",
    updated_at,
    _airbyte_start_at,
    _airbyte_end_at,
    _airbyte_active_row,
    _airbyte_ab_id,
    _airbyte_emitted_at,
    now() as _airbyte_normalized_at,
    _airbyte_table_two_hashid
from dedup_data where _airbyte_row_num = 1
  );
This section discusses the SQL code that creates the deduplicated table which in this tutorial is called table_two in the destination (the same name as it was called in the source). If a record appears only once in the source table then it should only appear once in this deduplicated destination table.
ℹ️ This table is populated by SQL commands which makes use of the table_two_scd history table as the input data.
The SQL used for creating table_two in the destination Postgres database can be seen by executing the following command (replacing the job ID and attempt ID to reflect your most recent sync):
cat /tmp/workspace/170/0/build/run/airbyte_utils/models/generated/airbyte_incremental/public/table_two.sql
Which responds with the following SQL code:
  create  table "postgres".public."table_two"
  as (

-- Final base SQL model
-- depends_on: "postgres".public."table_two_scd"
select
    _airbyte_unique_key,
    "id",
    "name",
    updated_at,
    _airbyte_ab_id,
    _airbyte_emitted_at,
    now() as _airbyte_normalized_at,
    _airbyte_table_two_hashid
from "postgres".public."table_two_scd"
-- table_two from "postgres".public._airbyte_raw_table_two
where 1 = 1
and _airbyte_active_row = 1

  );
This code is quite simple, as all it does is copies the rows where _airbyte_active_row = 1 from the history table called table_two_scd into the deduped tabled called table_two.
ℹ️ If there are multiple historical copies of a record in the history table (table_two_scd), only the record from the most recent sync will have an _airbyte_active_row value of 1. Therefore, by copying only the currently active row from the history table called table_two_scd, the data that is copied into table_two is deduplicated.
The diagram below shows that when you modify a record in the source system and then perform a sync, that updated record will be copied to a raw table in the destination database, and then appended into the history table. In other words, even though the source contains only two records, both the raw and history (SCD) destination tables each contain three records – this is because the current and the previous version of the record with id=2 is stored in each of these destination tables.
However, in this sync mode the final data table is deduped and only contains a single copy of each record corresponding to each unique id in the source system.

Go back to the Postgres shell in the airbyte-source container that you opened earlier in this tutorial, and update a record in table_two and view the table as follows:
UPDATE table_two SET name='Eg2b DD+Hs' WHERE id=2;
SELECT * FROM table_two;
And the source table_two table should now look as follows:
 id |    name    |         updated_at
----+------------+----------------------------
  1 | Eg1 DD+Hst | 2022-09-01 16:18:07.569818
  2 | Eg2b DD+Hs | 2022-09-01 17:02:14.841419
(2 rows)
The name and the updated_at values have been updated as expected. Execute a new sync by clicking on Sync Now in the connections UI and wait for the sync to complete. You should see a response indicating that one record has been emitted, as follows:

Look at the incremental dedupe history raw table called _airbyte_raw_table_two with the following command on the destination Postgres database.
SELECT * FROM _airbyte_raw_table_two;
Which should respond with a table that looks as follows:
            _airbyte_ab_id            |                                _airbyte_data                                |    _airbyte_emitted_at
--------------------------------------+-----------------------------------------------------------------------------+----------------------------
 3bd474b8-0329-4bce-bde7-aee7c5d30cc8 | {"id": 1, "name": "Eg1 DD+Hst", "updated_at": "2022-09-01T16:18:07.569818"} | 2022-09-01 16:52:44.103+00
 4282344a-62c3-4634-a91a-e6dafb9b253a | {"id": 2, "name": "Eg2a DD+Hs", "updated_at": "2022-09-01T16:30:13.939030"} | 2022-09-01 16:52:44.103+00
 89377204-7801-49c8-a779-91da45a86cc3 | {"id": 2, "name": "Eg2b DD+Hs", "updated_at": "2022-09-01T17:02:14.841419"} | 2022-09-01 17:02:39.894+00
(3 rows)
View the history table called table_two_scd by executing the following:
SELECT * FROM table_two_scd;
Which looks as follows.
       _airbyte_unique_key        |     _airbyte_unique_key_scd      | id |    name    |         updated_at         |     _airbyte_start_at      |      _airbyte_end_at       | _airbyte_active_row |            _airbyte_ab_id            |    _airbyte_emitted_at     |    _airbyte_normalized_at     |    _airbyte_table_two_hashid
----------------------------------+----------------------------------+----+------------+----------------------------+----------------------------+----------------------------+---------------------+--------------------------------------+----------------------------+-------------------------------+----------------------------------
 c4ca4238a0b923820dcc509a6f75849b | 96a17eccedd409b3b3de3b411d431ab8 |  1 | Eg1 DD+Hst | 2022-09-01 16:18:07.569818 | 2022-09-01 16:18:07.569818 |                            |                   1 | 3bd474b8-0329-4bce-bde7-aee7c5d30cc8 | 2022-09-01 16:52:44.103+00 | 2022-09-01 17:03:37.521659+00 | 78812b56ae516cb4bb4278c595c3b20e
 c81e728d9d4c2f636f067f89cc14862c | 064c6bc6ac9c9956a7188495284d8c07 |  2 | Eg2a DD+Hs | 2022-09-01 16:30:13.93903  | 2022-09-01 16:30:13.93903  | 2022-09-01 17:02:14.841419 |                   0 | 4282344a-62c3-4634-a91a-e6dafb9b253a | 2022-09-01 16:52:44.103+00 | 2022-09-01 17:03:37.521659+00 | d89c24a3d20ae9663d6f9a40f023149c
 c81e728d9d4c2f636f067f89cc14862c | 8d269939a7b0ae8c321d5f25d3be8619 |  2 | Eg2b DD+Hs | 2022-09-01 17:02:14.841419 | 2022-09-01 17:02:14.841419 |                            |                   1 | 89377204-7801-49c8-a779-91da45a86cc3 | 2022-09-01 17:02:39.894+00 | 2022-09-01 17:03:37.521659+00 | 019e1ebcc8b9bb93c020422f7ba8313d
(3 rows)
When compared to the history table prior to the sync, it is worth highlighting that there are now two entries for the record where id has a value of 2. The new copy of the record where id=2 does not have an _airbyte_end_at value defined and it has an _airbyte_active_row value of 1 which means that it is still active. The previous version of this record has both _airbyte_start_at and _airbyte_end_at defined, along with a _airbyte_active_row value of 0, which indicates that this is a historical record.
View the deduplicated table called table_two in the destination by executing the following:
SELECT * FROM table_two;
Which looks as follows:
       _airbyte_unique_key        | id |    name    |         updated_at         |            _airbyte_ab_id            |    _airbyte_emitted_at     |    _airbyte_normalized_at     |    _airbyte_table_two_hashid
----------------------------------+----+------------+----------------------------+--------------------------------------+----------------------------+-------------------------------+----------------------------------
 c4ca4238a0b923820dcc509a6f75849b |  1 | Eg1 DD+Hst | 2022-09-01 16:18:07.569818 | 3bd474b8-0329-4bce-bde7-aee7c5d30cc8 | 2022-09-01 16:52:44.103+00 | 2022-09-01 17:03:39.029637+00 | 78812b56ae516cb4bb4278c595c3b20e
 c81e728d9d4c2f636f067f89cc14862c |  2 | Eg2b DD+Hs | 2022-09-01 17:02:14.841419 | 89377204-7801-49c8-a779-91da45a86cc3 | 2022-09-01 17:02:39.894+00 | 2022-09-01 17:03:39.029637+00 | 019e1ebcc8b9bb93c020422f7ba8313d
(2 rows)
Notice that even though there are two copies of the record where id is 2 in the historical table, there is only a single copy in this table, as it has been de-duplicated. This has been achieved by SQL which only copies the records from table_two_scd into table_two when _airbyte_active_row has a value of 1. This is different from the behavior that previously seen in the incremental append replication mode, which resulted in both copies of the updated record being stored in the final table.
The SQL that is used for creating the final (deduped) as well as the history (SCD) table has several intermediate steps that make use of common table expressions (or CTEs), some temporary tables, and a staging table, as demonstrated in the following diagram:
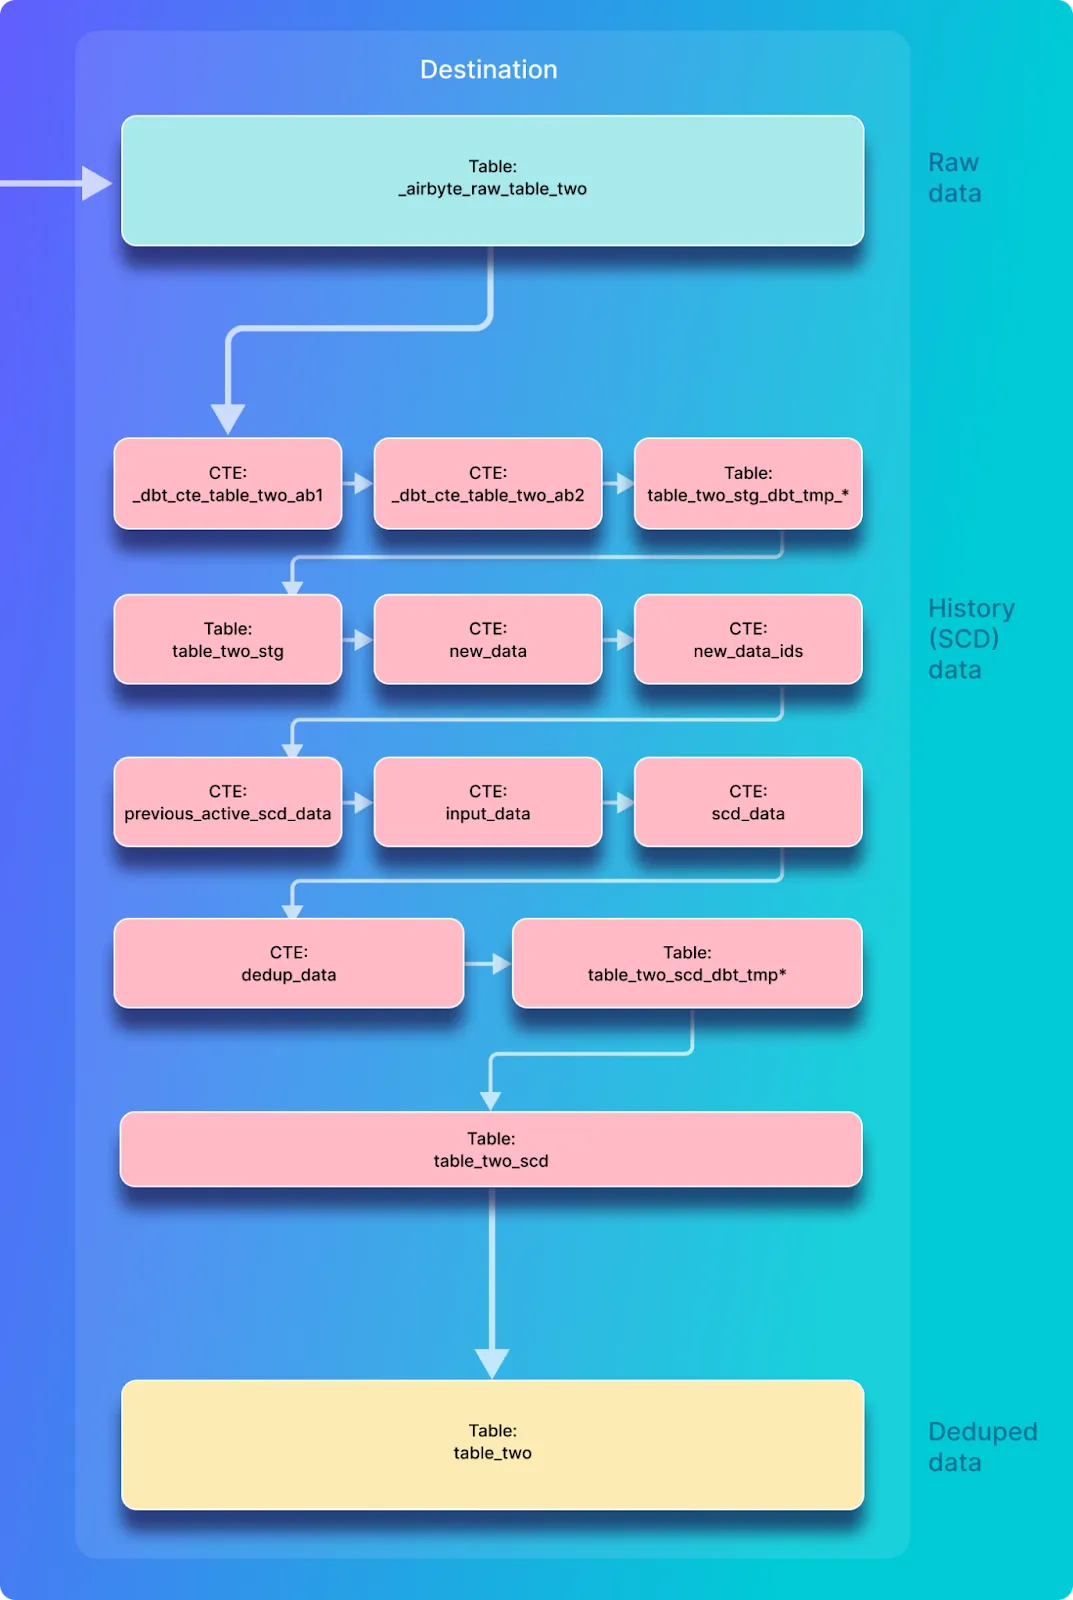
You will now look at the SQL that is used for incremental history + dedupe replication after the destination has already been initialized. This is slightly different than the first iteration, as records are inserted into an existing table rather than creating a new destination table. Using the job ID (171 in my case) and attempt ID (0 in my case) from the most recent sync, you can view the SQL used for the creation of table_two_stg with the following command:
cat /tmp/workspace/171/0/build/run/airbyte_utils/models/generated/airbyte_incremental/public/table_two_stg.sql
Which returns the following SQL.
    delete from "postgres"._airbyte_public."table_two_stg"
    where (_airbyte_ab_id) in (
        select (_airbyte_ab_id)
        from "table_two_stg__dbt_tmp140757456406"
    );


    insert into "postgres"._airbyte_public."table_two_stg" ("_airbyte_table_two_hashid", "id", "name", "updated_at", "_airbyte_ab_id", "_airbyte_emitted_at", "_airbyte_normalized_at")
    (
        select "_airbyte_table_two_hashid", "id", "name", "updated_at", "_airbyte_ab_id", "_airbyte_emitted_at", "_airbyte_normalized_at"
        from "table_two_stg__dbt_tmp140757456406"
    )
At a high level, this SQL copies all records from a temporary table called table_two_stg__dbt_tmp140757456406 into table_two_stg. In the case that a document already exists in the destination table and it also appears in the temporary table, duplicates are avoided by removing it from the destination table before inserting the entire temporary table into the destination table. This is the same as the logic that was described earlier in the analysis of the incremental append SQL.
The main logic is performed in the creation of table_two_stg__dbt_tmp140757456406 which can be found in the dbt log file associated with this sync. This can be viewed with the following command on the airbyte-server container:
cat /tmp/workspace/171/0/logs/dbt.log
And then searching through the logs for the creation of the temporary table table_two_stg__dbt_tmp140757456406. The code for the creation of this temporary table looks as follows:
  create temporary table "table_two_stg__dbt_tmp140757456406"
  as (

with __dbt__cte__table_two_ab1 as (

-- SQL model to parse JSON blob stored in a single column and extract into separated field columns as described by the JSON Schema
-- depends_on: "postgres".public._airbyte_raw_table_two
select
    jsonb_extract_path_text(_airbyte_data, 'id') as "id",
    jsonb_extract_path_text(_airbyte_data, 'name') as "name",
    jsonb_extract_path_text(_airbyte_data, 'updated_at') as updated_at,
    _airbyte_ab_id,
    _airbyte_emitted_at,
    now() as _airbyte_normalized_at
from "postgres".public._airbyte_raw_table_two as table_alias
-- table_two
where 1 = 1

),  __dbt__cte__table_two_ab2 as (

-- SQL model to cast each column to its adequate SQL type converted from the JSON schema type
-- depends_on: __dbt__cte__table_two_ab1
select
    cast("id" as
    bigint
) as "id",
    cast("name" as text) as "name",
    cast(nullif(updated_at, '') as
    timestamp
) as updated_at,
    _airbyte_ab_id,
    _airbyte_emitted_at,
    now() as _airbyte_normalized_at
from __dbt__cte__table_two_ab1
-- table_two
where 1 = 1

)-- SQL model to build a hash column based on the values of this record
-- depends_on: __dbt__cte__table_two_ab2
select
    md5(cast(coalesce(cast("id" as text), '') || '-' || coalesce(cast("name" as text), '') || '-' || coalesce(cast(updated_at as text), '') as text)) as _airbyte_table_two_hashid,
    tmp.*
from __dbt__cte__table_two_ab2 tmp
-- table_two
where 1 = 1

and coalesce(
    cast(_airbyte_emitted_at as
    timestamp with time zone
) >= (select max(cast(_airbyte_emitted_at as
    timestamp with time zone
)) from "postgres"._airbyte_public."table_two_stg"),
    true)
  );
This SQL is nearly the same as the SQL used in the creation of the staging table in the previous sync. However, the main difference is that there is an additional code block at the end which reduces the number of records that will be processed to only include the records that were sent in the most recent sync along with records from the previous sync (as discussed in this issue). This is achieved by finding the largest _airbyte_emitted_at value in the destination table table_two_stg and only selecting records for normalization from the raw table that have an _airbyte_emitted_at value that is greater than or equal to this value.
View the SQL that creates the history table by executing the following command in the airbyte-server container:
cat /tmp/workspace/171/0/build/run/airbyte_utils/models/generated/airbyte_incremental/scd/public/table_two_scd.sql
Which responds with the following SQL
    delete from "postgres".public."table_two_scd"
    where (_airbyte_unique_key_scd) in (
        select (_airbyte_unique_key_scd)
        from "table_two_scd__dbt_tmp140759296919"
    );


    insert into "postgres".public."table_two_scd" ("_airbyte_unique_key", "_airbyte_unique_key_scd", "id", "name", "updated_at", "_airbyte_start_at", "_airbyte_end_at", "_airbyte_active_row", "_airbyte_ab_id", "_airbyte_emitted_at", "_airbyte_normalized_at", "_airbyte_table_two_hashid")
    (
        select "_airbyte_unique_key", "_airbyte_unique_key_scd", "id", "name", "updated_at", "_airbyte_start_at", "_airbyte_end_at", "_airbyte_active_row", "_airbyte_ab_id", "_airbyte_emitted_at", "_airbyte_normalized_at", "_airbyte_table_two_hashid"
        from "table_two_scd__dbt_tmp140759296919"
    )
Similar to the analysis of SQL in previous sections, this table called table_two_scd is updated by copying records from a temporary table into it. The main logic is implemented in the creation of the temporary table called table_two_scd__dbt_tmp140759296919 which can be found in the dbt log files as follows:
cat /tmp/workspace/171/0/logs/dbt.log
And searching for the creation of the temporary table (table_two_scd__dbt_tmp140759296919 in this example). I have broken the relevant code into several sections for discussion.
The first section of the SQL creates the temporary table and selects records from the staging table that do not already exist in table_two_scd by comparing _airbyte_emitted_at timestamp in the staging table (table_two_stg) versus the history (table_two_scd) table to determine which records need to be copied into the common table expression (CTE) called new_data.
  create temporary table "table_two_scd__dbt_tmp140759296919"
  as (

-- depends_on: ref('table_two_stg')
with

new_data as (
    -- retrieve incremental "new" data
    select
        *
    from "postgres"._airbyte_public."table_two_stg"
    -- table_two from "postgres".public._airbyte_raw_table_two
    where 1 = 1

and coalesce(
    cast(_airbyte_emitted_at as
    timestamp with time zone
) >= (select max(cast(_airbyte_emitted_at as
    timestamp with time zone
)) from "postgres".public."table_two_scd"),
    true)
),
The next section of the SQL stores a list of unique hashes of the primary key field (id) called _airbyte_unique_key for new records and stores them in a CTE called new_data_ids as follows:
new_data_ids as (
    -- build a subset of _airbyte_unique_key from rows that are new
    select distinct
        md5(cast(coalesce(cast("id" as text), '') as text)) as _airbyte_unique_key
    from new_data
),
empty_new_data as (
    -- build an empty table to only keep the table's column types
    select * from new_data where 1 = 0
),
The next section of the SQL creates a CTE called previous_active_scd_data, which selects the records in the existing history table (table_two_scd) that will require additional SQL processing.
previous_active_scd_data as (
    -- retrieve "incomplete old" data that needs to be updated with an end date because of new changes
    select
        this_data."_airbyte_table_two_hashid",
  this_data."id",
  this_data."name",
  this_data."updated_at",
  this_data."_airbyte_ab_id",
  this_data."_airbyte_emitted_at",
  this_data."_airbyte_normalized_at"
    from "postgres".public."table_two_scd" as this_data
    -- make a join with new_data using primary key to filter active data that need to be updated only
    join new_data_ids on this_data._airbyte_unique_key = new_data_ids._airbyte_unique_key
    -- force left join to NULL values (we just need to transfer column types only for the star_intersect macro on schema changes)
    left join empty_new_data as inc_data on this_data._airbyte_ab_id = inc_data._airbyte_ab_id
    where _airbyte_active_row = 1
),
The next section creates a CTE called input_data, which combines the records from the CTEs called new_data (containing records inserted in the last sync) and previous_active_scd_data (containing existing records that need to be updated), as follows:
input_data as (
    select "_airbyte_table_two_hashid",
  "id",
  "name",
  "updated_at",
  "_airbyte_ab_id",
  "_airbyte_emitted_at",
  "_airbyte_normalized_at" from new_data
    union all
    select "_airbyte_table_two_hashid",
  "id",
  "name",
  "updated_at",
  "_airbyte_ab_id",
  "_airbyte_emitted_at",
  "_airbyte_normalized_at" from previous_active_scd_data
),
The next section defines a CTE called scd_data which is based on records from the input_data CTE that was just created. This new CTE calculates a field called _airbyte_end_at which indicates the time at which a record was no longer valid. This is calculated by using the lag function to set _airbyte_end_at on a previous version of a given record to the value of the updated_at time taken from the newer version of that record – effectively, if a new copy of a record exists, then the previous version of that record is no longer valid from the moment that it was updated. It also sets _airbyte_active_row to 1 for the most recent entry for a given record and 0 for other entries.
scd_data as (
    -- SQL model to build a Type 2 Slowly Changing Dimension (SCD) table for each record identified by their primary key
    select
      md5(cast(coalesce(cast("id" as text), '') as text)) as _airbyte_unique_key,
      "id",
      "name",
      updated_at,
      updated_at as _airbyte_start_at,
      lag(updated_at) over (
        partition by cast("id" as text)
        order by
            updated_at is null asc,
            updated_at desc,
            _airbyte_emitted_at desc
      ) as _airbyte_end_at,
      case when row_number() over (
        partition by cast("id" as text)
        order by
            updated_at is null asc,
            updated_at desc,
            _airbyte_emitted_at desc
      ) = 1 then 1 else 0 end as _airbyte_active_row,
      _airbyte_ab_id,
      _airbyte_emitted_at,
      _airbyte_table_two_hashid
    from input_data
),
The next SQL block uses the scd_data CTE shown above as its input. It partitions records into groups that have the same _airbyte_unique_key, _airbyte_start_at, and _airbyte_emitted_at and orders them into rows. The resulting row number is written into _airbyte_row_num, which is used for dedupe in the next step. This SQL also calculates a value for _airbyte_unique_key_scd based on several fields, as shown below.
dedup_data as (
    select
        -- we need to ensure de-duplicated rows for merge/update queries
        -- additionally, we generate a unique key for the scd table
        row_number() over (
            partition by
                _airbyte_unique_key,
                _airbyte_start_at,
                _airbyte_emitted_at
            order by _airbyte_active_row desc, _airbyte_ab_id
        ) as _airbyte_row_num,
        md5(cast(coalesce(cast(_airbyte_unique_key as text), '') || '-' || coalesce(cast(_airbyte_start_at as text), '') || '-' || coalesce(cast(_airbyte_emitted_at as text), '') as text)) as _airbyte_unique_key_scd,
        scd_data.*
    from scd_data
)
For the final output, the SQL selects only records where _airbyte_row_num = 1 from the dedup_data CTE that was calculated above to ensure that no duplicates of the same historical version of a given record are written into the temporary table (and therefore not into the table_two_scd which is created based on the temporary table)
select
    _airbyte_unique_key,
    _airbyte_unique_key_scd,
    "id",
    "name",
    updated_at,
    _airbyte_start_at,
    _airbyte_end_at,
    _airbyte_active_row,
    _airbyte_ab_id,
    _airbyte_emitted_at,
    now() as _airbyte_normalized_at,
    _airbyte_table_two_hashid
from dedup_data where _airbyte_row_num = 1
  );
And finally table_two is created by the SQL which can be seen by executing:
cat /tmp/workspace/171/0/build/run/airbyte_utils/models/generated/airbyte_incremental/public/table_two.sql
Which should respond with:
    delete from "postgres".public."table_two"
    where (_airbyte_unique_key) in (
        select (_airbyte_unique_key)
        from "table_two__dbt_tmp140800091278"
    );


    insert into "postgres".public."table_two" ("_airbyte_unique_key", "id", "name", "updated_at", "_airbyte_ab_id", "_airbyte_emitted_at", "_airbyte_normalized_at", "_airbyte_table_two_hashid")
    (
        select "_airbyte_unique_key", "id", "name", "updated_at", "_airbyte_ab_id", "_airbyte_emitted_at", "_airbyte_normalized_at", "_airbyte_table_two_hashid"
        from "table_two__dbt_tmp140800091278"
    )
Again this is SQL which copies records from a temporary table into table_two, and the main work is done in the logic which creates the temporary table. In this example the temporary table is called table_two__dbt_tmp140800091278, the creation of which can be found in the dbt logs as before by executing:
cat /tmp/workspace/171/0/logs/dbt.log
And searching for the creation of the table called table_two__dbt_tmp140800091278 the code looks as follows:
  create temporary table "table_two__dbt_tmp140800091278"
  as (

-- Final base SQL model
-- depends_on: "postgres".public."table_two_scd"
select
    _airbyte_unique_key,
    "id",
    "name",
    updated_at,
    _airbyte_ab_id,
    _airbyte_emitted_at,
    now() as _airbyte_normalized_at,
    _airbyte_table_two_hashid
from "postgres".public."table_two_scd"
-- table_two from "postgres".public._airbyte_raw_table_two
where 1 = 1
and _airbyte_active_row = 1

and coalesce(
    cast(_airbyte_emitted_at as
    timestamp with time zone
) >= (select max(cast(_airbyte_emitted_at as
    timestamp with time zone
)) from "postgres".public."table_two"),
    true)
  );
This code selects rows from table_two_scd which are considered active as indicated by _airbyte_active_row value of 1 only if the value of _airbyte_emitted_at is greater than or equal to the highest _airbyte_emitted_at value that has already been written to table_two. Again, this means that records from the current sync and the previous sync will be normalized.
In this step you will insert a new record with an id of 3 into the source table. This new record will be copied to the destination and appended to the raw data table, and will be then normalized into the history and deduped tables as shown below:
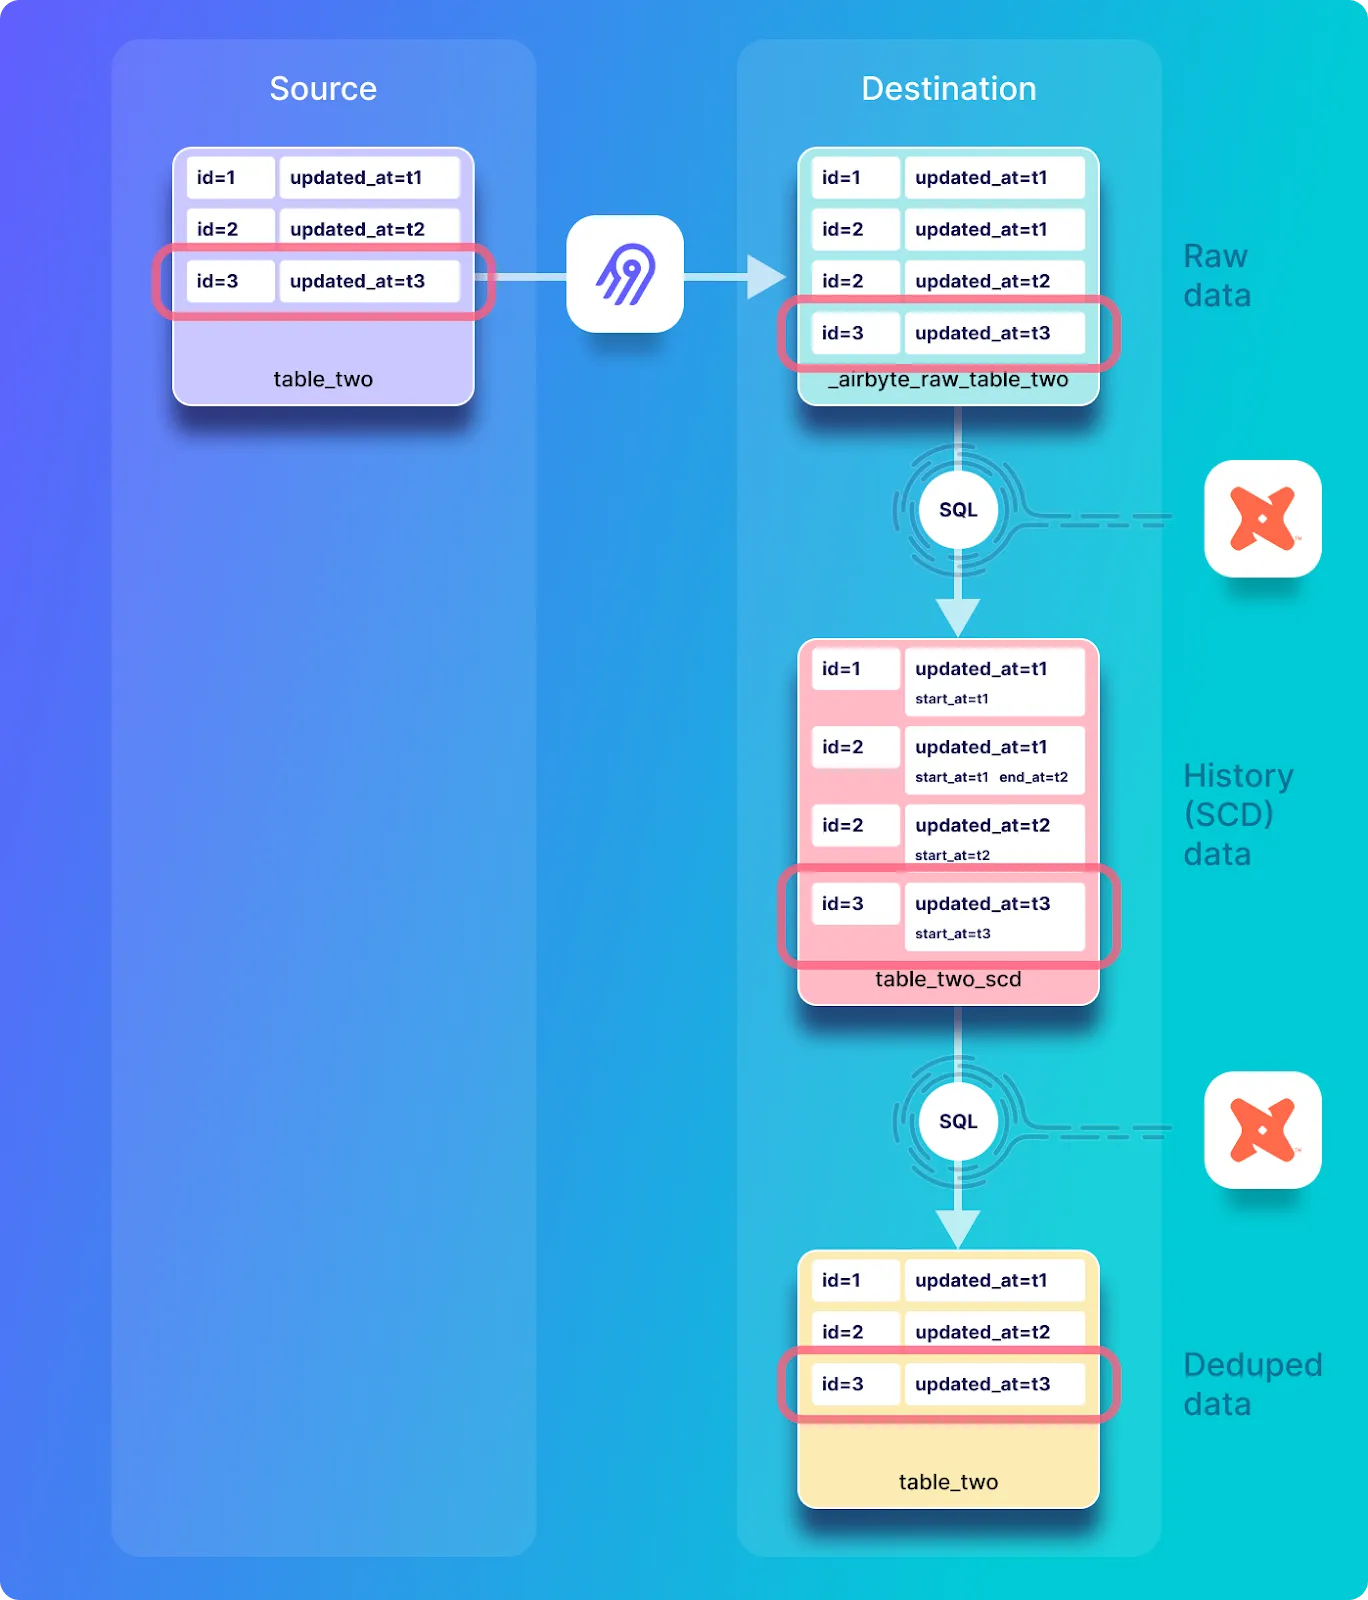
Go back to the Postgres shell in the airbyte-source container that you opened earlier in this tutorial, and insert a new record into table_two and view it as follows:
INSERT INTO table_two(id, name) VALUES(3, 'Eg3 DD+Hst');
SELECT * FROM table_two;
The source table_two table should look as follows:
 id |    name    |         updated_at
----+------------+----------------------------
  1 | Eg1 DD+Hst | 2022-09-01 16:18:07.569818
  2 | Eg2b DD+Hs | 2022-09-01 17:02:14.841419
  3 | Eg3 DD+Hst | 2022-09-01 17:05:19.570672
(3 rows)
Execute a new sync by clicking on Sync Now in the connections UI and wait for the sync to complete. You should see a response indicating that one record has been emitted, as follows:

Look at the content of incremental dedupe history synchronization into the raw table called _airbyte_raw_table_two by executing the following:
SELECT * FROM _airbyte_raw_table_two;
Which should respond with a tables that look as follows:
            _airbyte_ab_id            |                                _airbyte_data                                |    _airbyte_emitted_at
--------------------------------------+-----------------------------------------------------------------------------+----------------------------
 3bd474b8-0329-4bce-bde7-aee7c5d30cc8 | {"id": 1, "name": "Eg1 DD+Hst", "updated_at": "2022-09-01T16:18:07.569818"} | 2022-09-01 16:52:44.103+00
 4282344a-62c3-4634-a91a-e6dafb9b253a | {"id": 2, "name": "Eg2a DD+Hs", "updated_at": "2022-09-01T16:30:13.939030"} | 2022-09-01 16:52:44.103+00
 89377204-7801-49c8-a779-91da45a86cc3 | {"id": 2, "name": "Eg2b DD+Hs", "updated_at": "2022-09-01T17:02:14.841419"} | 2022-09-01 17:02:39.894+00
 18ad74f5-ba91-4b23-bc78-b2b604bb1696 | {"id": 3, "name": "Eg3 DD+Hst", "updated_at": "2022-09-01T17:05:19.570672"} | 2022-09-01 17:05:44.49+00
(4 rows)
View the history table called table_two_scd by executing the following:
SELECT * FROM table_two_scd;
Which includes the record that was just added to the source table, and looks as follows.
       _airbyte_unique_key        |     _airbyte_unique_key_scd      | id |    name    |         updated_at         |     _airbyte_start_at      |      _airbyte_end_at       | _airbyte_active_row |            _airbyte_ab_id            |    _airbyte_emitted_at     |    _airbyte_normalized_at     |    _airbyte_table_two_hashid
----------------------------------+----------------------------------+----+------------+----------------------------+----------------------------+----------------------------+---------------------+--------------------------------------+----------------------------+-------------------------------+----------------------------------
 c4ca4238a0b923820dcc509a6f75849b | 96a17eccedd409b3b3de3b411d431ab8 |  1 | Eg1 DD+Hst | 2022-09-01 16:18:07.569818 | 2022-09-01 16:18:07.569818 |                            |                   1 | 3bd474b8-0329-4bce-bde7-aee7c5d30cc8 | 2022-09-01 16:52:44.103+00 | 2022-09-01 17:03:37.521659+00 | 78812b56ae516cb4bb4278c595c3b20e
 c81e728d9d4c2f636f067f89cc14862c | 064c6bc6ac9c9956a7188495284d8c07 |  2 | Eg2a DD+Hs | 2022-09-01 16:30:13.93903  | 2022-09-01 16:30:13.93903  | 2022-09-01 17:02:14.841419 |                   0 | 4282344a-62c3-4634-a91a-e6dafb9b253a | 2022-09-01 16:52:44.103+00 | 2022-09-01 17:03:37.521659+00 | d89c24a3d20ae9663d6f9a40f023149c
 c81e728d9d4c2f636f067f89cc14862c | 8d269939a7b0ae8c321d5f25d3be8619 |  2 | Eg2b DD+Hs | 2022-09-01 17:02:14.841419 | 2022-09-01 17:02:14.841419 |                            |                   1 | 89377204-7801-49c8-a779-91da45a86cc3 | 2022-09-01 17:02:39.894+00 | 2022-09-01 17:06:41.92607+00  | 019e1ebcc8b9bb93c020422f7ba8313d
 eccbc87e4b5ce2fe28308fd9f2a7baf3 | f3dfb89e70d5712b62b4b4baf10cf04c |  3 | Eg3 DD+Hst | 2022-09-01 17:05:19.570672 | 2022-09-01 17:05:19.570672 |                            |                   1 | 18ad74f5-ba91-4b23-bc78-b2b604bb1696 | 2022-09-01 17:05:44.49+00  | 2022-09-01 17:06:41.92607+00  | 0845d83977c1cdd5464c31cc1f03a649
(4 rows)
Have a look at the content of the deduped table by executing the following:
SELECT * FROM table_two;
The deduped table_two table looks as follows, and has one record corresponding to each record in the source table.
       _airbyte_unique_key        | id |    name    |         updated_at         |            _airbyte_ab_id            |    _airbyte_emitted_at     |    _airbyte_normalized_at     |    _airbyte_table_two_hashid
----------------------------------+----+------------+----------------------------+--------------------------------------+----------------------------+-------------------------------+----------------------------------
 c4ca4238a0b923820dcc509a6f75849b |  1 | Eg1 DD+Hst | 2022-09-01 16:18:07.569818 | 3bd474b8-0329-4bce-bde7-aee7c5d30cc8 | 2022-09-01 16:52:44.103+00 | 2022-09-01 17:03:39.029637+00 | 78812b56ae516cb4bb4278c595c3b20e
 c81e728d9d4c2f636f067f89cc14862c |  2 | Eg2b DD+Hs | 2022-09-01 17:02:14.841419 | 89377204-7801-49c8-a779-91da45a86cc3 | 2022-09-01 17:02:39.894+00 | 2022-09-01 17:06:43.486086+00 | 019e1ebcc8b9bb93c020422f7ba8313d
 eccbc87e4b5ce2fe28308fd9f2a7baf3 |  3 | Eg3 DD+Hst | 2022-09-01 17:05:19.570672 | 18ad74f5-ba91-4b23-bc78-b2b604bb1696 | 2022-09-01 17:05:44.49+00  | 2022-09-01 17:06:43.486086+00 | 0845d83977c1cdd5464c31cc1f03a649
(3 rows)
The SQL used for this sync operation and all subsequent synchronization operations is the same as the SQL that was used during the second sync operation (in this tutorial the sync that was done in the previous section after the Update). The curious reader can verify this by looking at the SQL as demonstrated in the previous section, and using the job ID (172 in this example) and attempt ID (0 in this example), which can be extracted from Airbyte’s UI as previously demonstrated. The following commands can be used as a starting point on the airbyte-server container, to view the SQL that was executed for this sync:
cat /tmp/workspace/172/0/build/run/airbyte_utils/models/generated/airbyte_incremental/public/table_two_stg.sql
cat /tmp/workspace/172/0/build/run/airbyte_utils/models/generated/airbyte_incremental/scd/public/table_two_scd.sql
cat /tmp/workspace/172/0/build/run/airbyte_utils/models/generated/airbyte_incremental/public/table_two.sql
cat /tmp/workspace/172/0/logs/dbt.log
ℹ️ Because the SQL for this sync and all subsequent syncs in this same as the previous sync, I do not discuss it in detail here.
You will now delete a record from the source table, but as previously discussed, delete operations are not propagated by incremental synchronization replication modes. This is represented by the diagram below:
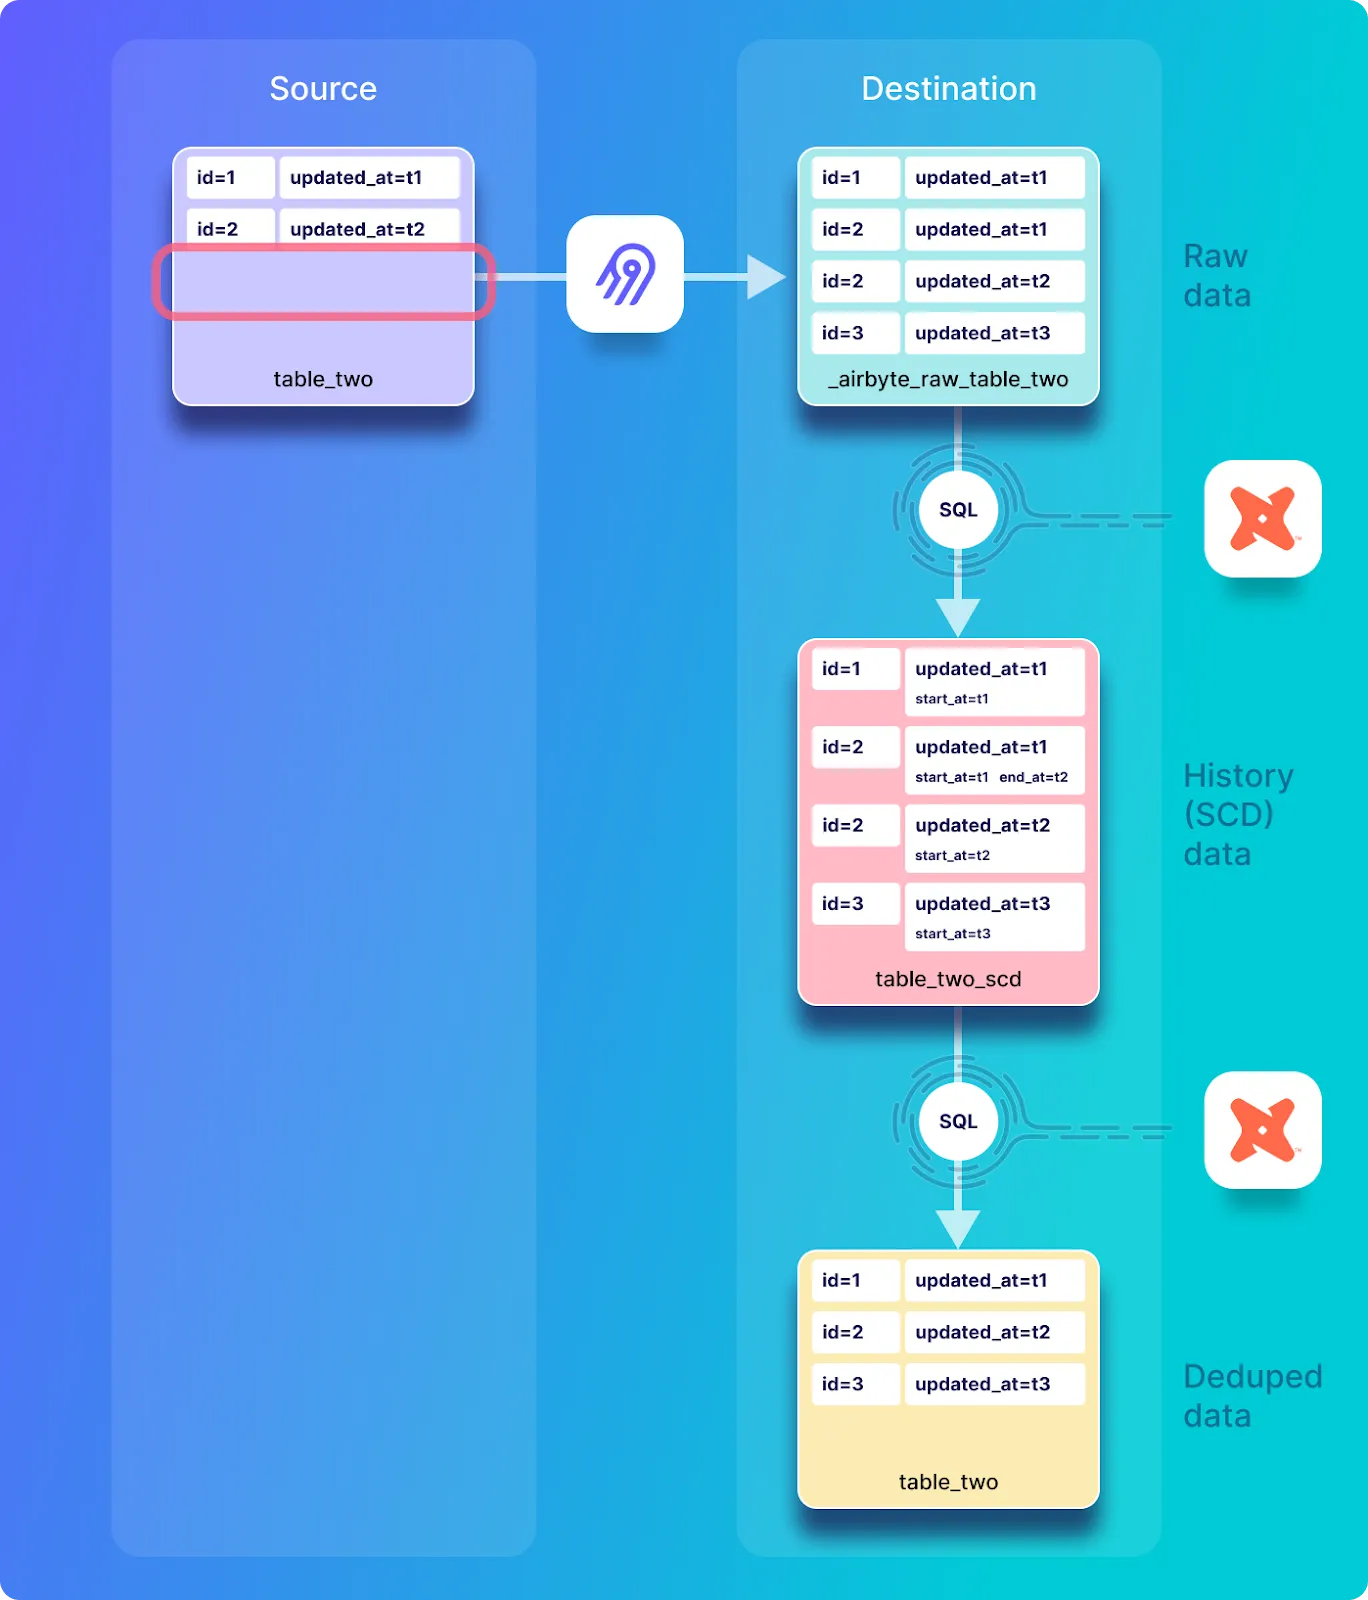
Remove a record from the source as follows:
DELETE FROM table_two where id=3;
SELECT * FROM table_two;
The source table_two table should look as follows:
 id |    name    |         updated_at
----+------------+----------------------------
  1 | Eg1 DD+Hst | 2022-09-01 16:18:07.569818
  2 | Eg2b DD+Hs | 2022-09-01 17:02:14.841419
(2 rows)
You should see that a new record with an id of 3 has been removed from the source table. Execute a new sync by clicking on Sync Now in the connections UI and wait for the sync to complete.

Look at the content of incremental dedupe history synchronization into the raw table called _airbyte_raw_table_two by executing the following:
SELECT * FROM _airbyte_raw_table_two;
Which should respond with a tables that look as follows:
            _airbyte_ab_id            |                                _airbyte_data                                |    _airbyte_emitted_at
--------------------------------------+-----------------------------------------------------------------------------+----------------------------
 3bd474b8-0329-4bce-bde7-aee7c5d30cc8 | {"id": 1, "name": "Eg1 DD+Hst", "updated_at": "2022-09-01T16:18:07.569818"} | 2022-09-01 16:52:44.103+00
 4282344a-62c3-4634-a91a-e6dafb9b253a | {"id": 2, "name": "Eg2a DD+Hs", "updated_at": "2022-09-01T16:30:13.939030"} | 2022-09-01 16:52:44.103+00
 89377204-7801-49c8-a779-91da45a86cc3 | {"id": 2, "name": "Eg2b DD+Hs", "updated_at": "2022-09-01T17:02:14.841419"} | 2022-09-01 17:02:39.894+00
 18ad74f5-ba91-4b23-bc78-b2b604bb1696 | {"id": 3, "name": "Eg3 DD+Hst", "updated_at": "2022-09-01T17:05:19.570672"} | 2022-09-01 17:05:44.49+00
(4 rows)
Note that this table is exactly the same as before the record was deleted from the source system – in other words, the record that has been deleted in the source system still exists in the destination. As previously mentioned, incremental sync modes do not propagate deletions from the source to the destination database, and so this is expected behavior.
View the history table called table_two_scd by executing the following:
SELECT * FROM table_two_scd;
Which includes the record that was just added to the source table, and looks as follows.
       _airbyte_unique_key        |     _airbyte_unique_key_scd      | id |    name    |         updated_at         |     _airbyte_start_at      |      _airbyte_end_at       | _airbyte_active_row |            _airbyte_ab_id            |    _airbyte_emitted_at     |    _airbyte_normalized_at     |    _airbyte_table_two_hashid
----------------------------------+----------------------------------+----+------------+----------------------------+----------------------------+----------------------------+---------------------+--------------------------------------+----------------------------+-------------------------------+----------------------------------
 c4ca4238a0b923820dcc509a6f75849b | 96a17eccedd409b3b3de3b411d431ab8 |  1 | Eg1 DD+Hst | 2022-09-01 16:18:07.569818 | 2022-09-01 16:18:07.569818 |                            |                   1 | 3bd474b8-0329-4bce-bde7-aee7c5d30cc8 | 2022-09-01 16:52:44.103+00 | 2022-09-01 17:03:37.521659+00 | 78812b56ae516cb4bb4278c595c3b20e
 c81e728d9d4c2f636f067f89cc14862c | 064c6bc6ac9c9956a7188495284d8c07 |  2 | Eg2a DD+Hs | 2022-09-01 16:30:13.93903  | 2022-09-01 16:30:13.93903  | 2022-09-01 17:02:14.841419 |                   0 | 4282344a-62c3-4634-a91a-e6dafb9b253a | 2022-09-01 16:52:44.103+00 | 2022-09-01 17:03:37.521659+00 | d89c24a3d20ae9663d6f9a40f023149c
 c81e728d9d4c2f636f067f89cc14862c | 8d269939a7b0ae8c321d5f25d3be8619 |  2 | Eg2b DD+Hs | 2022-09-01 17:02:14.841419 | 2022-09-01 17:02:14.841419 |                            |                   1 | 89377204-7801-49c8-a779-91da45a86cc3 | 2022-09-01 17:02:39.894+00 | 2022-09-01 17:06:41.92607+00  | 019e1ebcc8b9bb93c020422f7ba8313d
 eccbc87e4b5ce2fe28308fd9f2a7baf3 | f3dfb89e70d5712b62b4b4baf10cf04c |  3 | Eg3 DD+Hst | 2022-09-01 17:05:19.570672 | 2022-09-01 17:05:19.570672 |                            |                   1 | 18ad74f5-ba91-4b23-bc78-b2b604bb1696 | 2022-09-01 17:05:44.49+00  | 2022-09-01 17:23:28.007869+00 | 0845d83977c1cdd5464c31cc1f03a649
(4 rows)
This table is nearly identical to how it was before the most recent synchronization, with the exception of the _airbyte_normalized_at value, which indicates that even though no records were updated, the most recent record has been normalized regardless.
Have a look at the content of the deduped table by executing the following:
SELECT * FROM table_two;
The deduped table_two table looks as follows, and has one record corresponding to each record in the source table.
       _airbyte_unique_key        | id |    name    |         updated_at         |            _airbyte_ab_id            |    _airbyte_emitted_at     |    _airbyte_normalized_at     |    _airbyte_table_two_hashid
----------------------------------+----+------------+----------------------------+--------------------------------------+----------------------------+-------------------------------+----------------------------------
 c4ca4238a0b923820dcc509a6f75849b |  1 | Eg1 DD+Hst | 2022-09-01 16:18:07.569818 | 3bd474b8-0329-4bce-bde7-aee7c5d30cc8 | 2022-09-01 16:52:44.103+00 | 2022-09-01 17:03:39.029637+00 | 78812b56ae516cb4bb4278c595c3b20e
 c81e728d9d4c2f636f067f89cc14862c |  2 | Eg2b DD+Hs | 2022-09-01 17:02:14.841419 | 89377204-7801-49c8-a779-91da45a86cc3 | 2022-09-01 17:02:39.894+00 | 2022-09-01 17:06:43.486086+00 | 019e1ebcc8b9bb93c020422f7ba8313d
 eccbc87e4b5ce2fe28308fd9f2a7baf3 |  3 | Eg3 DD+Hst | 2022-09-01 17:05:19.570672 | 18ad74f5-ba91-4b23-bc78-b2b604bb1696 | 2022-09-01 17:05:44.49+00  | 2022-09-01 17:23:29.577994+00 | 0845d83977c1cdd5464c31cc1f03a649
(3 rows)
This table is also basically the same as it appeared before this sync, although the _airbyte_normalized_at value has been updated as expected. In other words, the record that has been deleted in the source has not been deleted in the destination table (as expected).
The SQL for this sync is the same as the previous sync, and so it does not need further discussion.
After doing a sync without modifying the source data, no data is transferred from the source to the destination, and the data tables will look the same as they did prior to the sync operation as shown below.
If a sync is executed without making any modifications on the source database, no records will be emitted, and no changes will be made on the destination database. You can confirm this by clicking Sync now and then verifying that no records have been emitted as shown below.

The raw data will appear exactly as it was before the sync. This can be seen by executing the command shown below:
SELECT * FROM _airbyte_raw_table_two;
Which should respond with a table that looks as follows:
            _airbyte_ab_id            |                                _airbyte_data                                |    _airbyte_emitted_at
--------------------------------------+-----------------------------------------------------------------------------+----------------------------
 3bd474b8-0329-4bce-bde7-aee7c5d30cc8 | {"id": 1, "name": "Eg1 DD+Hst", "updated_at": "2022-09-01T16:18:07.569818"} | 2022-09-01 16:52:44.103+00
 4282344a-62c3-4634-a91a-e6dafb9b253a | {"id": 2, "name": "Eg2a DD+Hs", "updated_at": "2022-09-01T16:30:13.939030"} | 2022-09-01 16:52:44.103+00
 89377204-7801-49c8-a779-91da45a86cc3 | {"id": 2, "name": "Eg2b DD+Hs", "updated_at": "2022-09-01T17:02:14.841419"} | 2022-09-01 17:02:39.894+00
 18ad74f5-ba91-4b23-bc78-b2b604bb1696 | {"id": 3, "name": "Eg3 DD+Hst", "updated_at": "2022-09-01T17:05:19.570672"} | 2022-09-01 17:05:44.49+00
View the history table called table_two_scd by executing the following:
SELECT * FROM table_two_scd;
Which looks as follows.
       _airbyte_unique_key        |     _airbyte_unique_key_scd      | id |    name    |         updated_at         |     _airbyte_start_at      |      _airbyte_end_at       | _airbyte_active_row |            _airbyte_ab_id            |    _airbyte_emitted_at     |    _airbyte_normalized_at     |    _airbyte_table_two_hashid
----------------------------------+----------------------------------+----+------------+----------------------------+----------------------------+----------------------------+---------------------+--------------------------------------+----------------------------+-------------------------------+----------------------------------
 c4ca4238a0b923820dcc509a6f75849b | 96a17eccedd409b3b3de3b411d431ab8 |  1 | Eg1 DD+Hst | 2022-09-01 16:18:07.569818 | 2022-09-01 16:18:07.569818 |                            |                   1 | 3bd474b8-0329-4bce-bde7-aee7c5d30cc8 | 2022-09-01 16:52:44.103+00 | 2022-09-01 17:03:37.521659+00 | 78812b56ae516cb4bb4278c595c3b20e
 c81e728d9d4c2f636f067f89cc14862c | 064c6bc6ac9c9956a7188495284d8c07 |  2 | Eg2a DD+Hs | 2022-09-01 16:30:13.93903  | 2022-09-01 16:30:13.93903  | 2022-09-01 17:02:14.841419 |                   0 | 4282344a-62c3-4634-a91a-e6dafb9b253a | 2022-09-01 16:52:44.103+00 | 2022-09-01 17:03:37.521659+00 | d89c24a3d20ae9663d6f9a40f023149c
 c81e728d9d4c2f636f067f89cc14862c | 8d269939a7b0ae8c321d5f25d3be8619 |  2 | Eg2b DD+Hs | 2022-09-01 17:02:14.841419 | 2022-09-01 17:02:14.841419 |                            |                   1 | 89377204-7801-49c8-a779-91da45a86cc3 | 2022-09-01 17:02:39.894+00 | 2022-09-01 17:06:41.92607+00  | 019e1ebcc8b9bb93c020422f7ba8313d
 eccbc87e4b5ce2fe28308fd9f2a7baf3 | f3dfb89e70d5712b62b4b4baf10cf04c |  3 | Eg3 DD+Hst | 2022-09-01 17:05:19.570672 | 2022-09-01 17:05:19.570672 |                            |                   1 | 18ad74f5-ba91-4b23-bc78-b2b604bb1696 | 2022-09-01 17:05:44.49+00  | 2022-09-01 17:32:20.158788+00 | 0845d83977c1cdd5464c31cc1f03a649
(4 rows)
Notice that once again the historical table is nearly identical to how it was prior to the sync, with the exception of _airbyte_normalized_at, which indicates that this record has been regenerated.
View the deduplicated table called table_two in the destination by executing the following:
SELECT * FROM table_two;
Which looks as follows:
       _airbyte_unique_key        | id |    name    |         updated_at         |            _airbyte_ab_id            |    _airbyte_emitted_at     |    _airbyte_normalized_at     |    _airbyte_table_two_hashid
----------------------------------+----+------------+----------------------------+--------------------------------------+----------------------------+-------------------------------+----------------------------------
 c4ca4238a0b923820dcc509a6f75849b |  1 | Eg1 DD+Hst | 2022-09-01 16:18:07.569818 | 3bd474b8-0329-4bce-bde7-aee7c5d30cc8 | 2022-09-01 16:52:44.103+00 | 2022-09-01 17:03:39.029637+00 | 78812b56ae516cb4bb4278c595c3b20e
 c81e728d9d4c2f636f067f89cc14862c |  2 | Eg2b DD+Hs | 2022-09-01 17:02:14.841419 | 89377204-7801-49c8-a779-91da45a86cc3 | 2022-09-01 17:02:39.894+00 | 2022-09-01 17:06:43.486086+00 | 019e1ebcc8b9bb93c020422f7ba8313d
 eccbc87e4b5ce2fe28308fd9f2a7baf3 |  3 | Eg3 DD+Hst | 2022-09-01 17:05:19.570672 | 18ad74f5-ba91-4b23-bc78-b2b604bb1696 | 2022-09-01 17:05:44.49+00  | 2022-09-01 17:32:21.63737+00  | 0845d83977c1cdd5464c31cc1f03a649
(3 rows)
Notice that once again the deduped data is nearly identical to how it was prior to the sync, with the exception of _airbyte_normalized_at, which indicates that this record has been regenerated.
In this section, you will explore incremental database replication with the Incremental Sync - Append mode and will examine the SQL that is used for normalizing the data in the destination Postgres database.
You will now create and populate a table called table_one. First open a shell on the source Postgres database with the following command:
docker exec -it airbyte-source psql --username=postgres
The Postgres terminal should respond with a prompt such as postgres=#. Create a new table called table_one in the source database as follows:
CREATE TABLE table_one(
  id integer PRIMARY KEY,
  name VARCHAR(200),
  updated_at timestamp DEFAULT NOW() NOT NULL
);
Notice that the table includes a field called updated_at, which will be used as the cursor field (discussed above). A cursor is required in order for incremental sync to keep track of records that have previously been synchronized, so that they are not re-sent to the destination.
In order for the cursor to work correctly, the updated_at field in this table must be updated each time a record is written or modified. When using Postgres, this can be automated with a Postgres trigger. Create a trigger called trigger_set_timestamp by pasting the following code into your source Postgres terminal:
CREATE OR REPLACE FUNCTION trigger_set_timestamp()
RETURNS TRIGGER AS '
 BEGIN
   NEW.updated_at = NOW();
   RETURN NEW;
 END;
'
LANGUAGE plpgsql;
The trigger should be executed on each update to the table_one table, which is accomplished by executing the following code:
CREATE TRIGGER set_timestamp_on_table_one
  BEFORE UPDATE ON table_one
  FOR EACH ROW
  EXECUTE PROCEDURE trigger_set_timestamp();
Now populate table_one with some data and view it as follows:
INSERT INTO table_one(id, name) VALUES(1, 'Eg1 IncApp');
INSERT INTO table_one(id, name) VALUES(2, 'Eg2 IncApp');
SELECT * FROM table_one;
The source table_one table should look as follows
 id |    name    |         updated_at
----+------------+----------------------------
  1 | Eg1 IncApp | 2022-09-01 11:01:41.666004
  2 | Eg2 IncApp | 2022-09-01 11:01:41.68834
(2 rows)
Verify that the trigger that sets the updated_at field is executing correctly by updating one of the rows in the table with the following command
UPDATE table_one SET name='Eg2a IncAp' WHERE id=2;
SELECT * FROM table_one;
The source table_one table should look as follows
 id |    name    |         updated_at
----+------------+----------------------------
  1 | Eg1 IncApp | 2022-09-01 11:01:41.666004
  2 | Eg2a IncAp | 2022-09-01 11:02:05.017416
(2 rows)
If the trigger has executed correctly then you should see that the updated_at field for the record with id=2 has been modified as shown above.
In this section you will create a connection that will be used for demonstrating the functionality of database replication with Incremental Sync | Append. This new connection will make use of the connectors that you have just created.
Create a new connection by clicking on Connections and then on + New connection as shown below (Note that this button may appear in the top right corner if you already have some connections instantiated):

Then select the Incremental-source source as follows:

Select the Incremental-destination as follows:

You will see a set up page as shown below. Set the name of the connection to incremental-sync-demo, and configure it as shown below:
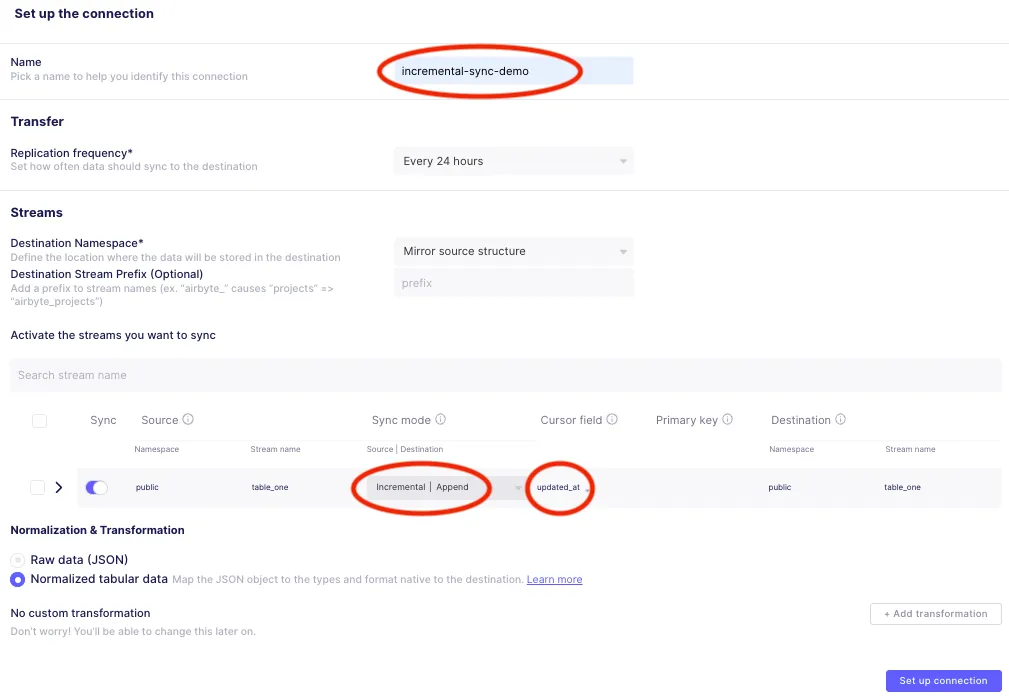
There are a few areas that are annotated in the above configuration:
After you click on Set up connection, the initial sync will start. Once it completes you should see the following status in the Sync History:

Make a note of the job ID and the attempt ID which in this case are 149 and 0 respectively, as can be seen in the path to the logs.log (/tmp/workspace/149/0/logs.log) in the screenshot above. You will need these values to find the SQL code used for the first incremental append sync.
In the first synchronization, Airbyte replicates all of the records from the source table into a raw table in the destination database. Then, dbt-generated SQL commands are executed to normalize the raw data into the final destination table as shown below:
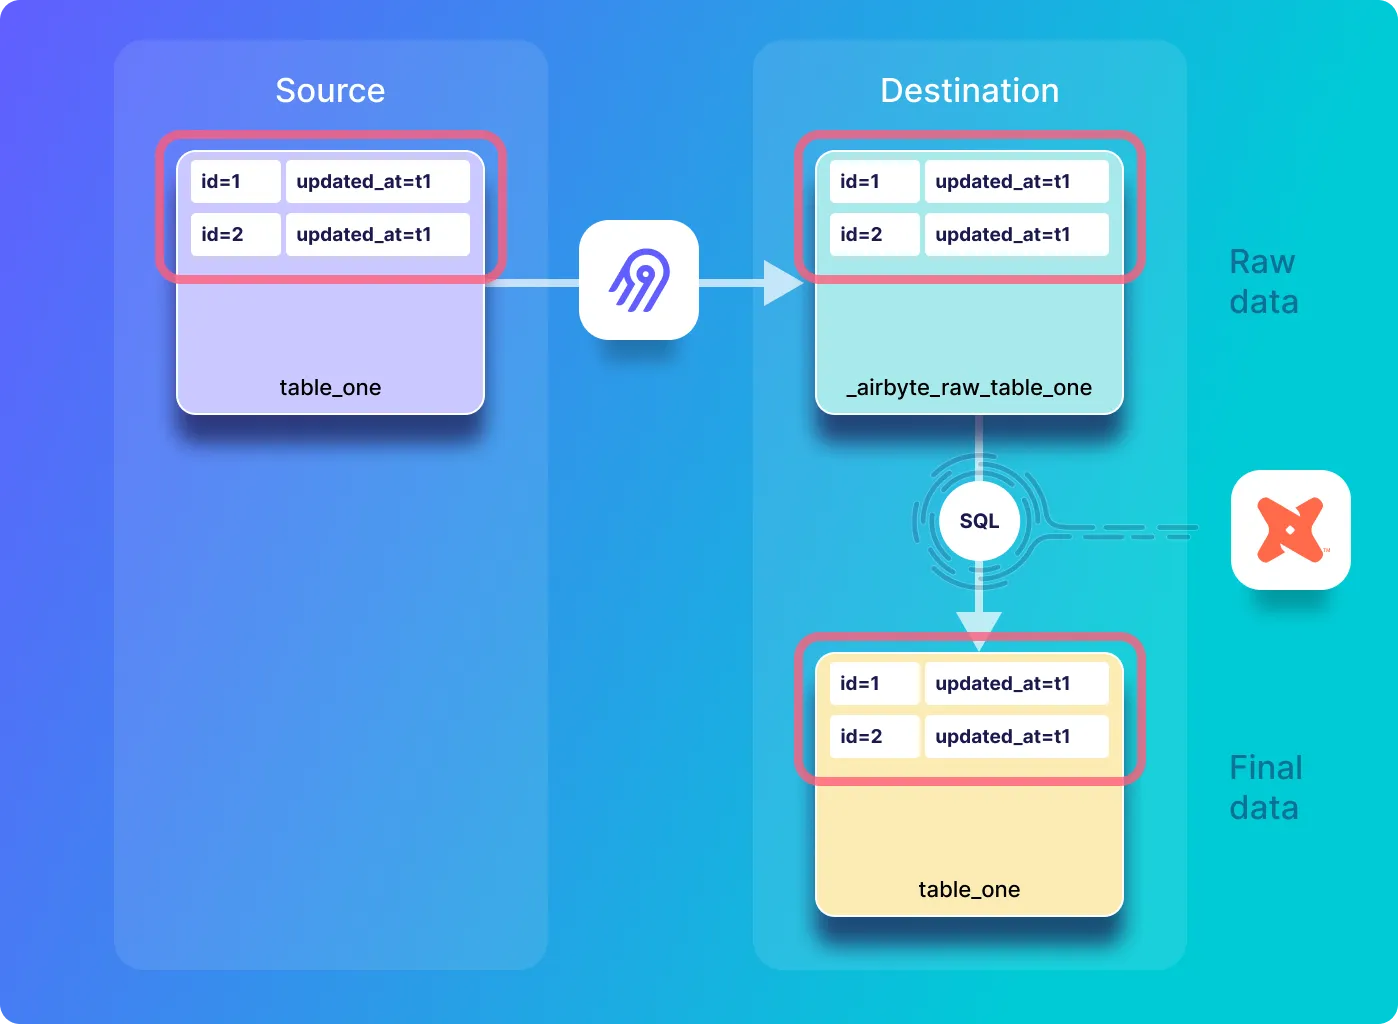
After the first sync has completed you can take a look at the Postgres destination to see how the replicated data looks. Execute the following command to open a shell to the destination Postgres database:
docker exec -it airbyte-destination psql --username=postgres
You can then view the names of the tables in the destination with the following command:
\dt;
Which should respond with the following.
                 List of relations
 Schema |          Name          | Type  |  Owner
--------+------------------------+-------+----------
 public | _airbyte_raw_table_one | table | postgres
 public | table_one              | table | postgres
(2 rows)
As a first step in each sync operation, Airbyte copies the records from table_one in the source database into a raw table in the destination database called _airbyte_raw_table_one. Look at its contents by executing the following:
SELECT * FROM _airbyte_raw_table_one;
Which should respond with a table that looks as follows:
            _airbyte_ab_id            |                                _airbyte_data                                |    _airbyte_emitted_at
--------------------------------------+-----------------------------------------------------------------------------+----------------------------
 2abc7493-bfc8-4493-ab62-de6ffe094a2d | {"id": 1, "name": "Eg1 IncApp", "updated_at": "2022-09-01T11:01:41.666004"} | 2022-09-01 11:12:03.301+00
 06e67da7-9c6a-46b6-a2e5-e1d102e16c7e | {"id": 2, "name": "Eg2a IncAp", "updated_at": "2022-09-01T11:02:05.017416"} | 2022-09-01 11:12:03.301+00
(2 rows)
In addition to the field containing the source data there are two additional fields in the raw table:
Have a look at the content of the normalized tables by executing the following:
SELECT * FROM table_one;
The normalized table_one table looks as follows
 id |    name    |         updated_at         |            _airbyte_ab_id            |    _airbyte_emitted_at     |    _airbyte_normalized_at     |    _airbyte_table_one_hashid
----+------------+----------------------------+--------------------------------------+----------------------------+-------------------------------+----------------------------------
  1 | Eg1 IncApp | 2022-09-01 11:01:41.666004 | 2abc7493-bfc8-4493-ab62-de6ffe094a2d | 2022-09-01 11:12:03.301+00 | 2022-09-01 11:12:50.300405+00 | 43ed5ad798cc8204591c1254dabc9da8
  2 | Eg2a IncAp | 2022-09-01 11:02:05.017416 | 06e67da7-9c6a-46b6-a2e5-e1d102e16c7e | 2022-09-01 11:12:03.301+00 | 2022-09-01 11:12:50.300405+00 | 2ec9ac8c405a07d980f9559637ec60df
(2 rows)
In addition to the columns extracted from the raw table, this normalized table also includes the following additional fields:
In order to understand the creation of the columns above, it is helpful to look at the SQL code that has been used for normalizing the data. For this, you will need the job ID and the attempt ID from the sync operation that you are interested in, which you extracted earlier.
Create a bash shell into the airbyte-server docker container as follows:
docker exec -it airbyte-server /bin/bash
Now you will look at the SQL that has been used for creating the table called table_one from the table called _airbyte_raw_table_one with the incremental append mode. I use the job ID of 149 and the attempt ID of 0 that were previously noted to view the SQL with the cat command as follows :
cat /tmp/workspace/149/0/build/run/airbyte_utils/models/generated/airbyte_incremental/public/table_one.sql
This returns the SQL that has been used for converting the raw data into the normalized table. The SQL for creating the incremental append table is the same as the full refresh append SQL discussed in the previous tutorial. However, as opposed to the full refresh append mode, only data that has been inserted or updated in the source has been copied into the raw destination table – this is handled by the source connector which only selects new records on the source for replication into the destination, and therefore it does not impact the SQL.
ℹ️ Because this first sync creates the destination table, the SQL used in subsequent syncs is organized differently. This will be discussed later in this tutorial.
I have broken this SQL down into four main sections for discussion below. The first section of SQL shows that the code creates the final table_one table, and extracts various fields from the raw _airbyte_raw_table_one json table.
  create  table "postgres".public."table_one"
  as (

with __dbt__cte__table_one_ab1 as (

-- SQL model to parse JSON blob stored in a single column and extract into separated field columns as described by the JSON Schema
-- depends_on: "postgres".public._airbyte_raw_table_one
select
    jsonb_extract_path_text(_airbyte_data, 'id') as "id",
    jsonb_extract_path_text(_airbyte_data, 'name') as "name",
    jsonb_extract_path_text(_airbyte_data, 'updated_at') as updated_at,
    _airbyte_ab_id,
    _airbyte_emitted_at,
    now() as _airbyte_normalized_at
from "postgres".public._airbyte_raw_table_one as table_alias
-- table_one
where 1 = 1
),
The next part of the SQL casts each field to the appropriate type as follows:
 __dbt__cte__table_one_ab2 as (

-- SQL model to cast each column to its adequate SQL type converted from the JSON schema type
-- depends_on: __dbt__cte__table_one_ab1
select
    cast("id" as
    bigint
) as "id",
    cast("name" as text) as "name",
    cast(nullif(updated_at, '') as
    timestamp
) as updated_at,
    _airbyte_ab_id,
    _airbyte_emitted_at,
    now() as _airbyte_normalized_at
from __dbt__cte__table_one_ab1
-- table_one
where 1 = 1

),
The next part of the SQL adds an md5 hash.
 __dbt__cte__table_one_ab3 as (

-- SQL model to build a hash column based on the values of this record
-- depends_on: __dbt__cte__table_one_ab2
select
    md5(cast(coalesce(cast("id" as text), '') || '-' || coalesce(cast("name" as text), '') || '-' || coalesce(cast(updated_at as text), '') as text)) as _airbyte_table_one_hashid,
    tmp.*
from __dbt__cte__table_one_ab2 tmp
-- table_one
where 1 = 1

)
And finally, the last part of the SQL selects the fields that will be written into the destination table_one table.
-- Final base SQL model
-- depends_on: __dbt__cte__table_one_ab3
select
    "id",
    "name",
    updated_at,
    _airbyte_ab_id,
    _airbyte_emitted_at,
    now() as _airbyte_normalized_at,
    _airbyte_table_one_hashid
from __dbt__cte__table_one_ab3
-- table_one from "postgres".public._airbyte_raw_table_one
where 1 = 1
  );
The diagram below shows what happens when you modify a record in the source system and then perform a sync. In this case, an updated version of the record will be copied from the source and appended to the raw table and the final table in destination.
ℹ️ Notice that even though the source only contains two records, both the raw and normalized destination tables contain three records each. This is because both the current and the previous version of the record with id of 2 (the version from the previous sync where updated_at=t1 and the new version where updated_at=t2) will be stored in each destination table.
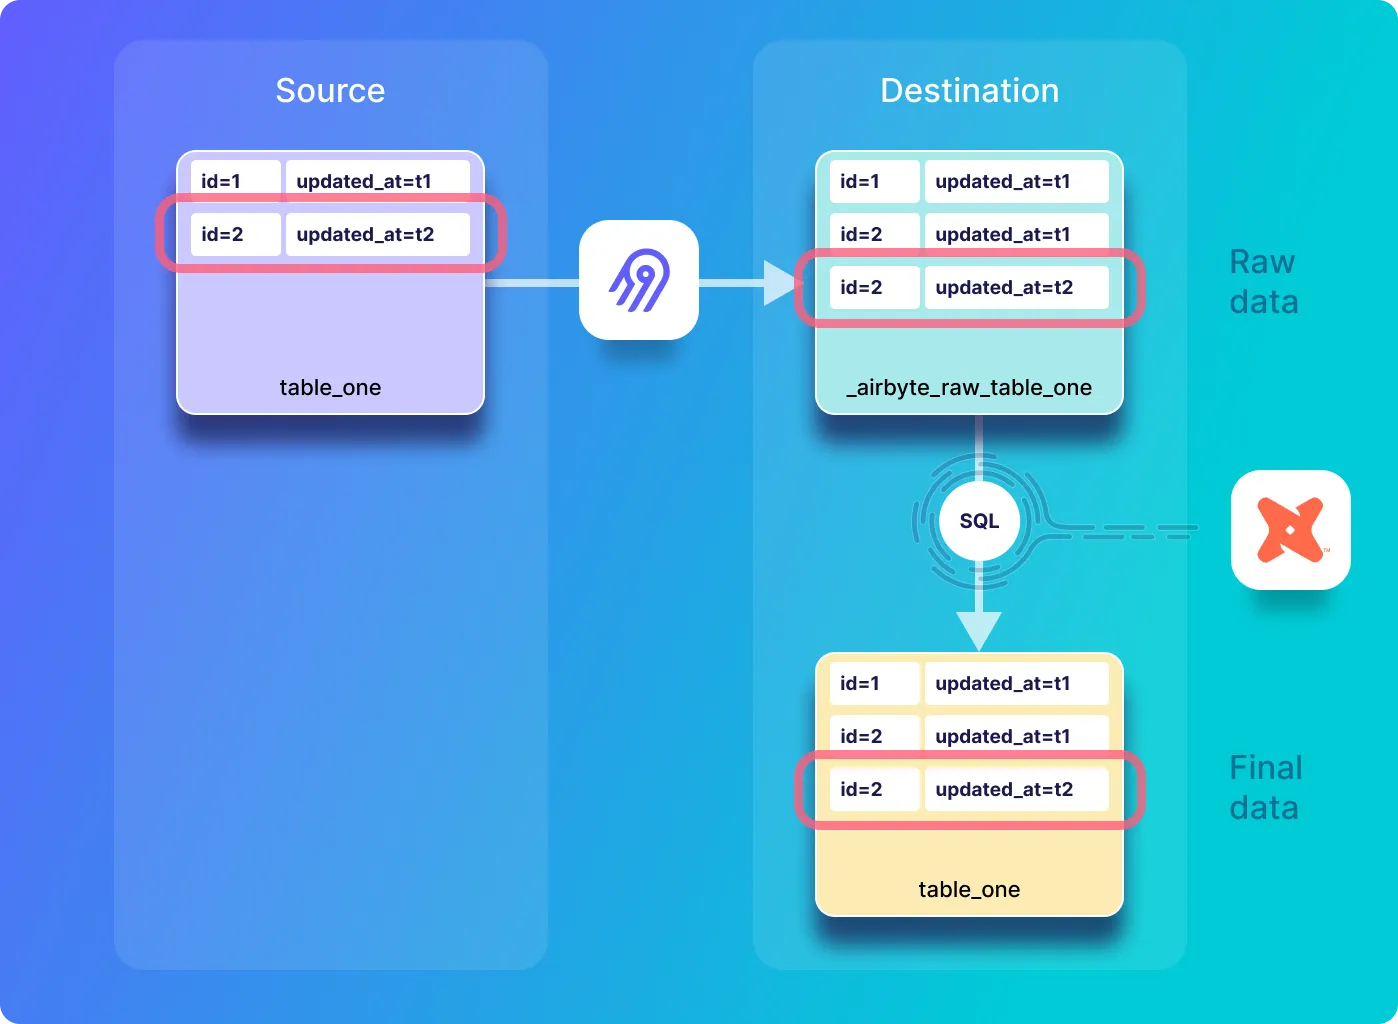
Go back to the Postgres shell in the airbyte-source container that you opened earlier in this tutorial, and update a record in table_one and view the table as follows:
UPDATE table_one SET name='Eg2b IncAp' WHERE id=2;
SELECT * FROM table_one;
And the source table_one table should now look as follows:
 id |    name    |         updated_at
----+------------+----------------------------
  1 | Eg1 IncApp | 2022-09-01 11:01:41.666004
  2 | Eg2b IncAp | 2022-09-01 11:16:38.093877
(2 rows)
The name and the updated_at values have been updated as expected. Execute a new sync by clicking on Sync Now in the connections UI and wait for the sync to complete. You should see a response indicating that one record has been emitted, as follows:

ℹ️ Note that opposed to the full sync modes discussed in the previous tutorial which would emit all of the records in the source on each sync, in the incremental sync modes only new or modified records are emitted – this is handled in the source connector logic, which only selects new documents in the source for replication to the destination.
A single record has been emitted, which corresponds to the record that was just updated. Additionally, make a note of the job ID and the attempt ID which in this case are 150 and 0. You will use these values later to view the SQL that has been used for normalization.
Look at the raw table called _airbyte_raw_table_one by executing the following command in the destination Postgres shell:
SELECT * FROM _airbyte_raw_table_one;
Which should respond with a table that looks as follows:
            _airbyte_ab_id            |                                _airbyte_data                                |    _airbyte_emitted_at
--------------------------------------+-----------------------------------------------------------------------------+----------------------------
 2abc7493-bfc8-4493-ab62-de6ffe094a2d | {"id": 1, "name": "Eg1 IncApp", "updated_at": "2022-09-01T11:01:41.666004"} | 2022-09-01 11:12:03.301+00
 06e67da7-9c6a-46b6-a2e5-e1d102e16c7e | {"id": 2, "name": "Eg2a IncAp", "updated_at": "2022-09-01T11:02:05.017416"} | 2022-09-01 11:12:03.301+00
 4559d1dd-e5a6-4c86-a8b5-afa8c7f3f833 | {"id": 2, "name": "Eg2b IncAp", "updated_at": "2022-09-01T11:16:38.093877"} | 2022-09-01 11:17:11.63+00
(3 rows)
Have a look at the content of the normalized table by executing the following:
SELECT * FROM table_one;
The normalized table_one table looks as follows:
 id |    name    |         updated_at         |            _airbyte_ab_id            |    _airbyte_emitted_at     |    _airbyte_normalized_at     |    _airbyte_table_one_hashid
----+------------+----------------------------+--------------------------------------+----------------------------+-------------------------------+----------------------------------
  1 | Eg1 IncApp | 2022-09-01 11:01:41.666004 | 2abc7493-bfc8-4493-ab62-de6ffe094a2d | 2022-09-01 11:12:03.301+00 | 2022-09-01 11:17:57.549949+00 | 43ed5ad798cc8204591c1254dabc9da8
  2 | Eg2a IncAp | 2022-09-01 11:02:05.017416 | 06e67da7-9c6a-46b6-a2e5-e1d102e16c7e | 2022-09-01 11:12:03.301+00 | 2022-09-01 11:17:57.549949+00 | 2ec9ac8c405a07d980f9559637ec60df
  2 | Eg2b IncAp | 2022-09-01 11:16:38.093877 | 4559d1dd-e5a6-4c86-a8b5-afa8c7f3f833 | 2022-09-01 11:17:11.63+00  | 2022-09-01 11:17:57.549949+00 | 40f631f32174002c94b689d73ecb2fee
(3 rows)
Notice that there are two copies of the record with id=2. This is expected when using the incremental append sync mode, as every time a record is inserted or updated a new copy of that record is inserted into the destination.
ℹ️ The astute reader may notice by looking at the value of _airbyte_normalized_at that it appears that the entire table has been re-normalized – not just the record which was updated. This is because records that were sent in the most recent sync, along with records from the previous sync will be normalized on each sync operation – an analysis of the SQL given below will explain in more detail why this happens.
In this section you will look at the SQL code which has been used for incremental append normalization of table_one after a record has been updated on the source. Go back to the terminal that you have open to the airbyte-server container, and using your job ID (in my case 150) and your attempt ID (in my case 0), have a look at the SQL with the following command:
cat /tmp/workspace/150/0/build/run/airbyte_utils/models/generated/airbyte_incremental/public/table_one.sql
Which responds with the following SQL:
    delete from "postgres".public."table_one"
    where (_airbyte_ab_id) in (
        select (_airbyte_ab_id)
        from "table_one__dbt_tmp102442422971"
    );


    insert into "postgres".public."table_one" ("id", "name", "updated_at", "_airbyte_ab_id", "_airbyte_emitted_at", "_airbyte_normalized_at", "_airbyte_table_one_hashid")
    (
        select "id", "name", "updated_at", "_airbyte_ab_id", "_airbyte_emitted_at", "_airbyte_normalized_at", "_airbyte_table_one_hashid"
        from "table_one__dbt_tmp102442422971"
    )
This SQL code for the second incremental append sync is different from the SQL that was used in the first iteration of the incremental append sync.
ℹ️ This SQL is basically the same as the SQL code that was discussed in detail in the previous tutorial in the discussion of the second sync done with the full refresh | append sync mode.
At a high level, this SQL code copies all records from a temporary table called table_one__dbt_tmp102442422971 into table_one. In the case that a record already exists in the destination table and it also appears in the temporary table, duplicates are avoided by removing it from the destination table before inserting the entire temporary table into the destination table.
In this sync and subsequent syncs, the main logic is applied during the creation of the temporary table. To see the SQL that was used to create it, look in the dbt log file which can be seen by executing the following command:
cat /tmp/workspace/150/0/logs/dbt.log
Search in the log for the creation of the temporary table, which in this case is called table_one__dbt_tmp102442422971. The SQL used to create the temporary table is pasted below:
  create temporary table "table_one__dbt_tmp102442422971"
  as (

with __dbt__cte__table_one_ab1 as (

-- SQL model to parse JSON blob stored in a single column and extract into separated field columns as described by the JSON Schema
-- depends_on: "postgres".public._airbyte_raw_table_one
select
    jsonb_extract_path_text(_airbyte_data, 'id') as "id",
    jsonb_extract_path_text(_airbyte_data, 'name') as "name",
    jsonb_extract_path_text(_airbyte_data, 'updated_at') as updated_at,
    _airbyte_ab_id,
    _airbyte_emitted_at,
    now() as _airbyte_normalized_at
from "postgres".public._airbyte_raw_table_one as table_alias
-- table_one
where 1 = 1

),  __dbt__cte__table_one_ab2 as (

-- SQL model to cast each column to its adequate SQL type converted from the JSON schema type
-- depends_on: __dbt__cte__table_one_ab1
select
    cast("id" as
    bigint
) as "id",
    cast("name" as text) as "name",
    cast(nullif(updated_at, '') as
    timestamp
) as updated_at,
    _airbyte_ab_id,
    _airbyte_emitted_at,
    now() as _airbyte_normalized_at
from __dbt__cte__table_one_ab1
-- table_one
where 1 = 1

),  __dbt__cte__table_one_ab3 as (

-- SQL model to build a hash column based on the values of this record
-- depends_on: __dbt__cte__table_one_ab2
select
    md5(cast(coalesce(cast("id" as text), '') || '-' || coalesce(cast("name" as text), '') || '-' || coalesce(cast(updated_at as text), '') as text)) as _airbyte_table_one_hashid,
    tmp.*
from __dbt__cte__table_one_ab2 tmp
-- table_one
where 1 = 1

)-- Final base SQL model
-- depends_on: __dbt__cte__table_one_ab3
select
    "id",
    "name",
    updated_at,
    _airbyte_ab_id,
    _airbyte_emitted_at,
    now() as _airbyte_normalized_at,
    _airbyte_table_one_hashid
from __dbt__cte__table_one_ab3
-- table_one from "postgres".public._airbyte_raw_table_one
where 1 = 1

and coalesce(
    cast(_airbyte_emitted_at as
    timestamp with time zone
) >= (select max(cast(_airbyte_emitted_at as
    timestamp with time zone
)) from "postgres".public."table_one"),
    true)
  );
This SQL is nearly the same as the SQL in the first iteration of incremental append sync that was in the file called table_one.sql – but in that example, the destination table called table_one was directly created without the use of a temporary table.
The previous description applies to the majority of this SQL. However, there is an additional code block at the end of this SQL, which reduces the number of records which will be processed to include only the records that were sent in the most recent sync, along with records from the previous sync (as discussed in this issue). This is achieved by extracting the largest _airbyte_emitted_at value from the destination table and only selecting records for normalization from the raw table that have an _airbyte_emitted_at value that is greater than or equal to this value. This reduces the number of records which will be selected for normalization to only the records that were sent in the most recent sync, along with records from the previous sync.
In this step you will insert a new record with an id of 3 into the source table. This new record will be appended to the raw table in the destination and will be then normalized and appended to the final data table as shown below:
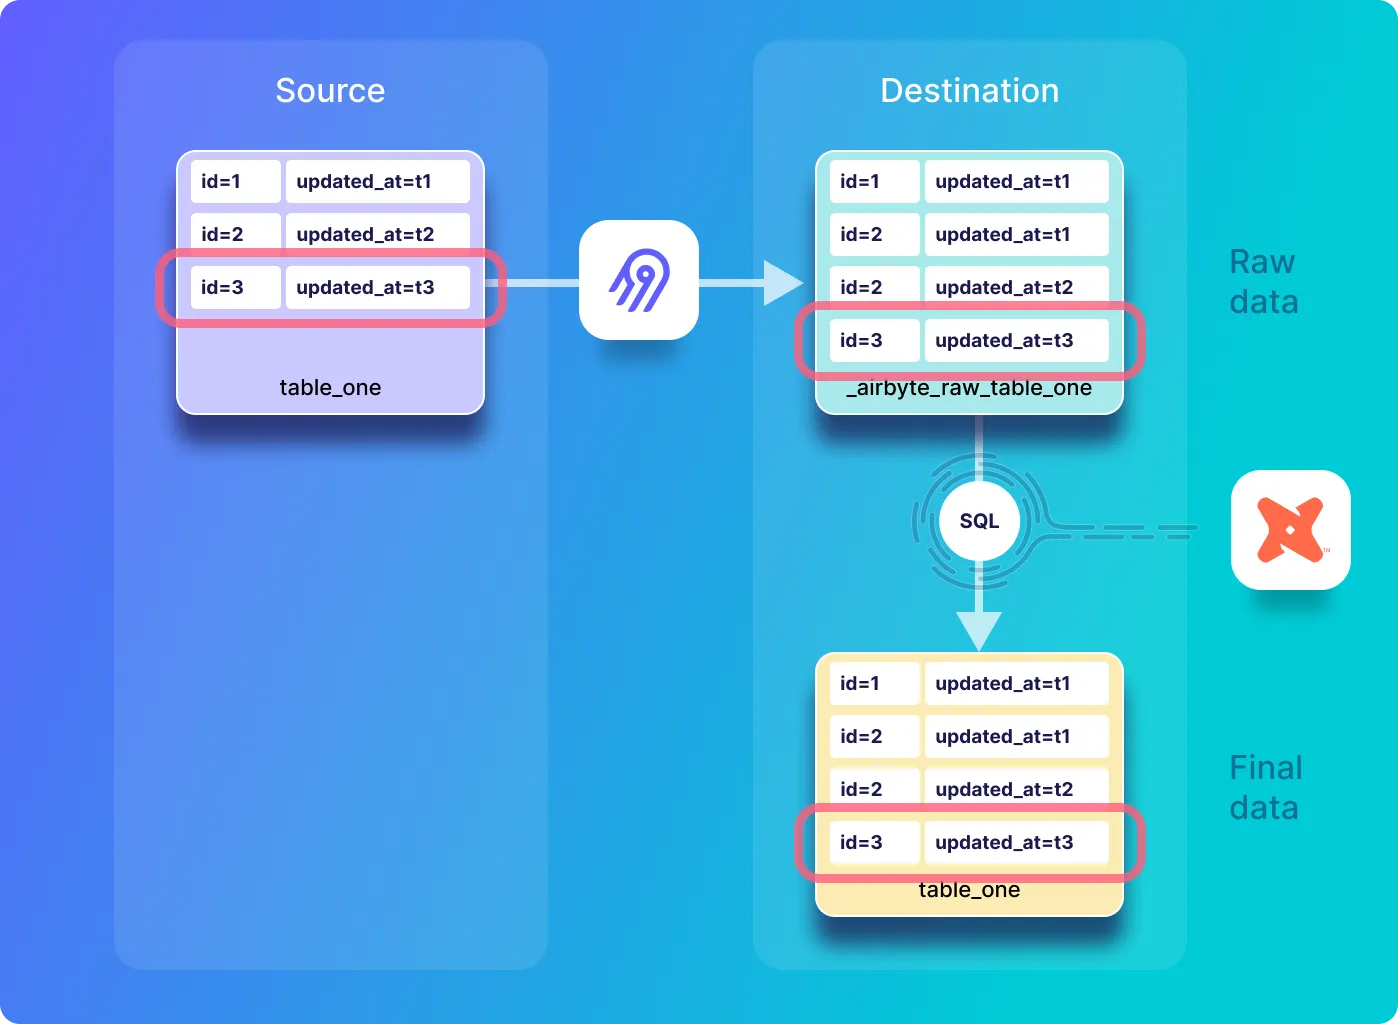
Go back to the Postgres shell in the airbyte-source container that you opened earlier in this tutorial, and insert a new record into table_one and view it as follows:
INSERT INTO table_one(id, name) VALUES(3, 'Eg3 IncApp');
SELECT * FROM table_one;;
The source table_one table should look as follows:
 id |    name    |         updated_at
----+------------+----------------------------
  1 | Eg1 IncApp | 2022-09-01 11:01:41.666004
  2 | Eg2b IncAp | 2022-09-01 11:16:38.093877
  3 | Eg3 IncApp | 2022-09-01 11:23:30.195854
(3 rows)
Execute a new sync by clicking on Sync Now in the connections UI and wait for the sync to complete.

You should see that one record has been emitted, which corresponds to the record that you have just inserted into table_one.
Look at the content of incremental append synchronization into the raw table called _airbyte_raw_table_one by executing the following:
SELECT * FROM _airbyte_raw_table_one;
Which should respond with a tables that look as follows:
            _airbyte_ab_id            |                                _airbyte_data                                |    _airbyte_emitted_at
--------------------------------------+-----------------------------------------------------------------------------+----------------------------
 2abc7493-bfc8-4493-ab62-de6ffe094a2d | {"id": 1, "name": "Eg1 IncApp", "updated_at": "2022-09-01T11:01:41.666004"} | 2022-09-01 11:12:03.301+00
 06e67da7-9c6a-46b6-a2e5-e1d102e16c7e | {"id": 2, "name": "Eg2a IncAp", "updated_at": "2022-09-01T11:02:05.017416"} | 2022-09-01 11:12:03.301+00
 4559d1dd-e5a6-4c86-a8b5-afa8c7f3f833 | {"id": 2, "name": "Eg2b IncAp", "updated_at": "2022-09-01T11:16:38.093877"} | 2022-09-01 11:17:11.63+00
 94871526-e631-49c6-a2f8-87a78755f8ae | {"id": 3, "name": "Eg3 IncApp", "updated_at": "2022-09-01T11:23:30.195854"} | 2022-09-01 11:24:19.629+00
(4 rows)
Have a look at the content of the normalized table by executing the following:
SELECT * FROM table_one;
The normalized table_one table looks as follows:
 id |    name    |         updated_at         |            _airbyte_ab_id            |    _airbyte_emitted_at     |    _airbyte_normalized_at     |    _airbyte_table_one_hashid
----+------------+----------------------------+--------------------------------------+----------------------------+-------------------------------+----------------------------------
  1 | Eg1 IncApp | 2022-09-01 11:01:41.666004 | 2abc7493-bfc8-4493-ab62-de6ffe094a2d | 2022-09-01 11:12:03.301+00 | 2022-09-01 11:17:57.549949+00 | 43ed5ad798cc8204591c1254dabc9da8
  2 | Eg2a IncAp | 2022-09-01 11:02:05.017416 | 06e67da7-9c6a-46b6-a2e5-e1d102e16c7e | 2022-09-01 11:12:03.301+00 | 2022-09-01 11:17:57.549949+00 | 2ec9ac8c405a07d980f9559637ec60df
  2 | Eg2b IncAp | 2022-09-01 11:16:38.093877 | 4559d1dd-e5a6-4c86-a8b5-afa8c7f3f833 | 2022-09-01 11:17:11.63+00  | 2022-09-01 11:25:06.485075+00 | 40f631f32174002c94b689d73ecb2fee
  3 | Eg3 IncApp | 2022-09-01 11:23:30.195854 | 94871526-e631-49c6-a2f8-87a78755f8ae | 2022-09-01 11:24:19.629+00 | 2022-09-01 11:25:06.485075+00 | e80c105c331899e3d7bcb8eb8e69bd10
(4 rows)
The record with id=3 has been inserted, and the previous records are the same as before. Additionally, as previously discussed, the record from the current sync as well as the previous sync have been normalized as can be seen by looking at the _airbyte_normalized_at column.
In this section you view the SQL code which has been used for incremental append normalization of table_one after a record has been inserted into the source. Go back to the terminal that you have open to the airbyte-server container, and using the job ID of 139 and attempt ID of 0, have a look at the SQL with the following command:
cat /tmp/workspace/151/0/build/run/airbyte_utils/models/generated/airbyte_incremental/public/table_one.sql
Which responds with the following SQL:
    delete from "postgres".public."table_one"
    where (_airbyte_ab_id) in (
        select (_airbyte_ab_id)
        from "table_one__dbt_tmp112543672970"
    );


    insert into "postgres".public."table_one" ("id", "name", "updated_at", "_airbyte_ab_id", "_airbyte_emitted_at", "_airbyte_normalized_at", "_airbyte_table_one_hashid")
    (
        select "id", "name", "updated_at", "_airbyte_ab_id", "_airbyte_emitted_at", "_airbyte_normalized_at", "_airbyte_table_one_hashid"
        from "table_one__dbt_tmp112543672970"
    )
This is the same as the SQL that was demonstrated in the previous sync. You can also find the SQL for the creation of the temporary table by looking in the dbt log as follows:
cat /tmp/workspace/151/0/logs/dbt.log
The logic of this SQL is the same as the SQL discussed in the previous section, and so requires no additional discussion.
Next you will delete a record with an id of 3 from the source table – however, as previously discussed, delete operations are not propagated by incremental synchronization replication modes. The following diagram is a representation of a deletion of the record where id=3 on the source – which has no impact on the destination:

Go back to the Postgres shell in the airbyte-source container that you opened earlier in this tutorial, and delete a record from table_one and view it as follows:
DELETE FROM table_one where id=3;
SELECT * FROM table_one;
The source table_one table should look as follows:
 id |    name    |         updated_at
----+------------+----------------------------
  1 | Eg1 IncApp | 2022-09-01 11:01:41.666004
  2 | Eg2b IncAp | 2022-09-01 11:16:38.093877
(2 rows)
You should see that a new record with an id of 3 has been removed from the source table. Execute a new sync by clicking on Sync Now in the connections UI and wait for the sync to complete.
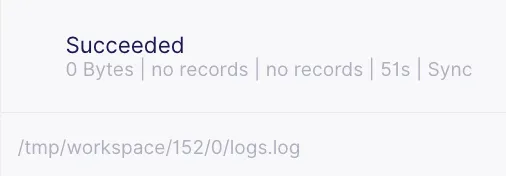
Notice that zero records have been emitted, in other words no changes have been propagated from the source to the destination. This may come as a surprise, but it is a limitation of incremental replication. As mentioned in the incremental append overview documentation, records in the warehouse destination will never be deleted or mutated. This is one reason why Change Data Capture (CDC) synchronization may be preferred in some cases. Alternatively soft deletes may be considered.
Look at the content of incremental append synchronization into the raw table called _airbyte_raw_table_one by executing the following:
SELECT * FROM _airbyte_raw_table_one;
Which should respond with a tables that look as follows:
            _airbyte_ab_id            |                                _airbyte_data                                |    _airbyte_emitted_at
--------------------------------------+-----------------------------------------------------------------------------+----------------------------
 2abc7493-bfc8-4493-ab62-de6ffe094a2d | {"id": 1, "name": "Eg1 IncApp", "updated_at": "2022-09-01T11:01:41.666004"} | 2022-09-01 11:12:03.301+00
 06e67da7-9c6a-46b6-a2e5-e1d102e16c7e | {"id": 2, "name": "Eg2a IncAp", "updated_at": "2022-09-01T11:02:05.017416"} | 2022-09-01 11:12:03.301+00
 4559d1dd-e5a6-4c86-a8b5-afa8c7f3f833 | {"id": 2, "name": "Eg2b IncAp", "updated_at": "2022-09-01T11:16:38.093877"} | 2022-09-01 11:17:11.63+00
 94871526-e631-49c6-a2f8-87a78755f8ae | {"id": 3, "name": "Eg3 IncApp", "updated_at": "2022-09-01T11:23:30.195854"} | 2022-09-01 11:24:19.629+00
(4 rows)
This table is exactly the same as it appeared before a record was deleted on the source database. In other words, as discussed above, the deletion has not been, and will not be, propagated to the destination.
ℹ️ The inability to directly propagate deleted records is one of the main disadvantages of incremental synchronization. This occurs because the records that are replicated to the destination are selected by a query on the source system for records that have been inserted or modified since the last synchronization. Any records that have been deleted are not returned by such a query, and therefore deleted records are not propagated to the destination. Two common ways to address this shortcoming are CDC replication, or by making use of soft deletes.
Have a look at the content of the normalized table by executing the following:
SELECT * FROM table_one;
The normalized table_one table looks as follows:
 id |    name    |         updated_at         |            _airbyte_ab_id            |    _airbyte_emitted_at     |    _airbyte_normalized_at     |    _airbyte_table_one_hashid
----+------------+----------------------------+--------------------------------------+----------------------------+-------------------------------+----------------------------------
  1 | Eg1 IncApp | 2022-09-01 11:01:41.666004 | 2abc7493-bfc8-4493-ab62-de6ffe094a2d | 2022-09-01 11:12:03.301+00 | 2022-09-01 11:17:57.549949+00 | 43ed5ad798cc8204591c1254dabc9da8
  2 | Eg2a IncAp | 2022-09-01 11:02:05.017416 | 06e67da7-9c6a-46b6-a2e5-e1d102e16c7e | 2022-09-01 11:12:03.301+00 | 2022-09-01 11:17:57.549949+00 | 2ec9ac8c405a07d980f9559637ec60df
  2 | Eg2b IncAp | 2022-09-01 11:16:38.093877 | 4559d1dd-e5a6-4c86-a8b5-afa8c7f3f833 | 2022-09-01 11:17:11.63+00  | 2022-09-01 11:25:06.485075+00 | 40f631f32174002c94b689d73ecb2fee
  3 | Eg3 IncApp | 2022-09-01 11:23:30.195854 | 94871526-e631-49c6-a2f8-87a78755f8ae | 2022-09-01 11:24:19.629+00 | 2022-09-01 11:29:30.12971+00  | e80c105c331899e3d7bcb8eb8e69bd10
(4 rows)
Notice that the most recent entry in the destination table_one has been re-normalized – as previously discussed, this is because the SQL that Airbyte executes will re-normalize all records in the destination table where _airbyte_emitted_at has the previous most recent value, as discussed in this issue.
The SQL used in this sync and all subsequent sync operations implements the same logic as the SQL used for all of the previous syncs after the initial synchronization. I therefore do not discuss it any further.
If a sync is executed without making any modifications on the source database, no records will be emitted, and no changes will be made on the destination data*. Therefore, after doing a sync without modifying the source data, the data tables will look the same as they did prior to the sync operation as shown below.
ℹ️ * There is a minor exception to this statement, as the normalization time of some records in the final table will be modified, which is not demonstrated in this diagram.

You can confirm this by clicking Sync now and then verifying that no records have been emitted as shown below.

Execute the following command to view the raw table.
SELECT * FROM _airbyte_raw_table_one;
Which should respond with a tables that look as follows:
            _airbyte_ab_id            |                                _airbyte_data                                |    _airbyte_emitted_at
--------------------------------------+-----------------------------------------------------------------------------+----------------------------
 2abc7493-bfc8-4493-ab62-de6ffe094a2d | {"id": 1, "name": "Eg1 IncApp", "updated_at": "2022-09-01T11:01:41.666004"} | 2022-09-01 11:12:03.301+00
 06e67da7-9c6a-46b6-a2e5-e1d102e16c7e | {"id": 2, "name": "Eg2a IncAp", "updated_at": "2022-09-01T11:02:05.017416"} | 2022-09-01 11:12:03.301+00
 4559d1dd-e5a6-4c86-a8b5-afa8c7f3f833 | {"id": 2, "name": "Eg2b IncAp", "updated_at": "2022-09-01T11:16:38.093877"} | 2022-09-01 11:17:11.63+00
 94871526-e631-49c6-a2f8-87a78755f8ae | {"id": 3, "name": "Eg3 IncApp", "updated_at": "2022-09-01T11:23:30.195854"} | 2022-09-01 11:24:19.629+00
(4 rows)
As expected, this is identical to the raw table that was in the destination before the sync.
Have a look at the content of the normalized table by executing the following:
SELECT * FROM table_one;
The normalized table_one table looks as follows:
 id |    name    |         updated_at         |            _airbyte_ab_id            |    _airbyte_emitted_at     |    _airbyte_normalized_at     |    _airbyte_table_one_hashid
----+------------+----------------------------+--------------------------------------+----------------------------+-------------------------------+----------------------------------
  1 | Eg1 IncApp | 2022-09-01 11:01:41.666004 | 2abc7493-bfc8-4493-ab62-de6ffe094a2d | 2022-09-01 11:12:03.301+00 | 2022-09-01 11:17:57.549949+00 | 43ed5ad798cc8204591c1254dabc9da8
  2 | Eg2a IncAp | 2022-09-01 11:02:05.017416 | 06e67da7-9c6a-46b6-a2e5-e1d102e16c7e | 2022-09-01 11:12:03.301+00 | 2022-09-01 11:17:57.549949+00 | 2ec9ac8c405a07d980f9559637ec60df
  2 | Eg2b IncAp | 2022-09-01 11:16:38.093877 | 4559d1dd-e5a6-4c86-a8b5-afa8c7f3f833 | 2022-09-01 11:17:11.63+00  | 2022-09-01 11:25:06.485075+00 | 40f631f32174002c94b689d73ecb2fee
  3 | Eg3 IncApp | 2022-09-01 11:23:30.195854 | 94871526-e631-49c6-a2f8-87a78755f8ae | 2022-09-01 11:24:19.629+00 | 2022-09-01 11:37:07.613905+00 | e80c105c331899e3d7bcb8eb8e69bd10
(4 rows)
Looking at the value of _airbyte_normalized_at, you can see that the last entry has been re-normalized, even though it has not been modified. As previously discussed, this is because normalization of the most recent records in the destination is performed on each sync.
In this tutorial I have guided you through a hands-on deep-dive into Airbyte’s incremental synchronization modes. The main focus of this article has been to discover how data is selected for replication, how replicated data will look, and to understand the SQL code that is executed to transform raw data into normalized data.
It is often preferable to use Airbyte’s incremental sync modes versus full refresh modes due to the (often very large) reduction in data that is copied on each sync operation, which may result in huge improvements in efficiency. However, one should be aware that when using incremental synchronization, due to the manner in which records are selected for replication, deleted records are not propagated to the destination. If incremental replication is used, it may be feasible to propagate delete operations by making use of soft deletes. Alternatively, Change Data Capture (CDC) replication may be considered as an alternative to incremental synchronization, as it ensures that deletions are propagated from the source to the destination correctly.
This tutorial has been followed-up with the final tutorial in this series called Explore Airbyte's Change Data Capture (CDC) synchronization. Additionally, you may be interested in other Airbyte tutorials, and in Airbyte’s blog. You can also join the conversation on our community Slack Channel, participate in discussions on Airbyte’s discourse, or sign up for our newsletter. Furthermore, if you are interested in Airbyte as a fully managed service, you can try Airbyte Cloud for free!
Alex is a Data Engineer and Technical writer at Airbyte, and was formerly employed as a Product Manager and as a Principal Consulting Architect at Elastic. Alex has an MBA from the IESE Business School in Barcelona, and a Masters degree in Electrical Engineering from the University of Toronto. Alex has a personal blog at https://alexmarquardt.com.
Alex is a Data Engineer and Technical writer at Airbyte, and was formerly employed as a Product Manager and as a Principal Consulting Architect at Elastic. Alex has an MBA from the IESE Business School in Barcelona, and a Masters degree in Electrical Engineering from the University of Toronto. Alex has a personal blog at https://alexmarquardt.com.
Download our free guide and discover the best approach for your needs, whether it's building your ELT solution in-house or opting for Airbyte Open Source or Airbyte Cloud.

Experience swift Postgres replication, effortlessly transferring data between databases in just 10 minutes.
Learn how to easily export Postgres data to CSV, JSON, Parquet, and Avro file formats stored in AWS S3.
Learn how to easily automate your LinkedIn Scraping with Airflow and Beautiful Soup.